

Windows 7, 8, 10 will no longer start – causes and solutions

Like any operating system, Windows is not without its faults. Fortunately, the stability of Microsoft software has increased significantly in recent years. All the more surprising then, when Windows flat out refuses to start. After you’ve gotten over the initial shock, the laborious troubleshooting begins: Is there a software error or is perhaps a hardware component broken? We’ll show you the most common methods to isolate and correct the error.
Try out your VPS for 30 days. If you're not satisfied, you get your money back.
What to do if Windows does not start?
Does Windows no longer boot properly, is it frozen on the logo screen, or does it immediately switch to the boot menu? Then it usually has something to do with the software. Fortunately, in this case there is a whole list of possible solutions that can solve the problem without you having to disassemble your entire computer:
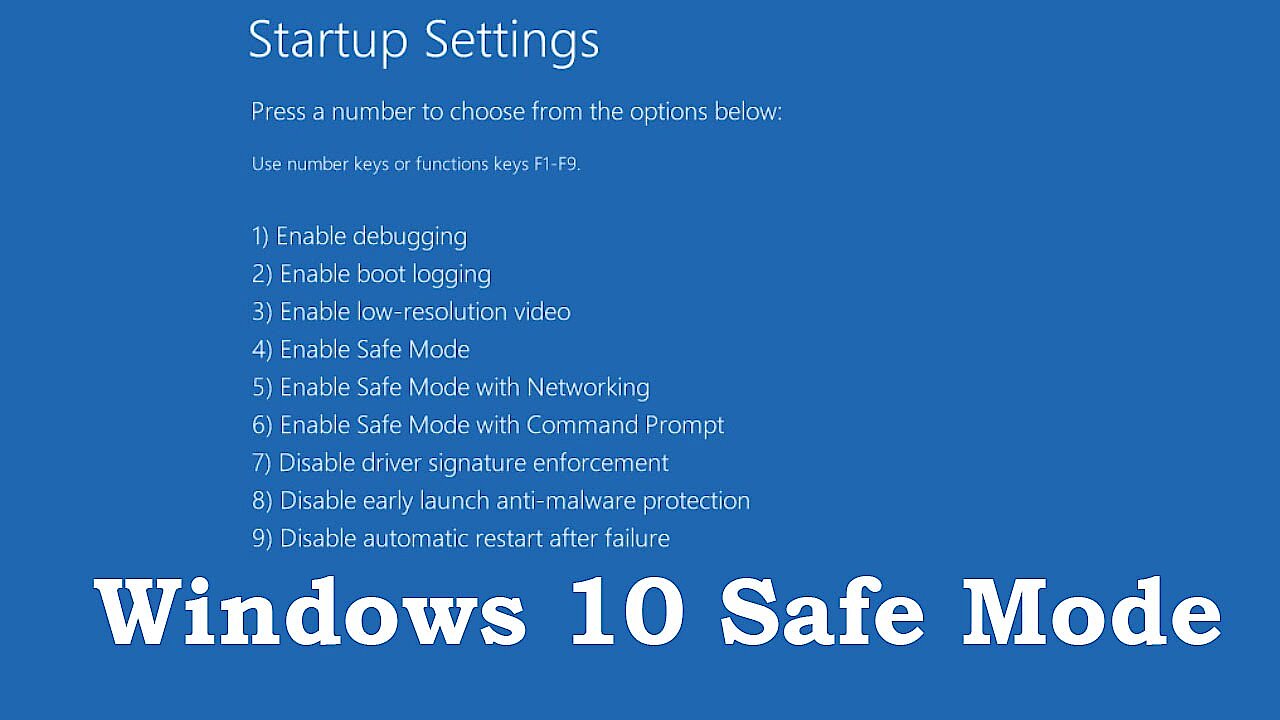
Start Windows in safe mode
The so-called “safe mode” should always be the first resort when Windows isn’t booting as usual. This is a configuration in which the operating system still starts up, but without any software autostart and with only a few absolutely necessary standard drivers. To the user, safe mode is immediately recognizable by its unusual screen resolution.
It can be accessed in all Windows versions via the BIOS menu (Basic Input/Output System) or on newer computers via the UEFI menu (Unified Extensible Firmware Interface). This opens if you press a specific key or key combination when starting your computer before the Windows logo appears. Which one this is depends on the BIOS or UEFI version that the hardware manufacturer supports. You get to where you want to be on many Windows 10 computers with the key combination [Ctrl] + [F8]. To find out which one is right for you, look at your computer's user guide; however, the required keyboard shortcut will also appear next to the Windows logo during startup.
Since modern computers boot extremely fast, you only have a small time window available to access the BIOS or UEFI menu. The solution: Press the key combination several times in quick succession so that your input is registered. If you miss the time window, just restart the computer and try again.
In the BIOS or UEFI menu, you have the choice between the following three options:
- Safe mode: Starts Windows in the usual desktop environment (Explorer), but with limited functions and reduced display.
- Safe mode with networking: Additionally starts those services that allow access to the internet, for example to download new drivers or external repair tools.
- Safe mode with command prompt: Starts command prompt cmd.exe instead of Windows Explorer, where advanced users can enter text-based commands – for example, to back up personal data or run an antivirus program.
If your computer can be started in safe mode, then it is highly unlikely that there is a problem with the system settings or the default drivers. In the secured desktop environment, you can now, for example, perform a virus scan or uninstall recently installed software (in the “Control Panel” under “Programs”) or drivers (in the “Device Manager”). Then restart your computer to check if the problem has been fixed. If not, the next step is Windows automatic repair.
 To display this video, third-party cookies are required. You can access and change your cookie settings here.
Try Windows automatic repair
If the safe mode did not work, you should try to automatically repair the system. For this, you need the installation data carrier for your Windows version. This contains a folder with the Windows Recovery Environment (short: Windows RE), the second security system, which can automatically detect and fix many errors.
Older computers often came with a DVD, which served as an installation data carrier. Today, Windows RE often resides on a separate system partition that must be activated by pressing a button. Sometimes Windows will prompt you to create a bootable disk such as a USB stick using a digital license.
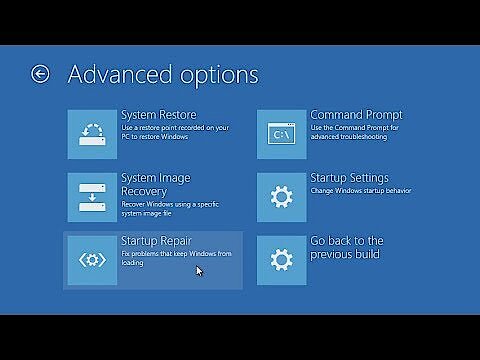
In order to be able to use the selected installation disk to repair Windows, you must ensure that your computer boots from it. To do this, go to the BIOS or UEFI menu (as explained above) and use the arrow keys on your keyboard to navigate to the “Boot” tab (this can also have a different but very similar name). Select your installation disk and press [Enter]. In the boot menu that opens, click on “Computer repair options” at the bottom left.
Depending on the Windows version, you can access the automatic system repair from here in different ways:
- Windows 10 and 8: Troubleshoot > Advanced Options > Startup Repair
- Windows 7: Advanced Startup Options > Repair Computer
 To display this video, third-party cookies are required. You can access and change your cookie settings here.
Restore previous Windows version
If the current version of Windows cannot be repaired manually or automatically, your next option is to restore your operating system to an earlier state when everything was still working. By restoring your system in this way, your personal files remain completely untouched, unlike when the system is re-installed.
The prerequisite, however, is that a corresponding system image is available. Unless you have disabled this feature on your own, Windows automatically creates these images at regular intervals, or whenever something fundamental changes the system flow – such as installing drivers, replacing a hardware component, or performing an update.
On the internet there are numerous external tools that can automate the backup of system images.
However, this automatic backup operation only includes the system disk that is usually located on the C: drive. If you also want to consider all other partitions, you must proceed manually. From Windows 7 onwards, it has been possible to create system images using self-explanatory, on-board tools.
These can be found under the following paths:
- Windows 10: Control Panel > System and Security > Backup and Restore > Create a System Image
- Windows 8: Control Panel > System and Security > File Version History > System Image Backup
- Windows 7: Control Panel > System and Security > Backup and Restore > Create a System Image > Backup Setup
You will then need to select the desired partitions and a recovery disk, such as an external hard disk. Saving your system image can take from a few minutes to hours, depending on the amount of data and performance of your computer.
If Windows doesn’t start and you want to restore an earlier version of your operating system, boot from your recovery disk (as described above) and navigate to the following item in the boot menu:
- Windows 10 and 8: Advanced Options > Restore System
- Windows 7: Advanced Startup Options > Repair Computer > Restore System
 To display this video, third-party cookies are required. You can access and change your cookie settings here.
Repair boot manager
Sometimes you get lucky and Windows will directly return an error message indicating the underlying problem: “BOOTMGR missing” or “Bootmanager missing” means that the program controlling the Windows boot process has been removed or damaged. This can happen, for example, due to a computer virus. In this case, you must reinstall or repair the boot manager. This task is also performed by the automatic system repair (see above).
If, contrary to expectations, using an installation data medium does not work, you can also proceed manually: To do this, open “Safe Mode with Command Prompt” as described above. In the command line, enter the following three cmd commands one after the other and confirm them with the [Enter] key:
bootrec /fixmbr
bootrec /fixboot
bootrec /rebuildbcd
When entering commands, pay attention to the space between the two terms. If this process is too complex for you, you can also use “System Restore” to restore Windows to a state where the boot manager was still present and working.
Reinstall the Windows operating system
If nothing else helps, the most radical method is always to completely rebuild your operating system. For this you need your installation data carrier again. However, you should have saved your personal data beforehand. This should be done at regular intervals, just like saving your system image, so that you are always prepared in case a problem arises.
Simply use the “Change schedule” option, which can be found in the following places in the Windows on-board tools:
- Windows 10: Control Panel > System & Security > Security & Maintenance > Recovery > Configure System Restore > Create
- Windows 8: Control Panel > System & Security > Backup files with the file version history
- Windows 7: Control Panel > System and Security > Backing Up and Restoring > Setting Up a Backup
A new Windows installation is also recommended if the error message “Operating System not found” is displayed when starting your computer. This is often the case if you have installed a new hard disk in your PC that does not yet have an operating system. But first check if you have not changed the boot order and the hard disk might not be recognized for this reason. Otherwise, you may be reinstalling for nothing.
What should you do if the whole computer won't start?
Now you know what you can do if your Windows operating system no longer boots. But what if, after switching on the computer, the dreaded bluescreen of death appears or the screen remains completely black? If neither Windows nor the BIOS or UEFI menu have started, there is probably no error with the software, but rather a hardware defect. The graphics card may not be properly connected, there may be dust on the memory contacts, or the newly installed processor may not be compatible with the old motherboard.
To exclude the latter, you should first try to update your BIOS or UEFI. To do this, reinstall your old processor and search for the appropriate update files on the mainboard manufacturer's website. But attention: updating the BIOS or UEFI isn’t without its risks. So be sure to make a backup first.
If the problem still isn't solved, you'll have to resort to the exclusion method: Remove all newly installed and connected hardware (including peripheral devices such as printers and headphones) and restart your computer. If your computer and Windows boot successfully again, start by reconnecting the remote hardware one by one and restarting the computer until you find the culprit. Also check that the cable connections are in perfect condition. It is also a good idea to try out the maybe-defective devices on another computer before disposing of them prematurely.
Sometimes the BIOS or UEFI tones can also help you to identify the source of the error: After switching it on, the computer clearly signals which hardware is causing problems by letting out a sequence of beeps. These tones are different for each BIOS or UEFI provider. For example, American Megatrends (AMI), the US hardware and software manufacturer, has a permanent beep for a defective power supply and a long-short sequence for a critical fault with the motherboard. A single, short tone, on the other hand, always means that the start was successful.
After you have fixed the problem with your Windows, you should definitely check your system for viruses, malware, and especially ransomware – better safe than sorry.
Click here for important legal disclaimers.
Reviewer

Christian Heldmaier
Christian Heldmaier is an experienced online marketing and SEO specialist from Karlsruhe. He has been working as an SEO Manager at IONOS since July 2020.