

How to install n8n on Kubernetes step by step

Kubernetes helps you deploy, manage and scale containerized apps like n8n as needed. In this guide, you’ll learn how to install n8n on Kubernetes and set up a stable, reliable environment for day-to-day use.
Step 1: Check requirements and choose the right server
Before you install n8n on Kubernetes, you’ll need a Linux server, ideally with a static public IP address, your own domain or subdomain, and root access. The simplest choice is a single Ubuntu server with lightweight Kubernetes through K3s. This is the setup used in this guide. K3s is good for beginners and includes several core Kubernetes components.
Opt for a server that matches what you plan to do. Kubernetes uses system resources of its own and n8n also requires memory and CPU. The examples below show some common usage scenarios and the right setup for each of them.
If you’re still getting familiar with n8n or want to compare it to other tools, it’s worth looking at n8n vs Zapier and n8n vs Make. Zapier and Make are more focused on simple cloud automations, while n8n gives you much more control and flexibility through self-hosting.
Learning and testing environments (personal use)
A modest server setup is usually enough to get started with. The main goal here is to build your first n8n workflow. It’s also a chance to get familiar with the interface and try out some simple automations. Demand on the server is usually low, as only a few workflows run at the same time and there’s no continuous background activity. A VPS with 2 vCores, 2 GB RAM, and 80 GB NVMe is generally enough. Keep in mind that Kubernetes also needs some of those resources, so there is less headroom for n8n. That makes this kind of setup less suitable for production use or workflows that need to run continuously.
Personal use (with production workloads) and small startups
If you plan to use n8n regularly, say for your own automations between tools or APIs, you’ll need a more powerful setup. Here workflows run regularly or are triggered by webhooks. This kind of setup can also work well for small teams or smaller projects. 4 vCores, 4 GB RAM, and 120 GB NVMe offers a good balance between performance and cost. It gives you enough headroom for multiple workflows running at the same time. That makes it a solid starting point for production use.
SMBs with multiple workflows and regular executions
For small and medium-sized businesses, n8n is often used to automate business processes. Typical examples include connecting CRM systems, email automations or processing orders from an online store. In setups like these, workflows run regularly and sometimes in parallel, which puts more demand on the server. 6 vCores, 8 GB RAM, and 240 GB NVMe gives you a stable base for production use. It delivers faster executions and helps avoid bottlenecks when several processes run at the same time. You also have enough room to expand the setup later.
Growing teams, agencies or heavily automated environments
When n8n is handling multiple workflows at the same time, a more powerful setup is usually needed. In agencies or larger teams, automations often run across marketing, data processing, and day-to-day internal tasks at the same time. More complex workflows with multiple API requests or longer runtimes are also common in these environments. 8 vCores, 16 GB RAM, and 480 GB NVMe will keep the system stable and responsive. This option gives you enough headroom for growth and heavier load peaks. It also gives you a solid base to move to a more advanced Kubernetes setup later.
Overview of typical uses and requirements by scenario
| Scenario | Used for | Recommended setup |
|---|---|---|
| Learning and test environments | Getting started with Kubernetes, individual n8n workflows, no continuous use under heavy load | 2 vCores CPU, 2 GB RAM, 80 GB NVMe |
| Personal use (with production workloads) and small startups | Personal automations, webhooks, smaller API integrations, small team use | 4 vCores CPU, 4 GB RAM, 120 GB NVMe |
| SMBs with multiple workflows and regular executions | Internal automations, CRM/store/email integrations, multiple users | 6 vCores CPU, 8 GB RAM, 240 GB NVMe |
| Growing teams, agencies, or heavily automated environments | Many active workflows, frequent webhooks, extra capacity for future growth | 8 vCores CPU, 16 GB RAM, 480 GB NVMe |
A more powerful setup with 12 vCores, 24 GB RAM, and 720 GB NVMe may be needed for larger environments. This is usually the case when many workflows run at the same time or when additional services are running on the same server.
- Automate manual routines for tech teams
- Automation on your own server: no task limits, full cost control
- Over 500 integrations and tools thanks to open source
Step 2: Prepare the server and install base packages
Log in to your Ubuntu server with SSH and update the package lists and installed packages first. This ensures your system is up to date and everything is in sync before you begin the Kubernetes setup.
sudo apt update && sudo apt upgrade -y
sudo apt install -y curl wget nano opensslNext, check that the server is reachable and has a public IP address:
hostname -IYour hosting provider can also confirm your public IP address. Write it down. You’ll need it in the next step when you create the DNS record for your subdomain.
Step 3: Point the subdomain to your server
Create an A record for the subdomain you want to use with your domain provider. If you’ll use n8n.your-domain.com for your n8n instance, that exact subdomain must point to your server’s public IP address. External access and HTTPS will only work reliably once the DNS record is active.
A typical DNS entry looks like this:
Type: A
Name: n8n
Value: 203.0.113.10
TTL: 3600Step 4: Install K3s
For beginners, K3s is usually the easiest way to run Kubernetes on a single server. K3s includes core components like Traefik as the ingress controller and local storage to keep data available after restarts.
Use this command to install K3s:
curl -sfL https://get.k3s.io | sh -Then check the service is running:
sudo systemctl status k3sKubernetes clusters use different ingress controllers to route external traffic to internal services. K3s uses Traefik by default. Other options include NGINX or HAProxy, but each uses different setup steps, routing behavior and configuration options.
If everything starts as it should, check the cluster status:
sudo k3s kubectl get nodes

To make kubectl easier to use, create an alias:
echo 'alias kubectl="sudo k3s kubectl"' >> ~/.bashrc
source ~/.bashrc
kubectl get nodesIf your server shows “Ready” as its status, Kubernetes is up and running.
Step 5: Install Helm
Helm is a package manager for Kubernetes, like apt on Ubuntu. Instead of creating and managing configuration files manually, you install complete applications known as “charts.” This makes setup simpler, easier to follow and less error-prone. The official n8n chart requires Helm 3.12 or later.
If you’re new to Kubernetes, Helm makes things much easier. You don’t need to write or fully understand every YAML file. Instead, you only need to adjust a few key settings, and Helm handles the rest. It also keeps track of your installation state, which makes installing updates and adjusting the configuration at a later point much easier.
Start by installing Helm directly on your server. While Helm is often installed using precompiled binaries, many Ubuntu setups use the official installer script because it’s much simpler:
curl -fsSL -o get_helm.sh https://raw.githubusercontent.com/helm/helm/main/scripts/get-helm-3
chmod 700 get_helm.sh
./get_helm.shThe first command downloads the installer script. The next two make it executable and run it. The script then installs the correct version of Helm automatically.
Then check that the installation worked by displaying the installed version:
helm version

If a version number appears, Helm is installed and ready to use with the n8n chart.
Many users move to n8n when they outgrow simpler automation tools. This often means switching from tools like Zapier to n8n to gain more control over data, workflows and hosting.
Step 6: Create a namespace for n8n
Now create a dedicated namespace for n8n to keep its resources separate from other Kubernetes objects. This is standard practice in Kubernetes.
kubectl create namespace n8nThen check the namespace was created:
kubectl get namespaces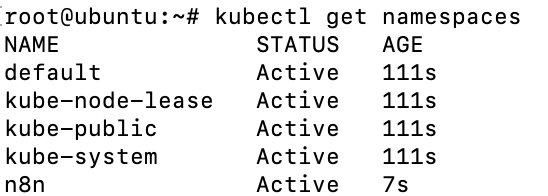
Step 7: Install cert-manager for TLS certificates
For a publicly accessible n8n instance, use HTTPS. n8n recommends handling TLS through a reverse proxy or another HTTP/HTTPS layer in front of the application. In this guide, Traefik handles incoming traffic, while cert-manager automates certificate issuance and renewal. cert-manager can also be installed with a Helm chart. Use the following command to do so:
helm install cert-manager oci://quay.io/jetstack/charts/cert-manager \
--namespace cert-manager \
--create-namespace \
--set crds.enabled=trueThen check the pods. Pods are the smallest deployable unit in Kubernetes. They run one or more containers together on the same node and share resources like network and storage.
kubectl get pods -n cert-manager

Wait until all pods show “Running” or “Completed” as their status.
Step 8: Create a Let’s Encrypt ClusterIssuer
For cert-manager to issue certificates automatically, you need to create a ClusterIssuer for Let’s Encrypt. A ClusterIssuer defines which certificate provider to use and how your domain is validated. In this case, that’s Let’s Encrypt, a free provider of SSL certificates.
For most setups, HTTP-01 validation is the easiest way. It doesn’t require access to a DNS API. Instead, Let’s Encrypt verifies your domain by requesting a specific file over HTTP. If the request succeeds, the domain is considered verified and the certificate is issued.
Start by creating a file named clusterissuer.yaml:
nano clusterissuer.yamlIn the file, add the following configuration:
apiVersion: cert-manager.io/v1
kind: ClusterIssuer
metadata:
    name: letsencrypt-prod
spec:
    acme:
        email: your-email@example.com
        server: https://acme-v02.api.letsencrypt.org/directory
        privateKeySecretRef:
            name: letsencrypt-prod
        solvers:
            - http01:
                    ingress:
ingressClassName: traefikReplace the email address with your own. Let’s Encrypt will use it to send important notices, such as certificate expiry reminders.
Then apply the file to your cluster:
kubectl apply -f clusterissuer.yamlThis creates the ClusterIssuer and makes it available across the cluster. Then check it was successful:
kubectl get clusterissuer

If ClusterIssuer appears, the setup was successful. The certificate itself will be issued automatically later, once n8n is reachable under your domain and an ingress is in place.
Step 9: Create the n8n secret
The official Helm chart requires several variables, including N8N_ENCRYPTION_KEY, N8N_HOST, N8N_PORT, and N8N_PROTOCOL. Replace n8n.your-domain.com with your subdomain and then run this command:
kubectl create secret generic n8n-secrets -n n8n \
--from-literal=N8N_ENCRYPTION_KEY=$(openssl rand -hex 32) \
--from-literal=N8N_HOST=n8n.your-domain.com \
--from-literal=N8N_PORT=5678 \
--from-literal=N8N_PROTOCOL=https \
--from-literal=WEBHOOK_URL=https://n8n.your-domain.com / \
--from-literal=N8N_PROXY_HOPS=1Step 10: Create the values file for n8n
This guide uses standalone mode. This means n8n runs in a single pod and does not require additional services like an external database or Redis. Instead, it uses a built-in SQLite database. This setup is ideal for getting to grips with n8n, smaller projects and simple deployments.
Create a configuration file called n8n-values.yaml:
nano n8n-values.yamlThis file defines how n8n is set up, including variables, storage, and the domain.
queueMode:
  enabled: false

database:
  type: sqlite
  useExternal: false

redis:
  enabled: false

persistence:
  enabled: true
  size: 10Gi

secretRefs:
  existingSecret: n8n-secrets

main:
  extraEnv:
    - name: TZ
      value: America/New_York

ingress:
  enabled: true
  className: traefik
  annotations:
    cert-manager.io/cluster-issuer: letsencrypt-prod
  hosts:
    - host: n8n.your-domain.com
      paths:
        - path: /
          pathType: Prefix
  tls:
    - secretName: n8n-tls
      hosts:
- n8n.your-domain.comBe sure to replace n8n.your-domain.com with your domain. Update the TZ value if needed to match your time zone. This file controls your setup and can be adjusted if you need to change or expand it.
The chart includes more advanced options like queue mode, workers, HPA, and dedicated webhook processors. For now, this simpler setup is a good place to start. According to n8n, standalone mode works well for smaller setups, while queue mode is better suited for larger, scalable environments with PostgreSQL and Redis.
Step 11: Install n8n with the official Helm chart
Now install n8n using the official Helm chart:
helm install n8n oci://ghcr.io/n8n-io/n8n-helm-chart/n8n \
--version 1.0.0 \
-n n8n \
-f n8n-values.yamlThen check the resources were created:
kubectl get all -n n8nNext, check the pods as they start up and look for errors:
kubectl get pods -n n8n -wOnce the main pod is ready, the installation is complete.
Other Helm charts are also available for installing n8n on Kubernetes. These include a community-maintained chart from the GitHub Community Charts project and the widely used 8gears chart, both of which are regularly updated.
Step 12: Check the ingress and certificate
Because you already configured ingress for external access and TLS in the values file, cert-manager will now request a certificate for your subdomain. Start by checking the ingress:
kubectl get ingress -n n8nThen check the certificate:
kubectl get certificate -n n8n
kubectl describe certificate n8n-tls -n n8nStep 13: Open n8n in your browser and complete setup
Once the ingress is active and the certificate is ready, open your n8n instance in a browser:
`https://n8n.your-domain.com``
The first time you open it, n8n will guide you through the setup. You’ll create your first user account in this step.




Step 14: Check n8n is working
Once everything is set up, quickly check that n8n is working. Open the n8n editor, create a simple test workflow, and save it. Then check the main pod logs.
kubectl logs -n n8n -l app.kubernetes.io/component=main --tail=100If the editor opens, login works, and no errors appear in the logs, the installation is complete.
Step 15: What to know before going live
Standalone mode works well for basic setups. The official Helm chart and n8n both clearly separate standalone and queue mode. Once you have multiple users, more concurrent executions, or high webhook traffic, queue mode is the better choice. It adds PostgreSQL and Redis and allows workers, which handle workflow execution, to scale independently.
Reviewer

Christian Heldmaier
Christian Heldmaier is an experienced online marketing and SEO specialist from Karlsruhe. He has been working as an SEO Manager at IONOS since July 2020.