How to create an n8n Discord bot with AI step by step

A Discord bot built with n8n and AI can respond to messages automatically, process content, and handle tasks in the background. Discord, n8n, and an AI model work together to analyze incoming messages and trigger suitable responses or actions. These bots are useful for automated communication, moderation, and connecting external services to a Discord server.
- Automate manual routines for tech teams
- Automation on your own server: no task limits, full cost control
- Over 500 integrations and tools thanks to open source
What are the benefits of a n8n Discord bot?
A Discord bot built with n8n lets you automate many processes without traditional software development. Instead of coding a complete bot from scratch in Python or JavaScript, you create a visual workflow in n8n using individual building blocks. This makes it especially useful if you’re just getting started with automation.
Further advantages at a glance:
- Changes can be implemented more easily later on, because you can adjust individual steps directly in the interface.
- At the same time, you can extend your n8n Discord bot with AI features, for example for automatic replies, summaries, or moderation assistance.
- n8n can also be connected to numerous other services, so your bot can not only respond to Discord messages but also process data from other tools. Possible options include links to Google Sheets, databases, CRMs or helpdesk systems. You can also integrate tools like Jira into n8n, for example to create tickets automatically or post status updates in Discord.
- Good traceability: You can see exactly what happens in the workflow and when. This makes troubleshooting and later improvements easier.
- Standardized recurring tasks: Teams and companies can use n8n to standardize recurring processes.
In addition to Discord, you can integrate other communication platforms with n8n. With n8n and Telegram or an n8n Telegram bot, you can create similar automations for Telegram or combine workflows across platforms.
What are the requirements for creating an n8n Discord bot?
Before you start creating a Discord bot based on n8n and AI, you should meet a few basic requirements. Proper preparation makes it much easier to get started and ensures that the individual components work together smoothly later on. Many of the required accounts can be set up in just a few minutes, but it’s still worth having everything fully ready in advance. To implement this, you’ll need:
- A publicly accessible, running n8n instance (with HTTPS)
- A Discord account
- A Discord server on which you have administrative rights
- Access to the Discord Developer Portal
- A bot token for your Discord bot
- A webhook and a bot connected to Discord
- An API access to an AI service, for example OpenAI
- Some time for the initial testing and adjustments
If you haven’t installed n8n yet, you can use an n8n Docker installation. This option is particularly suitable for beginners, since it allows you to start n8n quickly and in an isolated environment. For production environments or larger applications, an n8n Kubernetes installation is a good alternative, enabling you to run workflows in a scalable and fail-safe way.
For beginners, it’s best to first create your own Discord server for testing. This lets you try out your n8n workflow at your own pace and fix errors without affecting an existing or live server.
How to create an n8n Discord bot with AI step by step
Step 1: Prepare a Discord server for testing
If you don’t have your own test server yet, create one first. Open Discord, click the plus icon in the left sidebar, and create a new server. Give it a name. This server will later be used to safely test your n8n Discord Bot.
A dedicated test server is useful because it lets you test messages, permissions, and responses in a controlled environment. Small mistakes can happen quickly, especially when you’re new to automations. In a test environment, they are much easier to fix. Make sure you have administrator rights on the server.
Step 2: Create an application in the Discord Developer Portal
Open the Discord Developer Portal and log in with your Discord account. Click “New Application” and give your application a name. This application will form the basis of your n8n Discord bot.
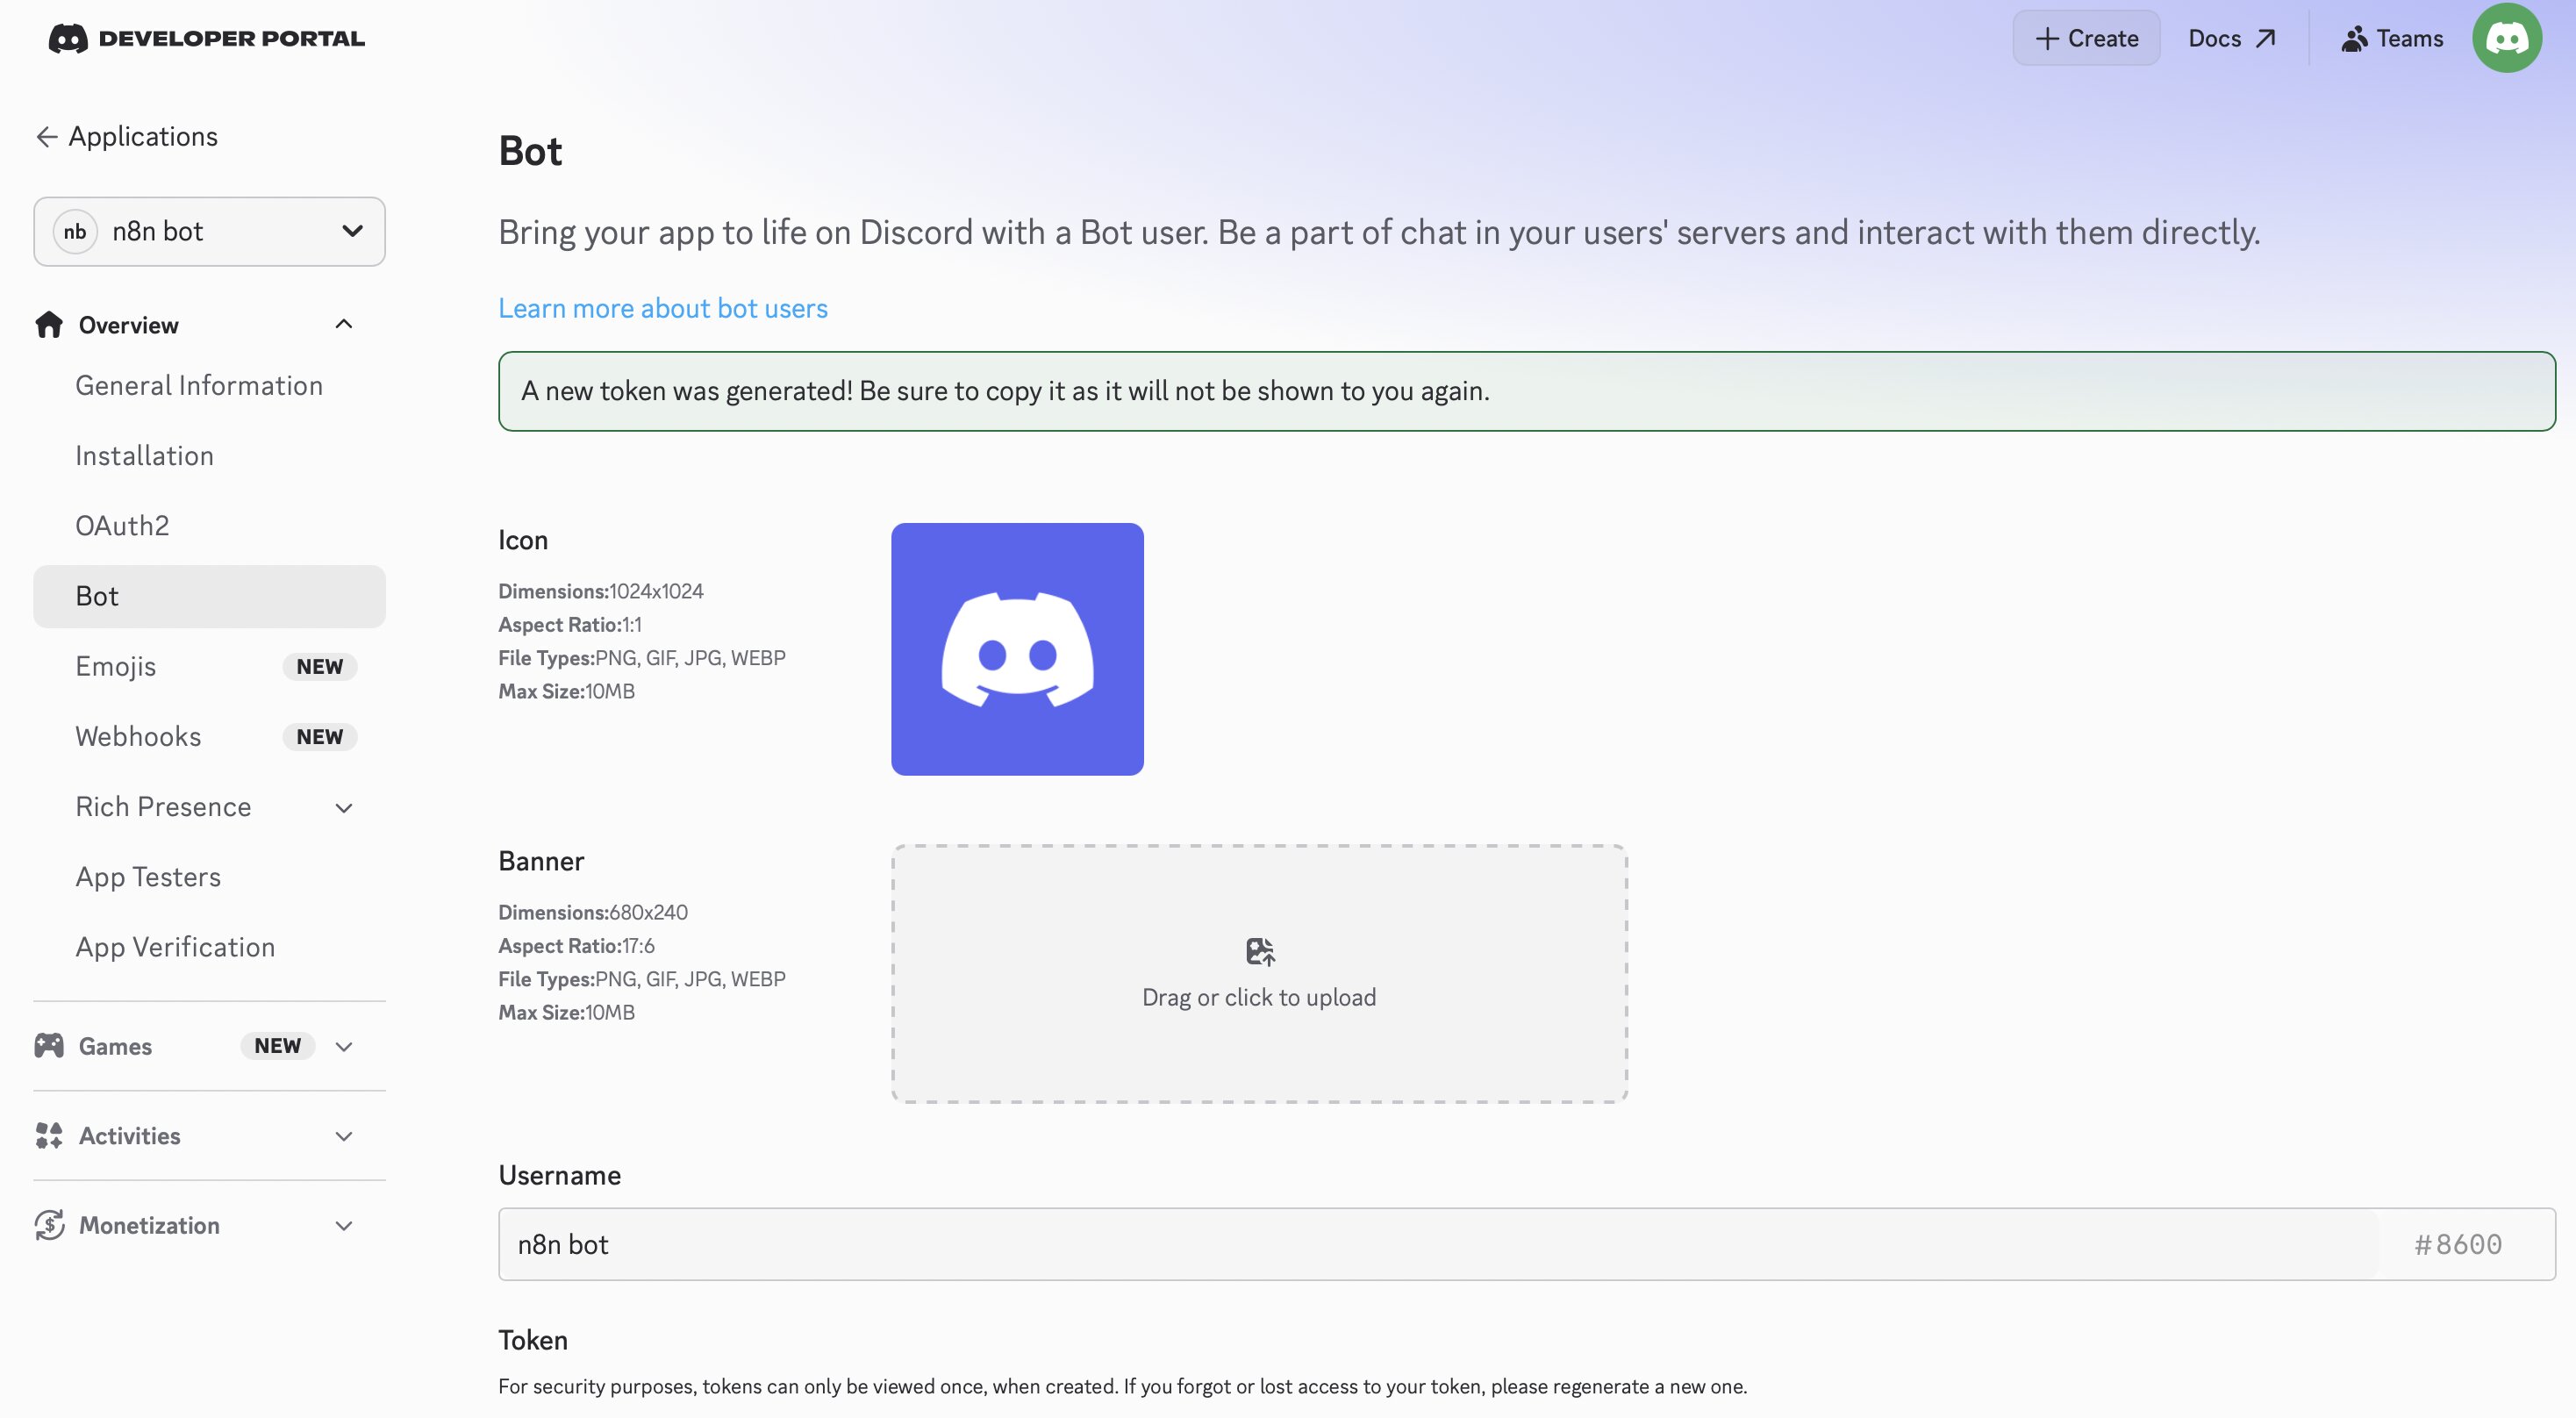
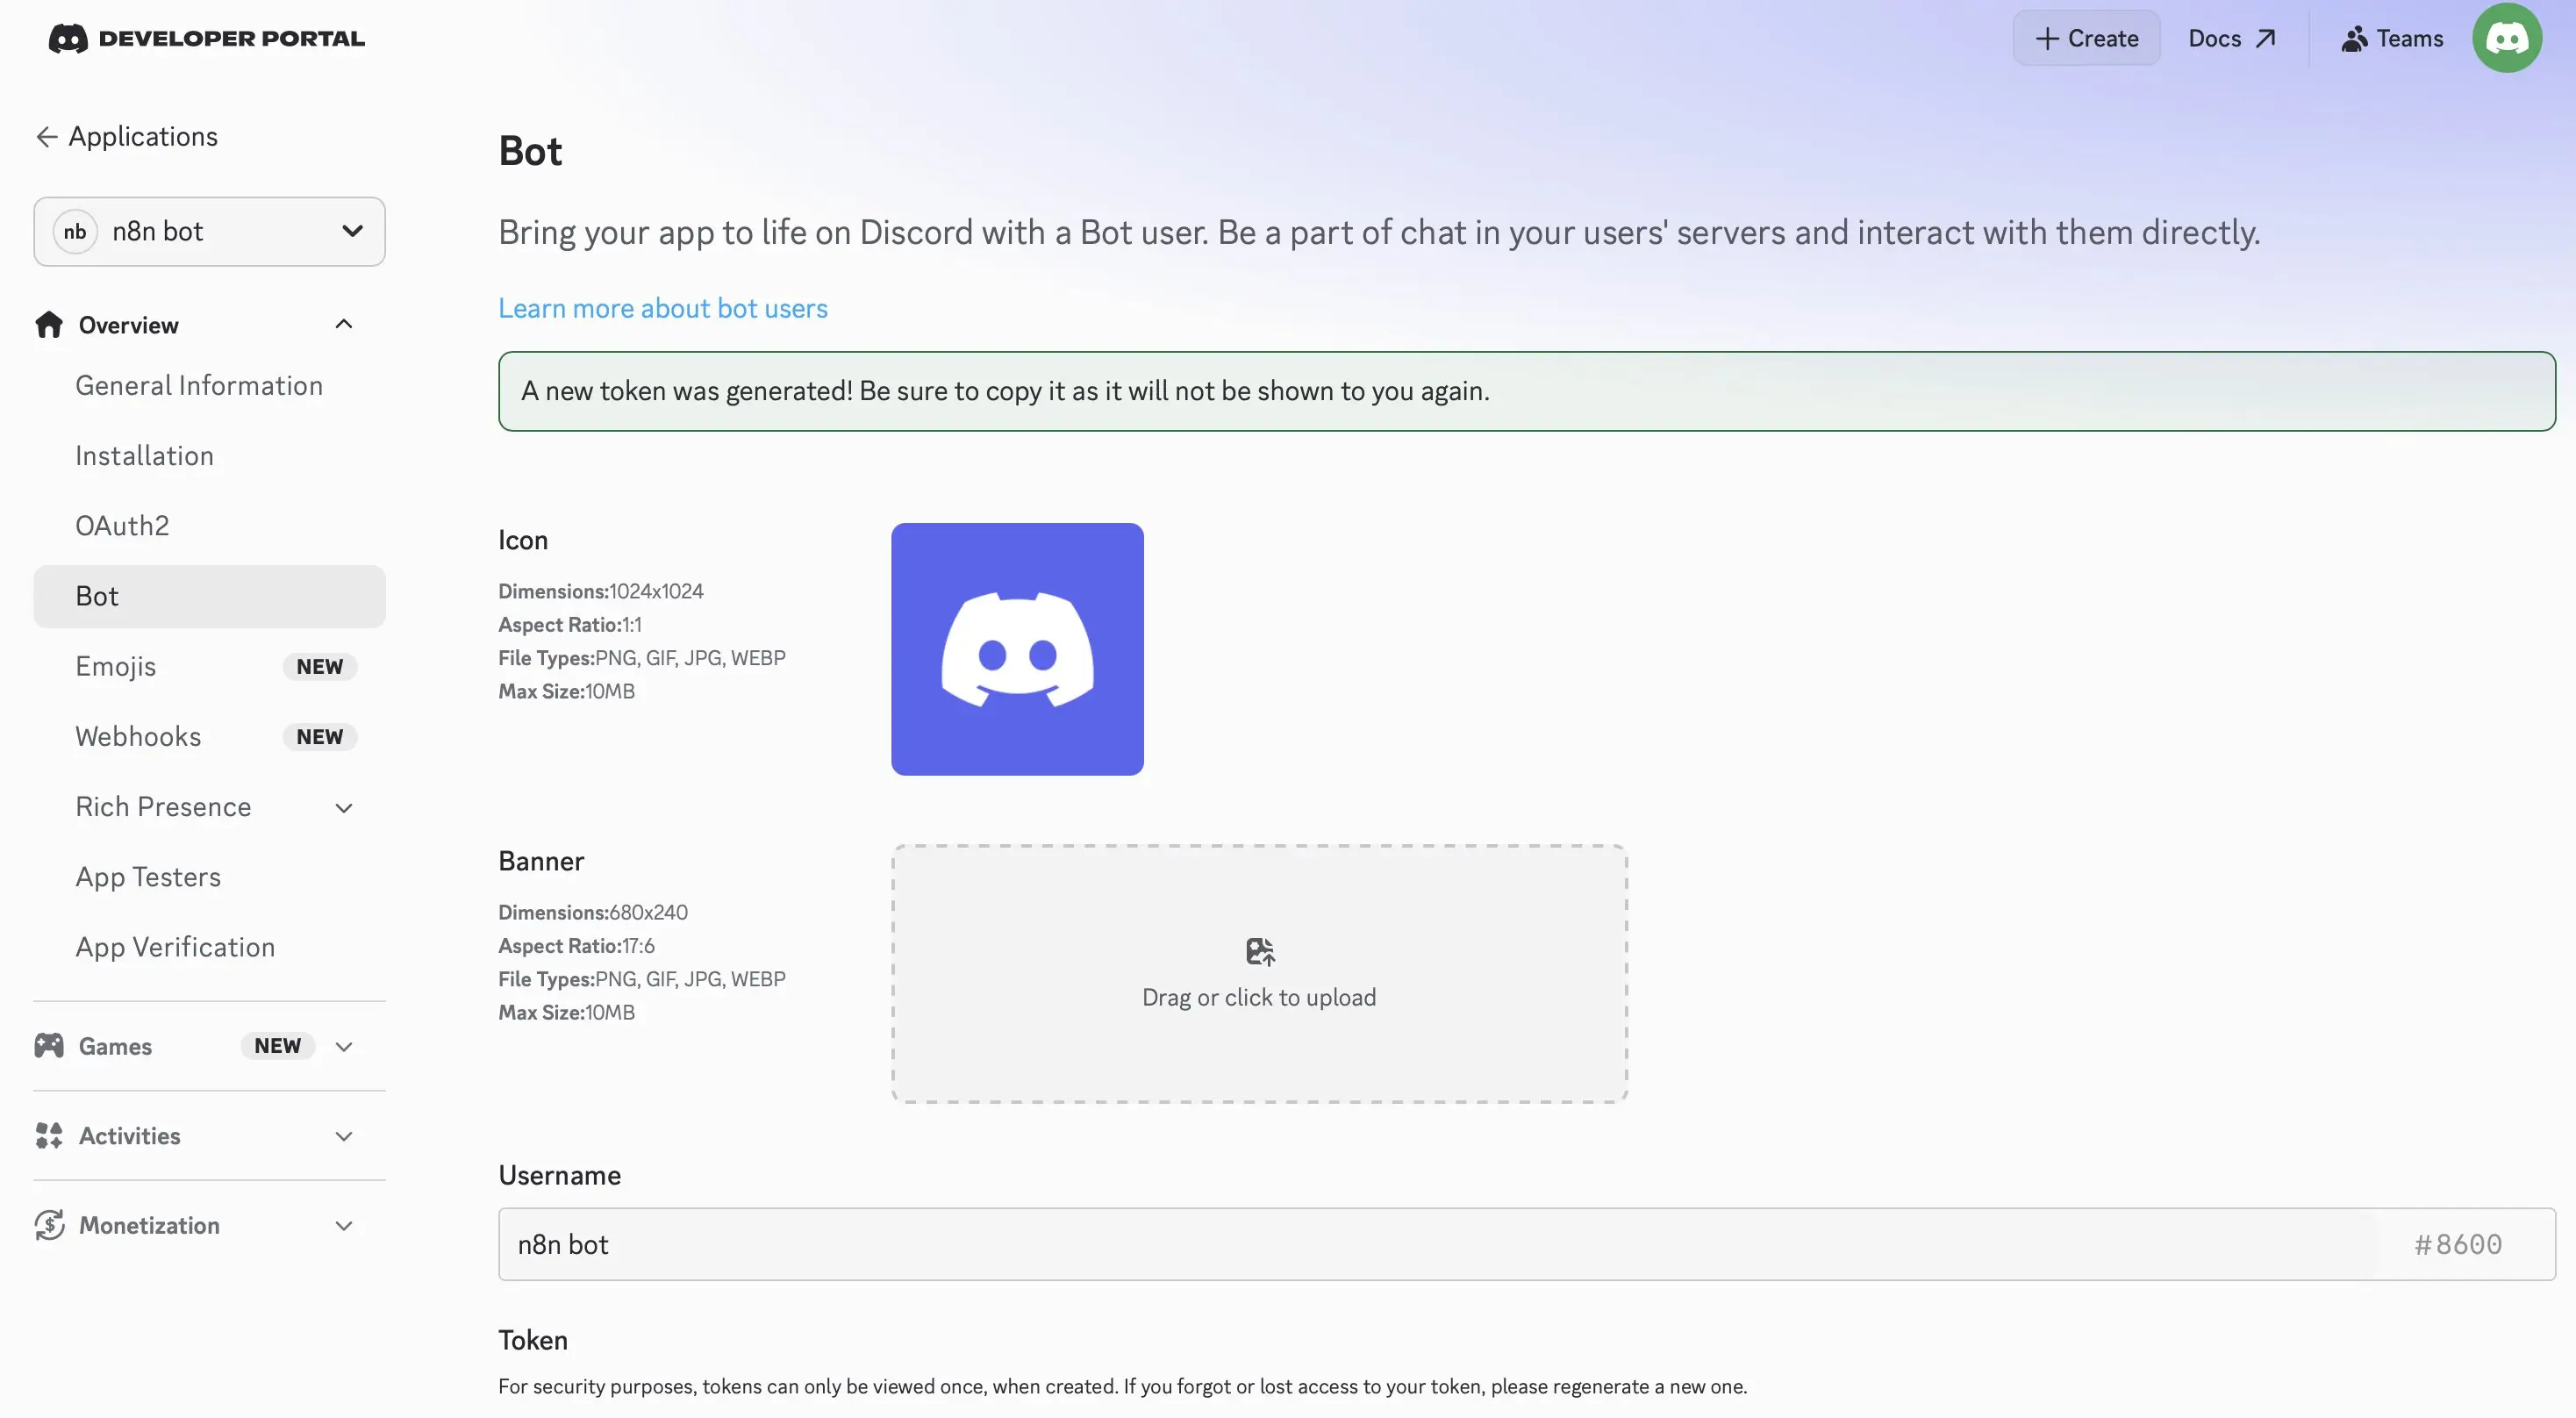
Then switch to the “Bot” section and create the actual Discord bot there. Discord will now generate a bot profile that can later communicate with your workflow. The so-called bot token is especially important. This token works like a password for your n8n Discord Bot and will later be stored in n8n. Keep the token confidential. Anyone with access to it can misuse your bot or perform actions in its name.
Step 3: Define the necessary permissions for the bot
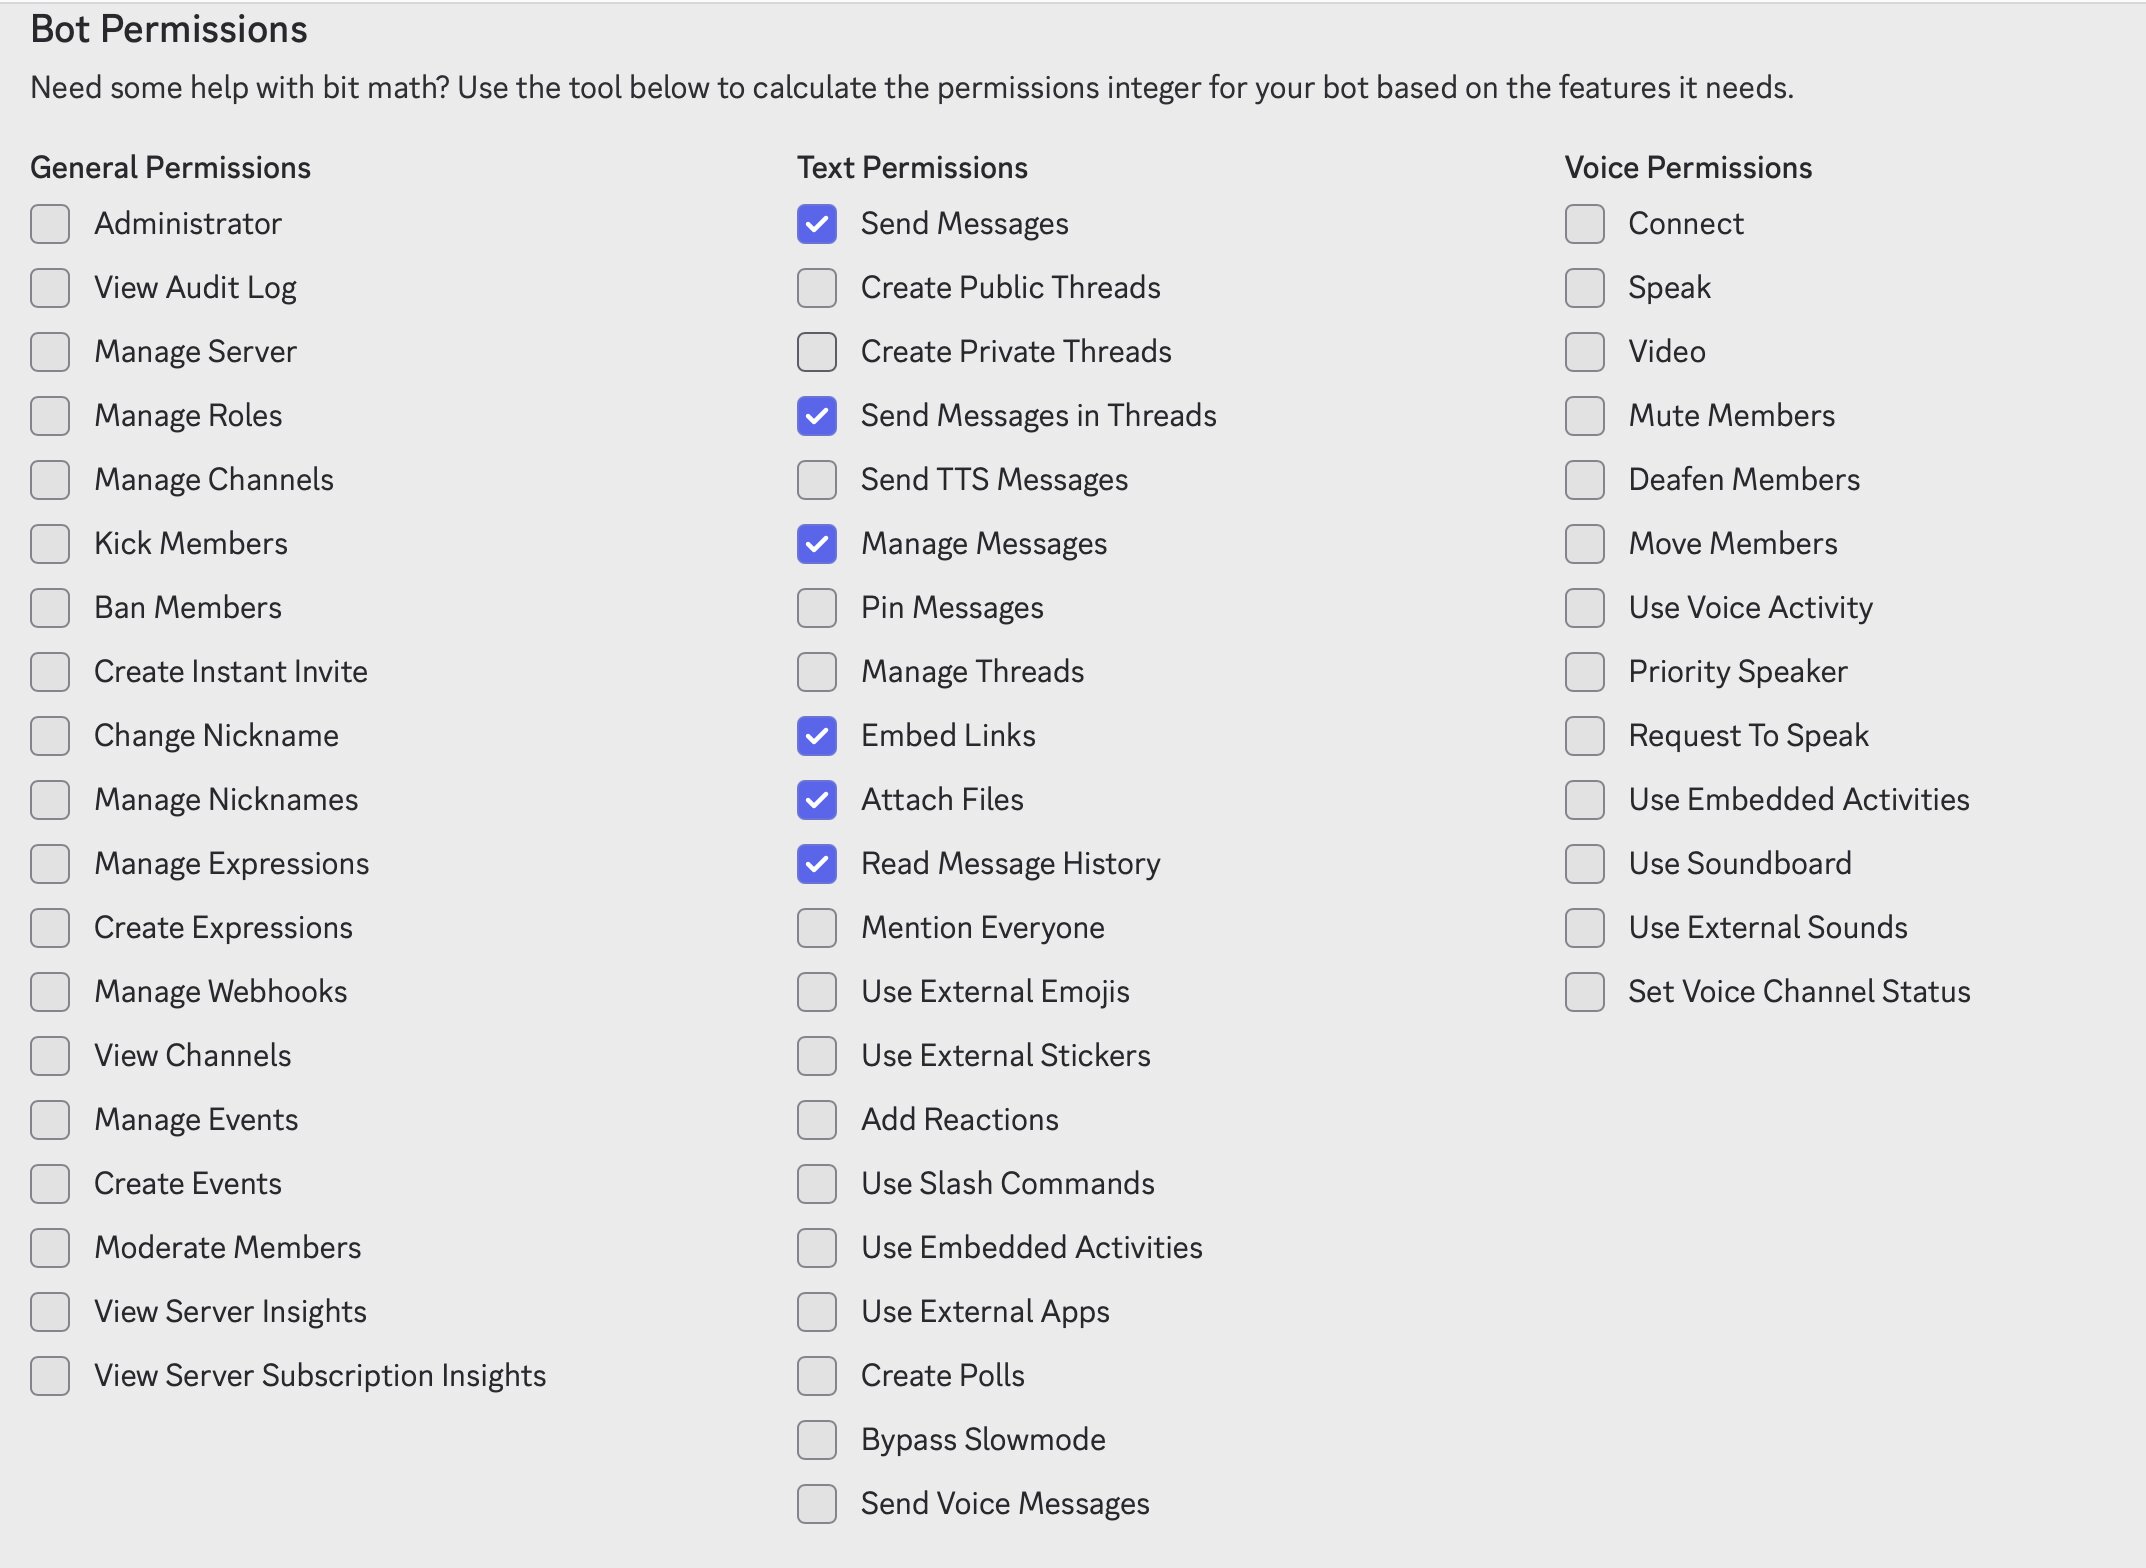
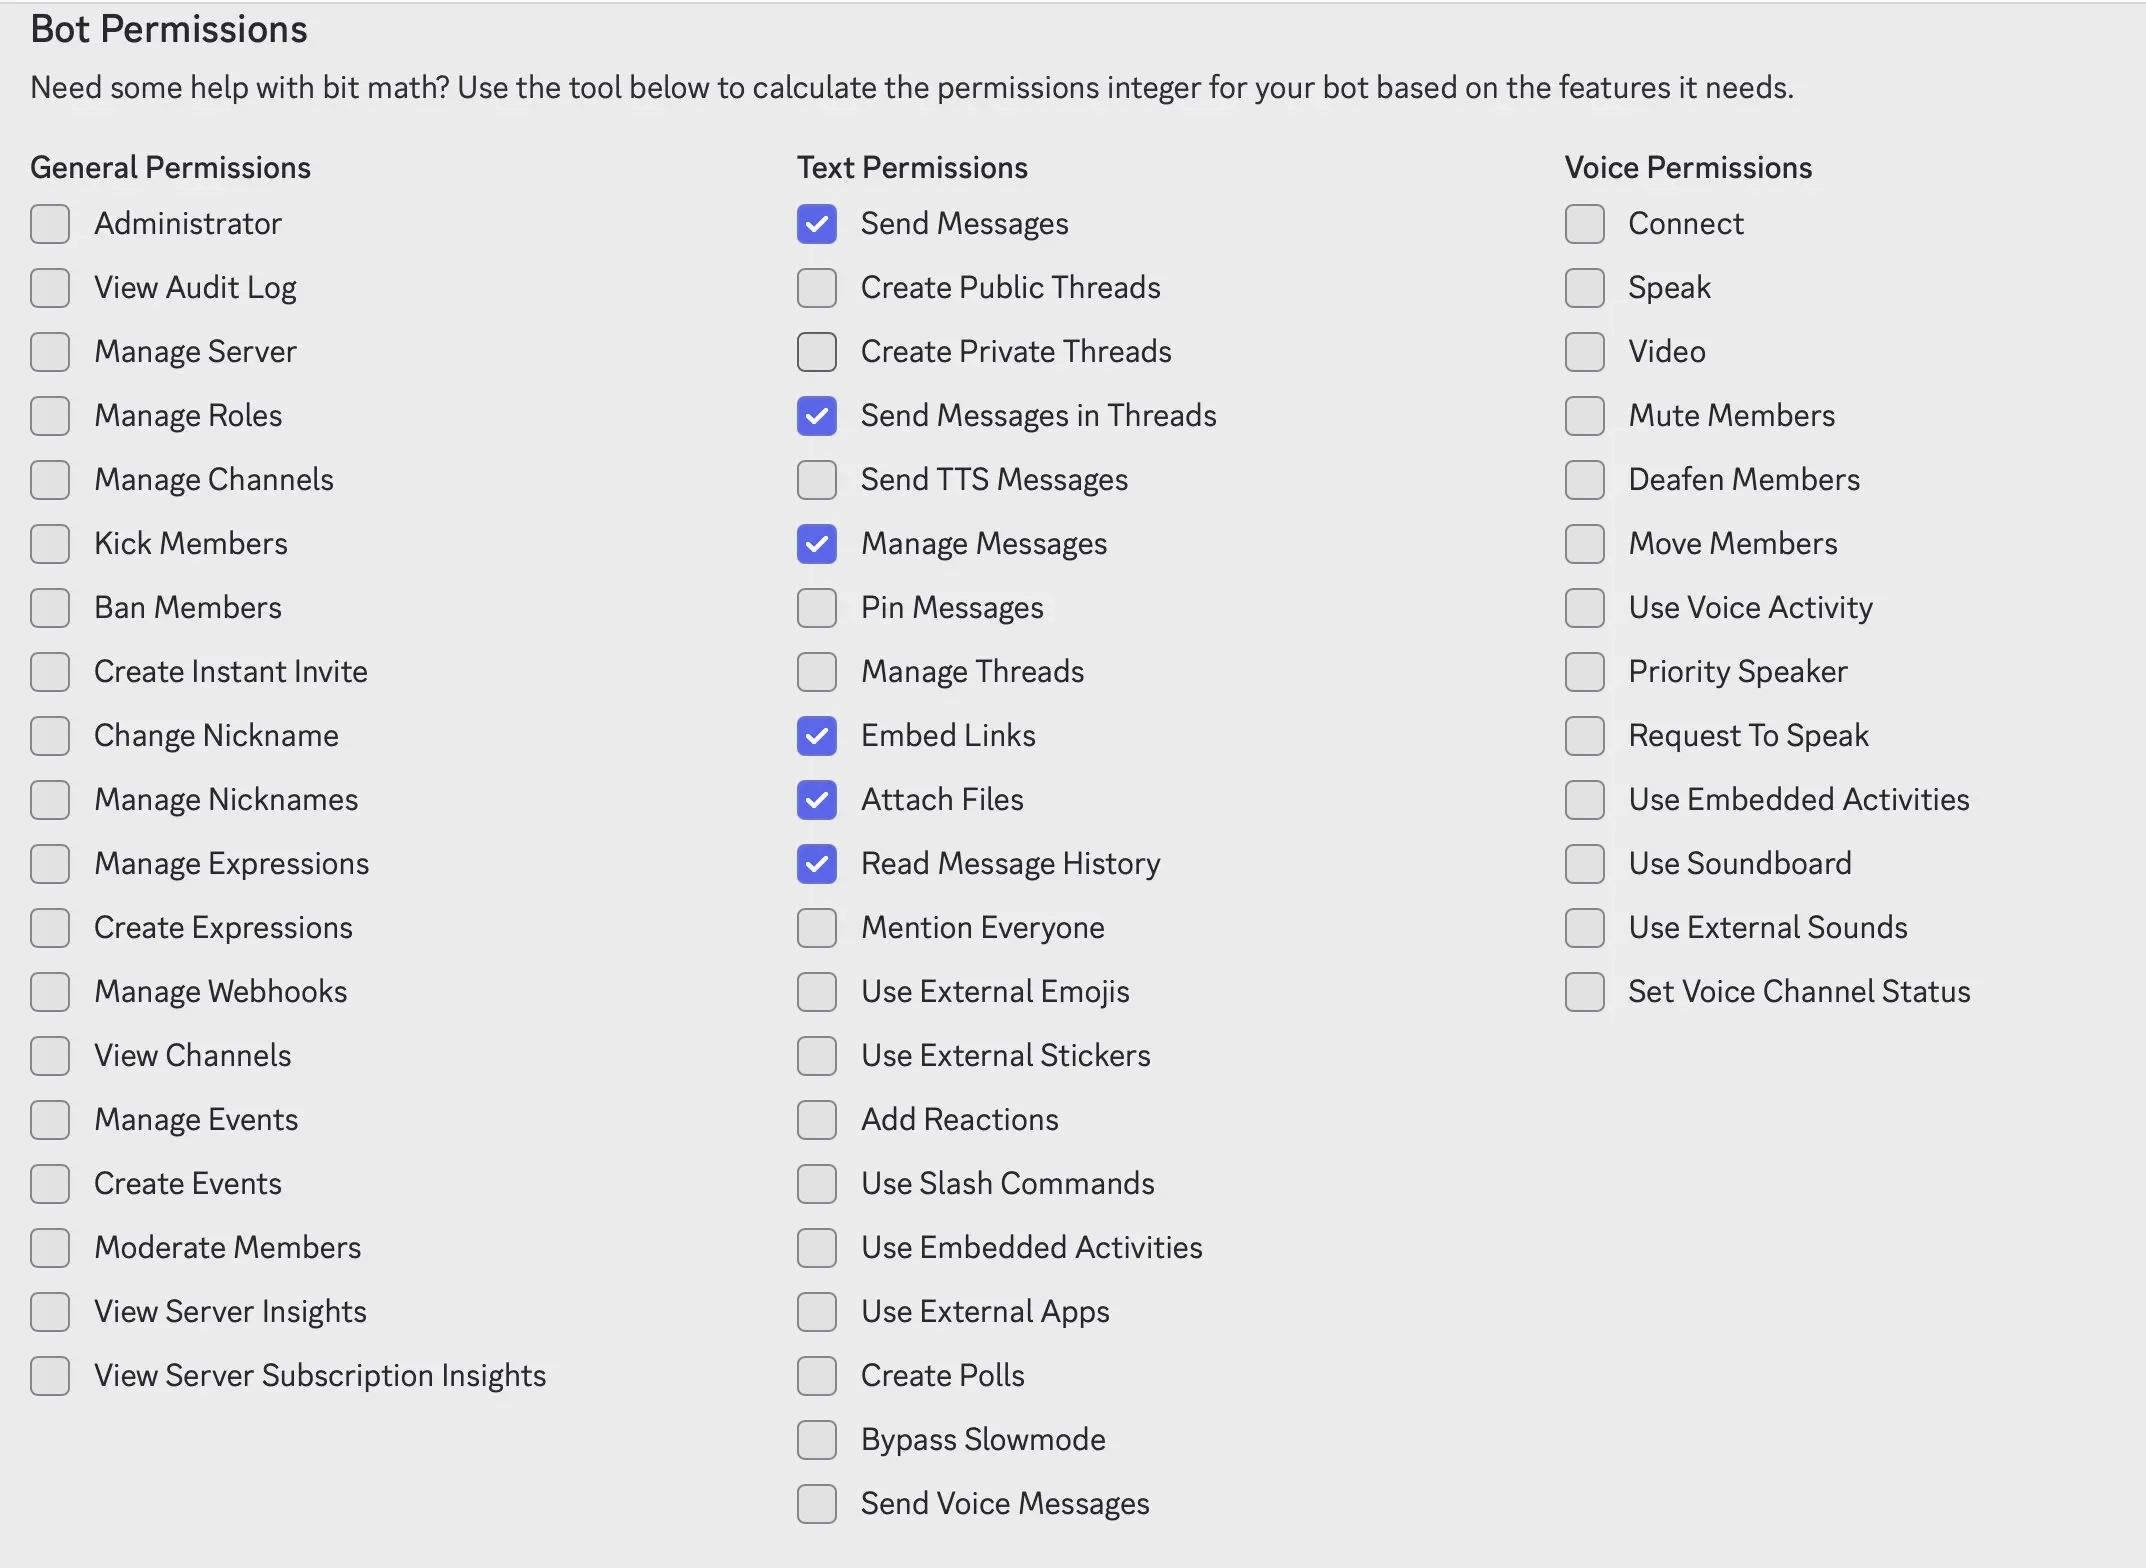
For your bot to work on your server, it needs the right permissions. You can define these in the Developer Portal. For a simple AI-based n8n Discord bot, the following permissions are usually enough to get started:
- Read messages
- Send messages
- Read message history
- Embed links
- Send attachments
Depending on your use case, additional permissions may be required later, for example for moderation, role management, or channel interactions. For beginners, however, it’s a good idea to enable only the permissions that are really needed. That keeps things clearer and more secure.
Step 4: Invite the bot to the Discord server
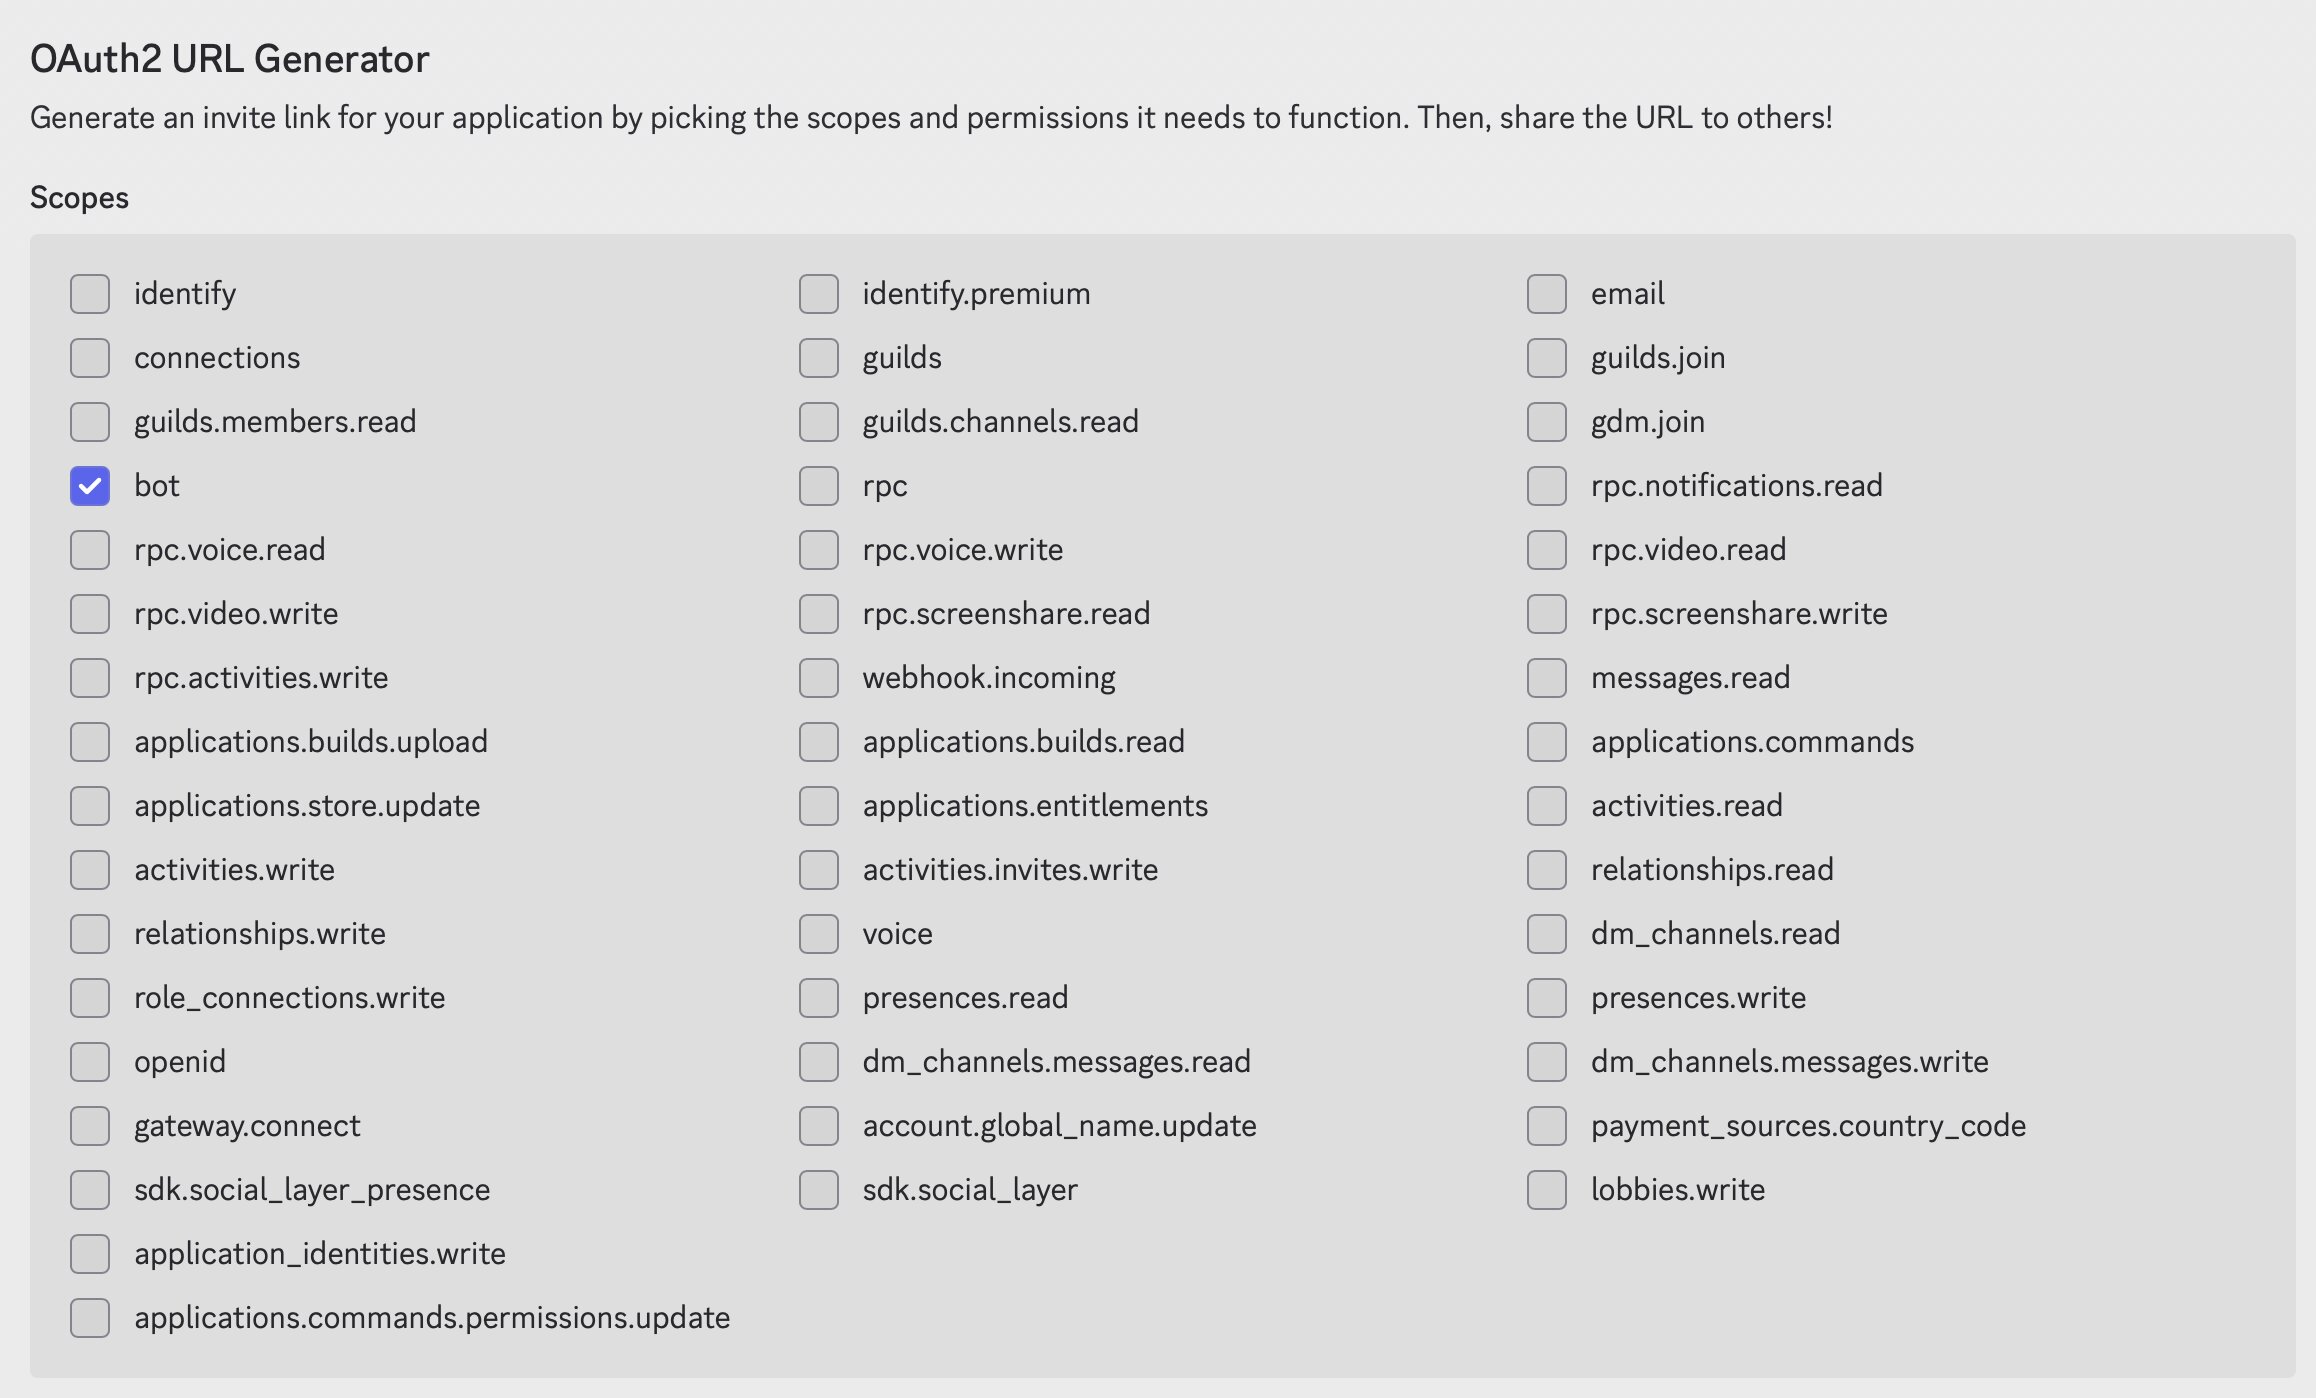
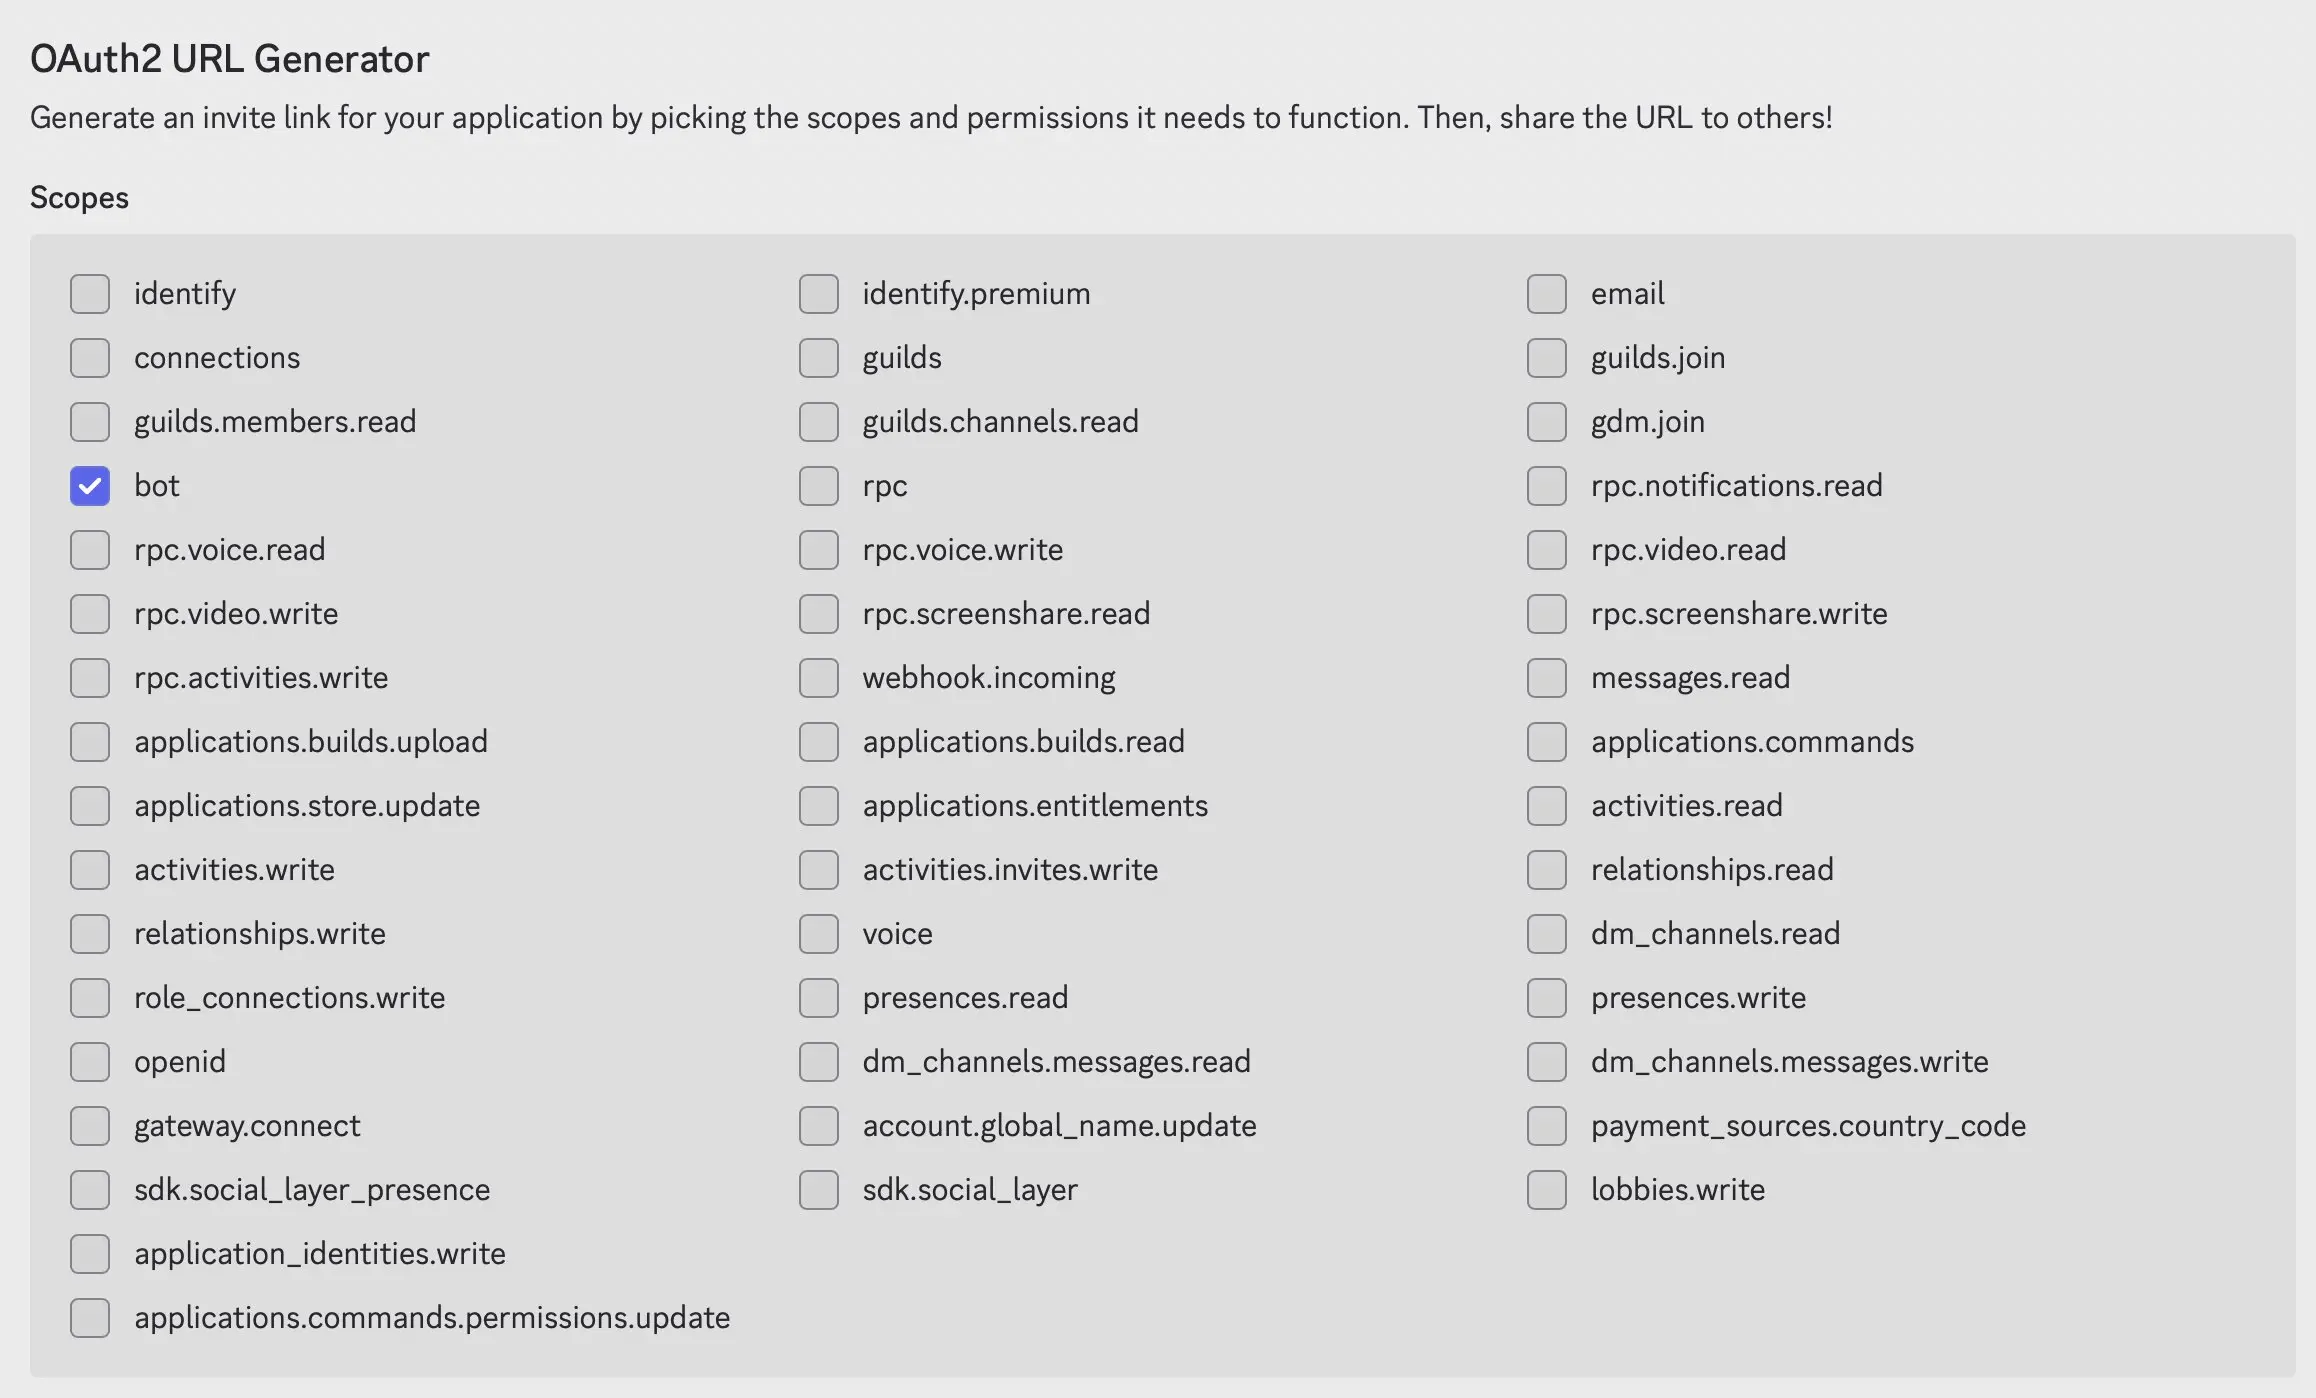
In the next step, create an invitation link for your n8n Discord bot so you can add it to your Discord server. To do this, go to the “OAuth2” section in the Discord Developer Portal and open the “OAuth2 URL Generator.”
Under Scopes, enable at least the “bot” option and, if you want to use slash commands, also “applications.commands.” Then select the permissions your bot should have later, for example reading and sending messages. Based on this selection, Discord automatically generates a URL. Open this link, choose your (test) server, and confirm the invitation.
After that, the bot will appear on your server. It’s normal that it doesn’t respond to messages yet, because you’ll set up the actual functionality and logic for your n8n Discord bot in the next step.
Step 5: Create a Discord webhook
For many workflows, a webhook is the easiest way to send messages from n8n to Discord. However, webhooks are an outbound-only channel. For interactive bots that respond to user input (for example, slash commands), a webhook alone is not enough. For that, you also need interactions, which are set up in Step 7.
Open the settings of the desired text channel in Discord and go to “Integrations.” There you can create a new webhook. Assign a name, select the channel, and copy the webhook URL. You will enter this URL in n8n later. This allows n8n to automatically send messages to Discord without you having to write your own bot program logic.
A webhook is a good option for your first automations. If you later need more complex interactions, such as responding to specific Discord messages, you can also work with bot logic, slash commands, or external triggers.
Step 6: Open n8n and create a new workflow
Open your n8n instance and create a new workflow. Give it a meaningful name. Unlike simple automations, a real n8n Discord bot is not just about sending messages. Your workflow also needs to be able to receive incoming requests from Discord and respond to them.
A typical structure consists of three parts:
- Input (Discord → n8n)
- Processing (AI)
- Output (n8n → Discord)
Step 7: Connect Discord and n8n (interactions)
Unlike webhooks, which are only used to send outgoing messages, interactions allow Discord to send data into your workflow. These are structured requests triggered by actions such as slash commands. Whenever a user runs such a command in Discord, Discord sends a request to a URL you define. This is the URL you provide in n8n for your n8n Discord bot.
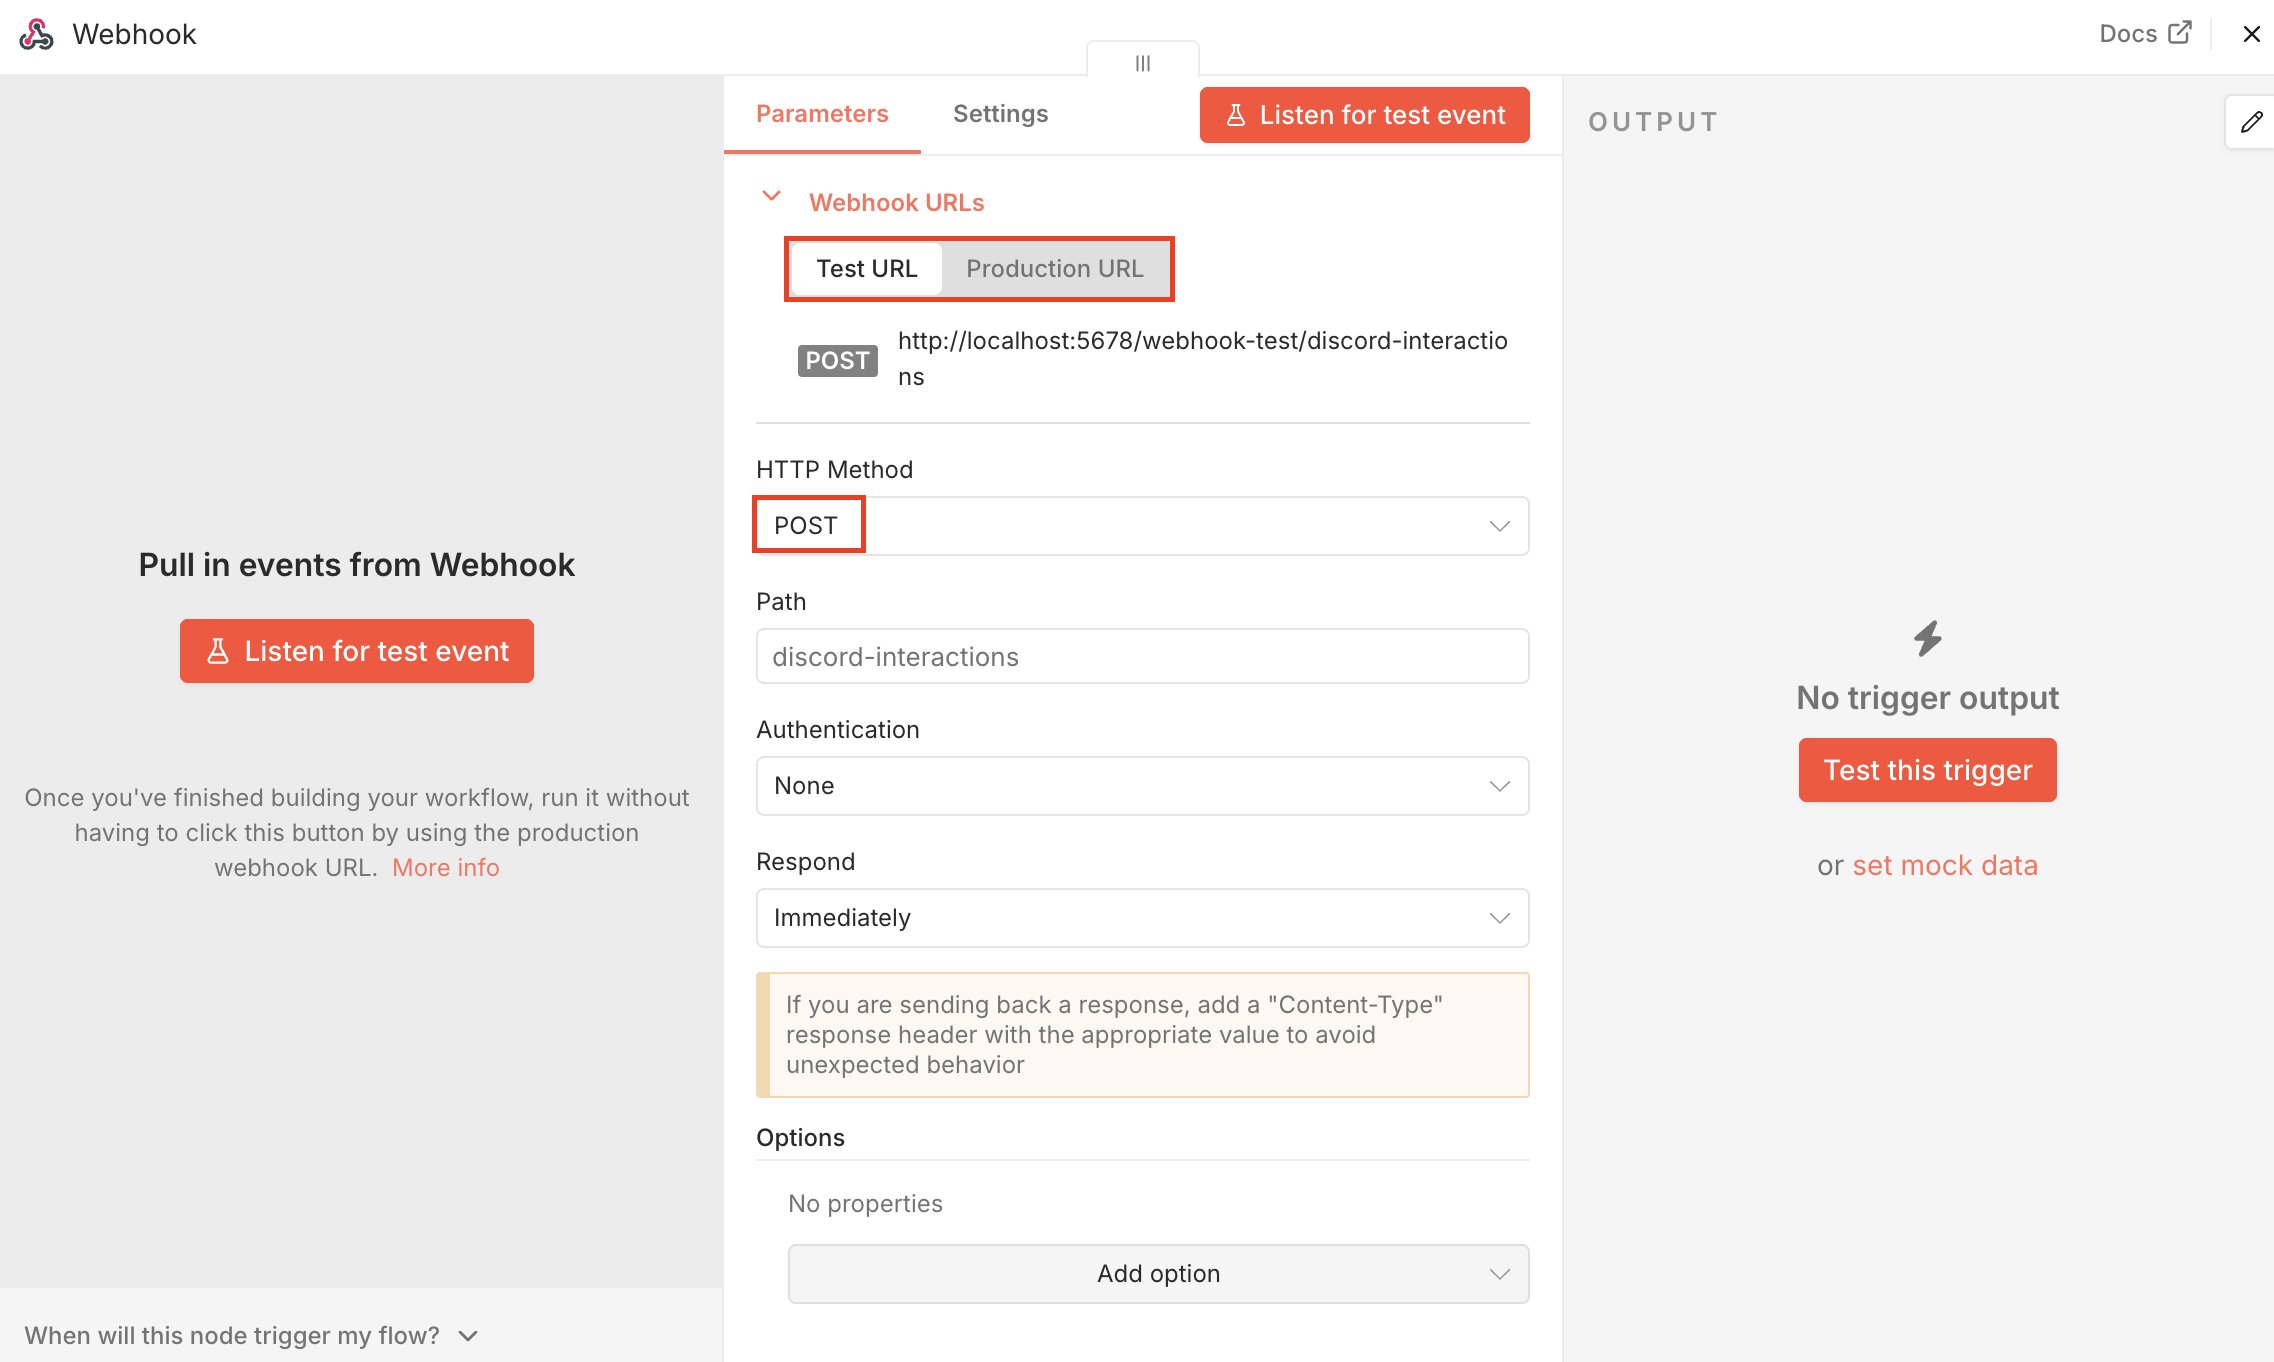
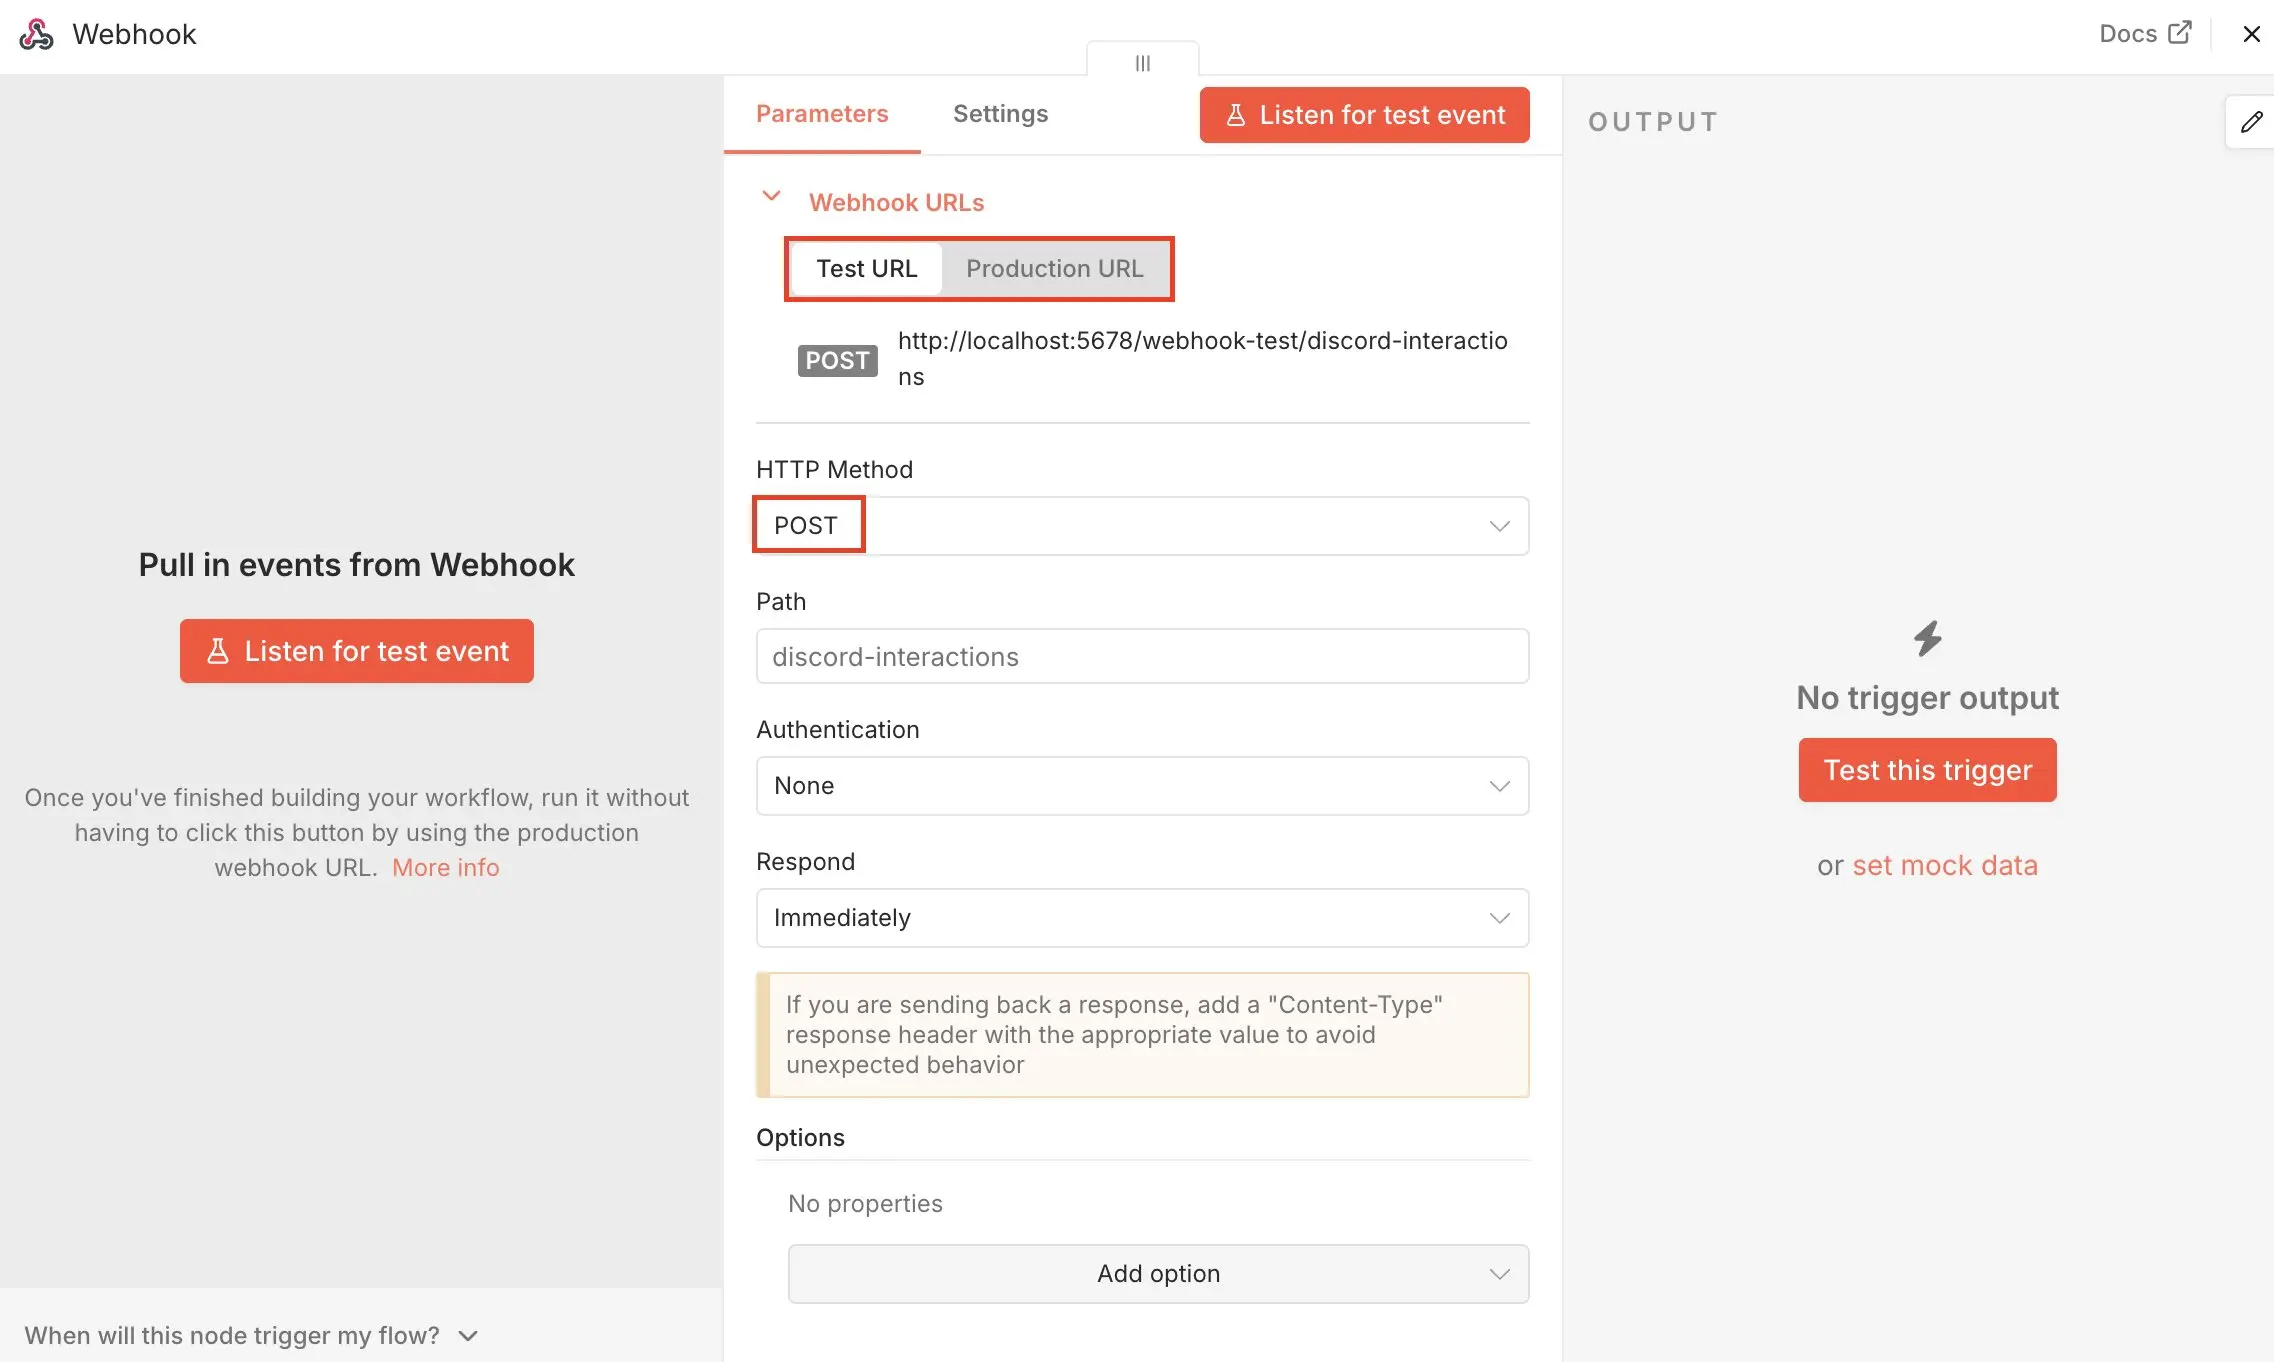
First, create a Webhook node in your workflow. This node serves as the entry point for all requests coming from Discord. Open the Webhook node settings and select POST as the method. Then assign a path, for example, discord-interaction.
As soon as you save these settings, n8n automatically generates a webhook URL. The interface shows two variants: a test URL and a production URL. The test URL is only suitable for short tests in the editor. To run your n8n Discord bot later, you need the production URL, because it also works when the workflow is active.
Next, store this URL in Discord. Open the Discord Developer Portal and go to the application you created earlier. In the “General Information” section, you’ll find the “Interactions Endpoint URL” field. Enter the production URL from n8n here and save your changes.
Signature verification and ping verification
For Discord to accept your Interactions Endpoint URL and use it permanently, your endpoint must meet two key requirements:
-
Respond to ping verification: When setting things up, Discord automatically sends a test request with the following content:
{
"type": 1
}
Your endpoint must respond to this with an unchanged so-called pong response. This indicates that your endpoint is reachable. The following response should therefore be sent:
```
 {
   "type": 1}
```- Perform signature verification: In addition, Discord checks every incoming request using the security headers
X-Signature-Ed25519andX-Signature-Timestamp. This signature ensures that the request actually comes from Discord and has not been tampered with in transit. For production applications, this verification is mandatory.
Complete signature verification (Ed25519) cannot be implemented in n8n without additional logic or external services. By default, n8n does not provide native support for verifying these signatures.
For simple tests, you can still use the endpoint. However, for stable production operation, you need to place additional middleware in front that handles the signature verification.
Typical workaround for production setups
In practice, the following architecture is often used:
Discord -> Middleware (signature verification) -> n8n webhook
The middleware can, for example, be implemented as a small standalone service, such as a simple Node.js server, a serverless function (for example, using Cloudflare Workers), or as part of an existing backend service. The specific technology is not what matters, but rather the function of this intermediate layer.
This component sits logically between Discord and your n8n instance and handles several key tasks. First, it checks every incoming request using the provided signature to ensure that the data really comes from Discord and has not been tampered with. It also correctly answers the ping request sent by Discord, which is required to verify the endpoint.
Only after these checks have been successfully completed does the middleware forward the request to the actual n8n webhook. This way, your n8n Discord bot workflow receives only validated and trustworthy data and can continue processing as usual.
Discord only accepts HTTPS URLs for the Interactions Endpoint. Therefore, make sure that your n8n instance is accessible via HTTPS, for example through your own domain with an SSL certificate.
This establishes the connection. Whenever a user runs a slash command, Discord automatically sends the relevant data to your n8n Discord bot workflow and starts it.
Step 8: Create a slash command for the bot
So that users can trigger your n8n Discord bot directly in the chat, you need a so-called slash command. These application commands are created via the Discord API.
Before you create the slash command, you need two important values from the Discord Developer Portal:
- Application ID: You can find this in the “General Information” section of your application.
- Bot token: You can find this in the “Bot” section. Treat the token as confidential, as it grants access to your bot.
The command itself is created via an HTTP request to the Discord API. You can execute this request either through a terminal or directly using a tool like n8n. An example using curl looks like this:
curl -X POST https://discord.com/api/v10/applications/YOUR_APPLICATION_ID/commands \
-H "Authorization: Bot YOUR_BOT_TOKEN" \
-H "Content-Type: application/json" \
-d '{
    "name": "ask",
    "description": "Ask the bot a question",
    "options": [
        {
            "name": "question",
            "description": "Your question",
            "type": 3,
            "required": true
        }
    ]
}'Replace the following:
YOUR_APPLICATION_IDwith your actual application IDYOUR_BOT_TOKENwith your bot token
This request creates a new slash command named /ask. In addition, it defines an input option called “question” that users can use to pass a message to the n8n Discord bot.
Once the request has been executed successfully, the new command is available. Open your Discord server and click in a text input field. Type /, and your new command should appear automatically in the suggestion list.
- NEW: VM cloning, load balancing, block storage, and more
- Ideal for agentic AI, LLMs, and automation at scale
- Free 24/7 expert support and 99.99%+ uptime
- Unlimited traffic and no setup fees
Step 9: Process incoming data from Discord
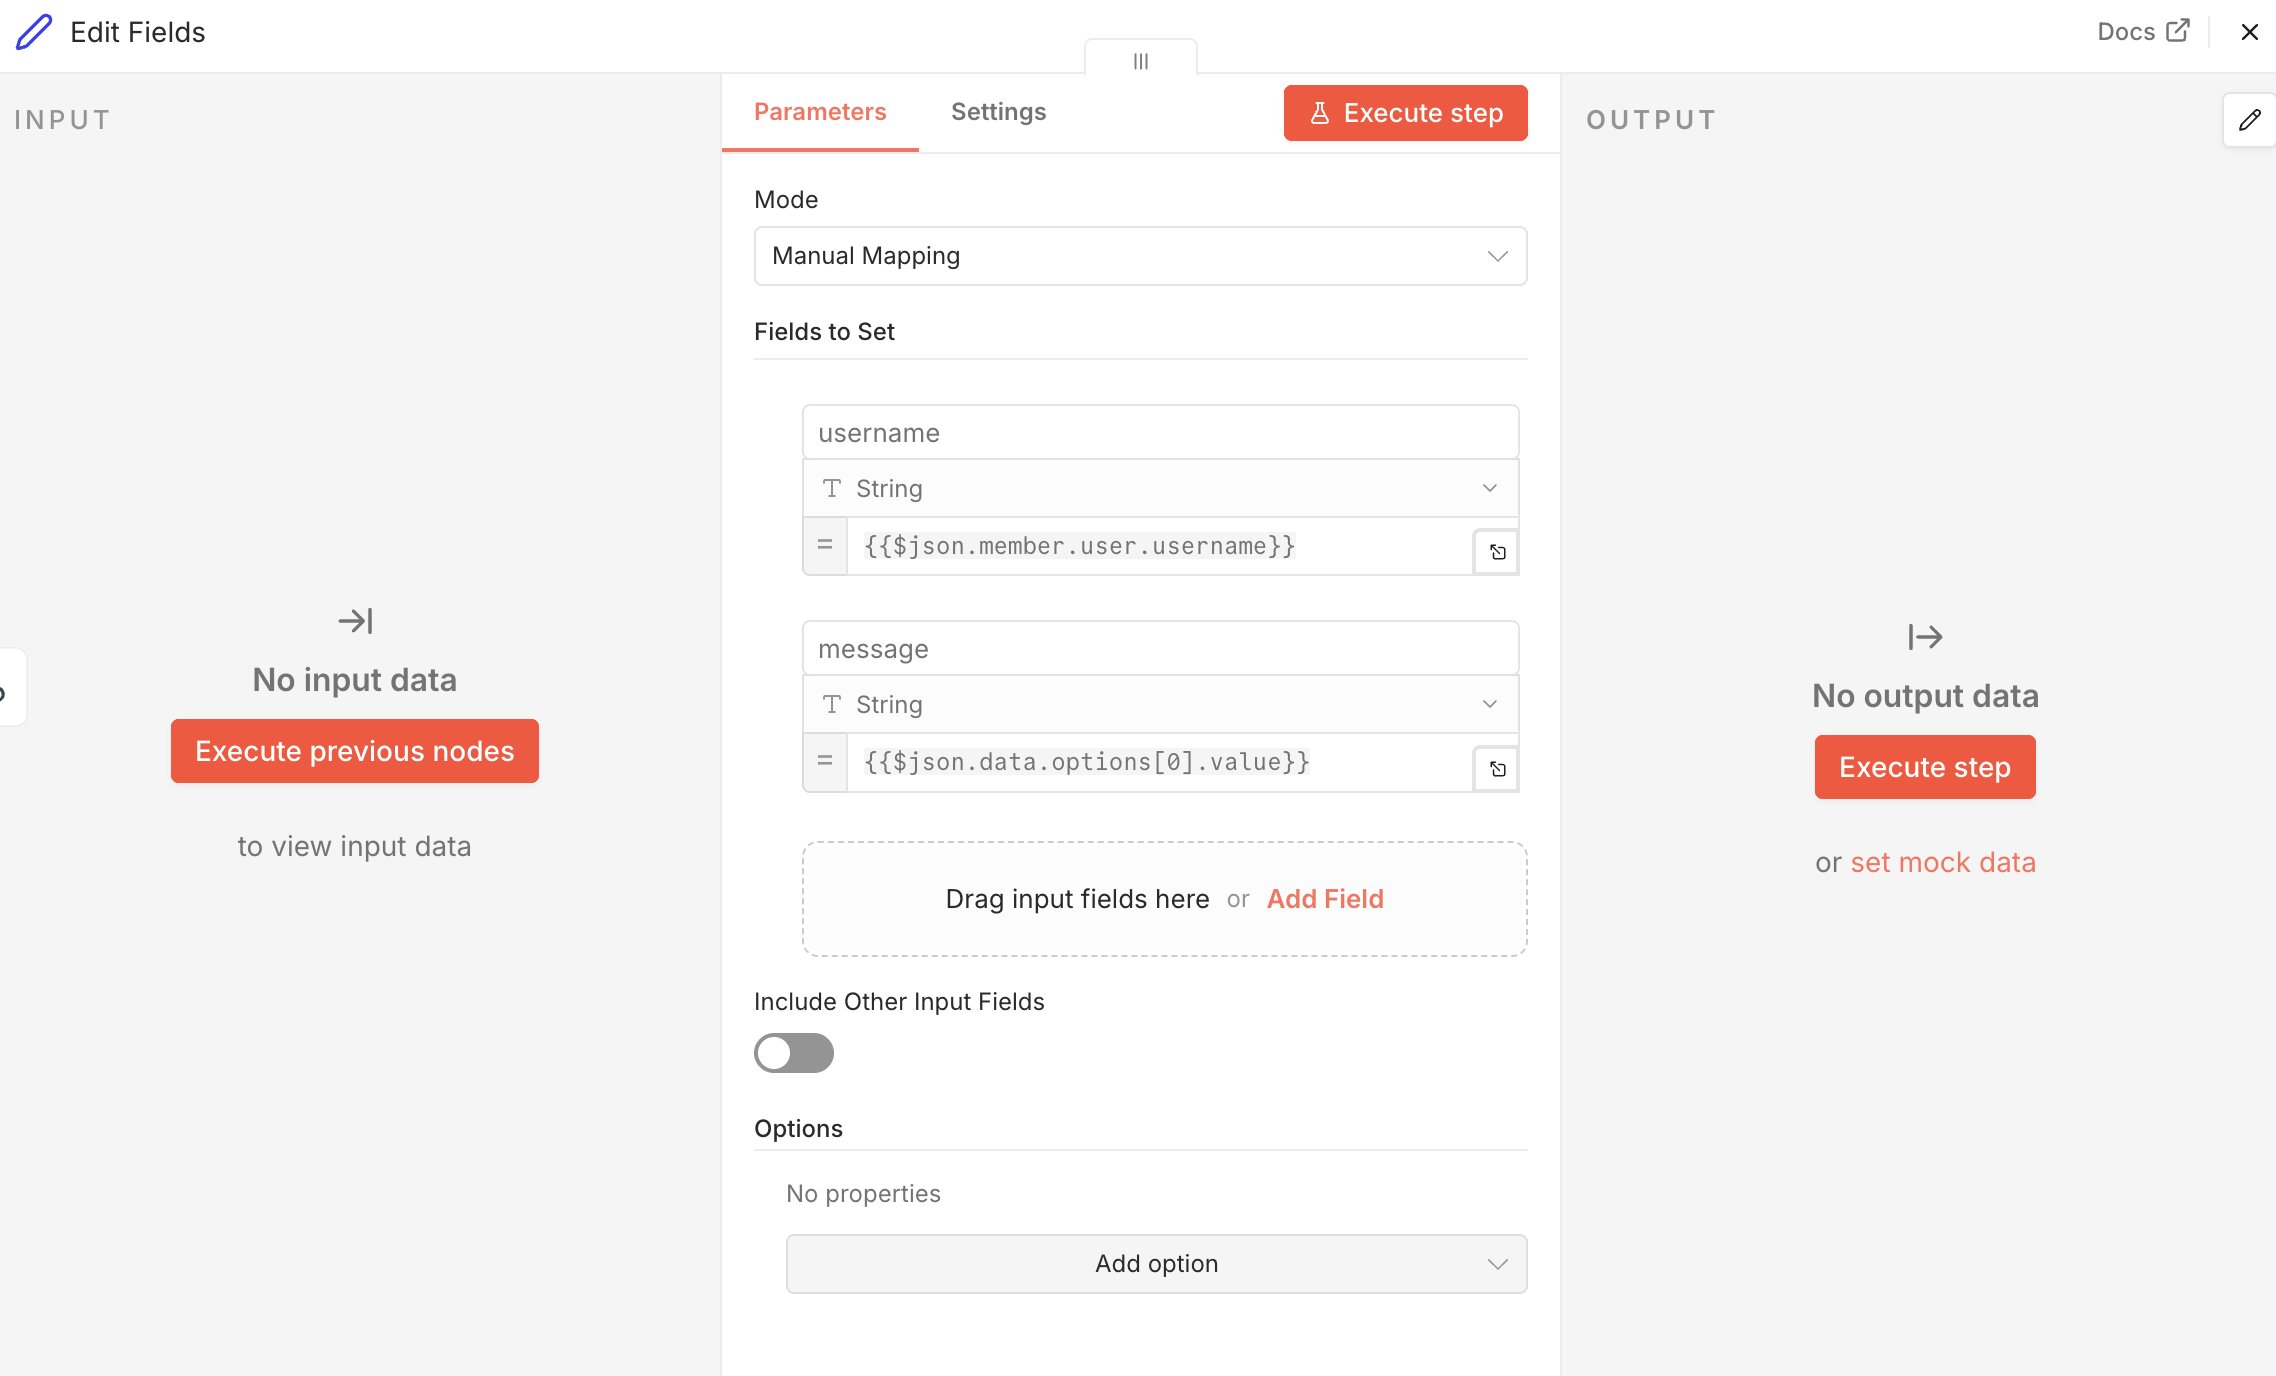
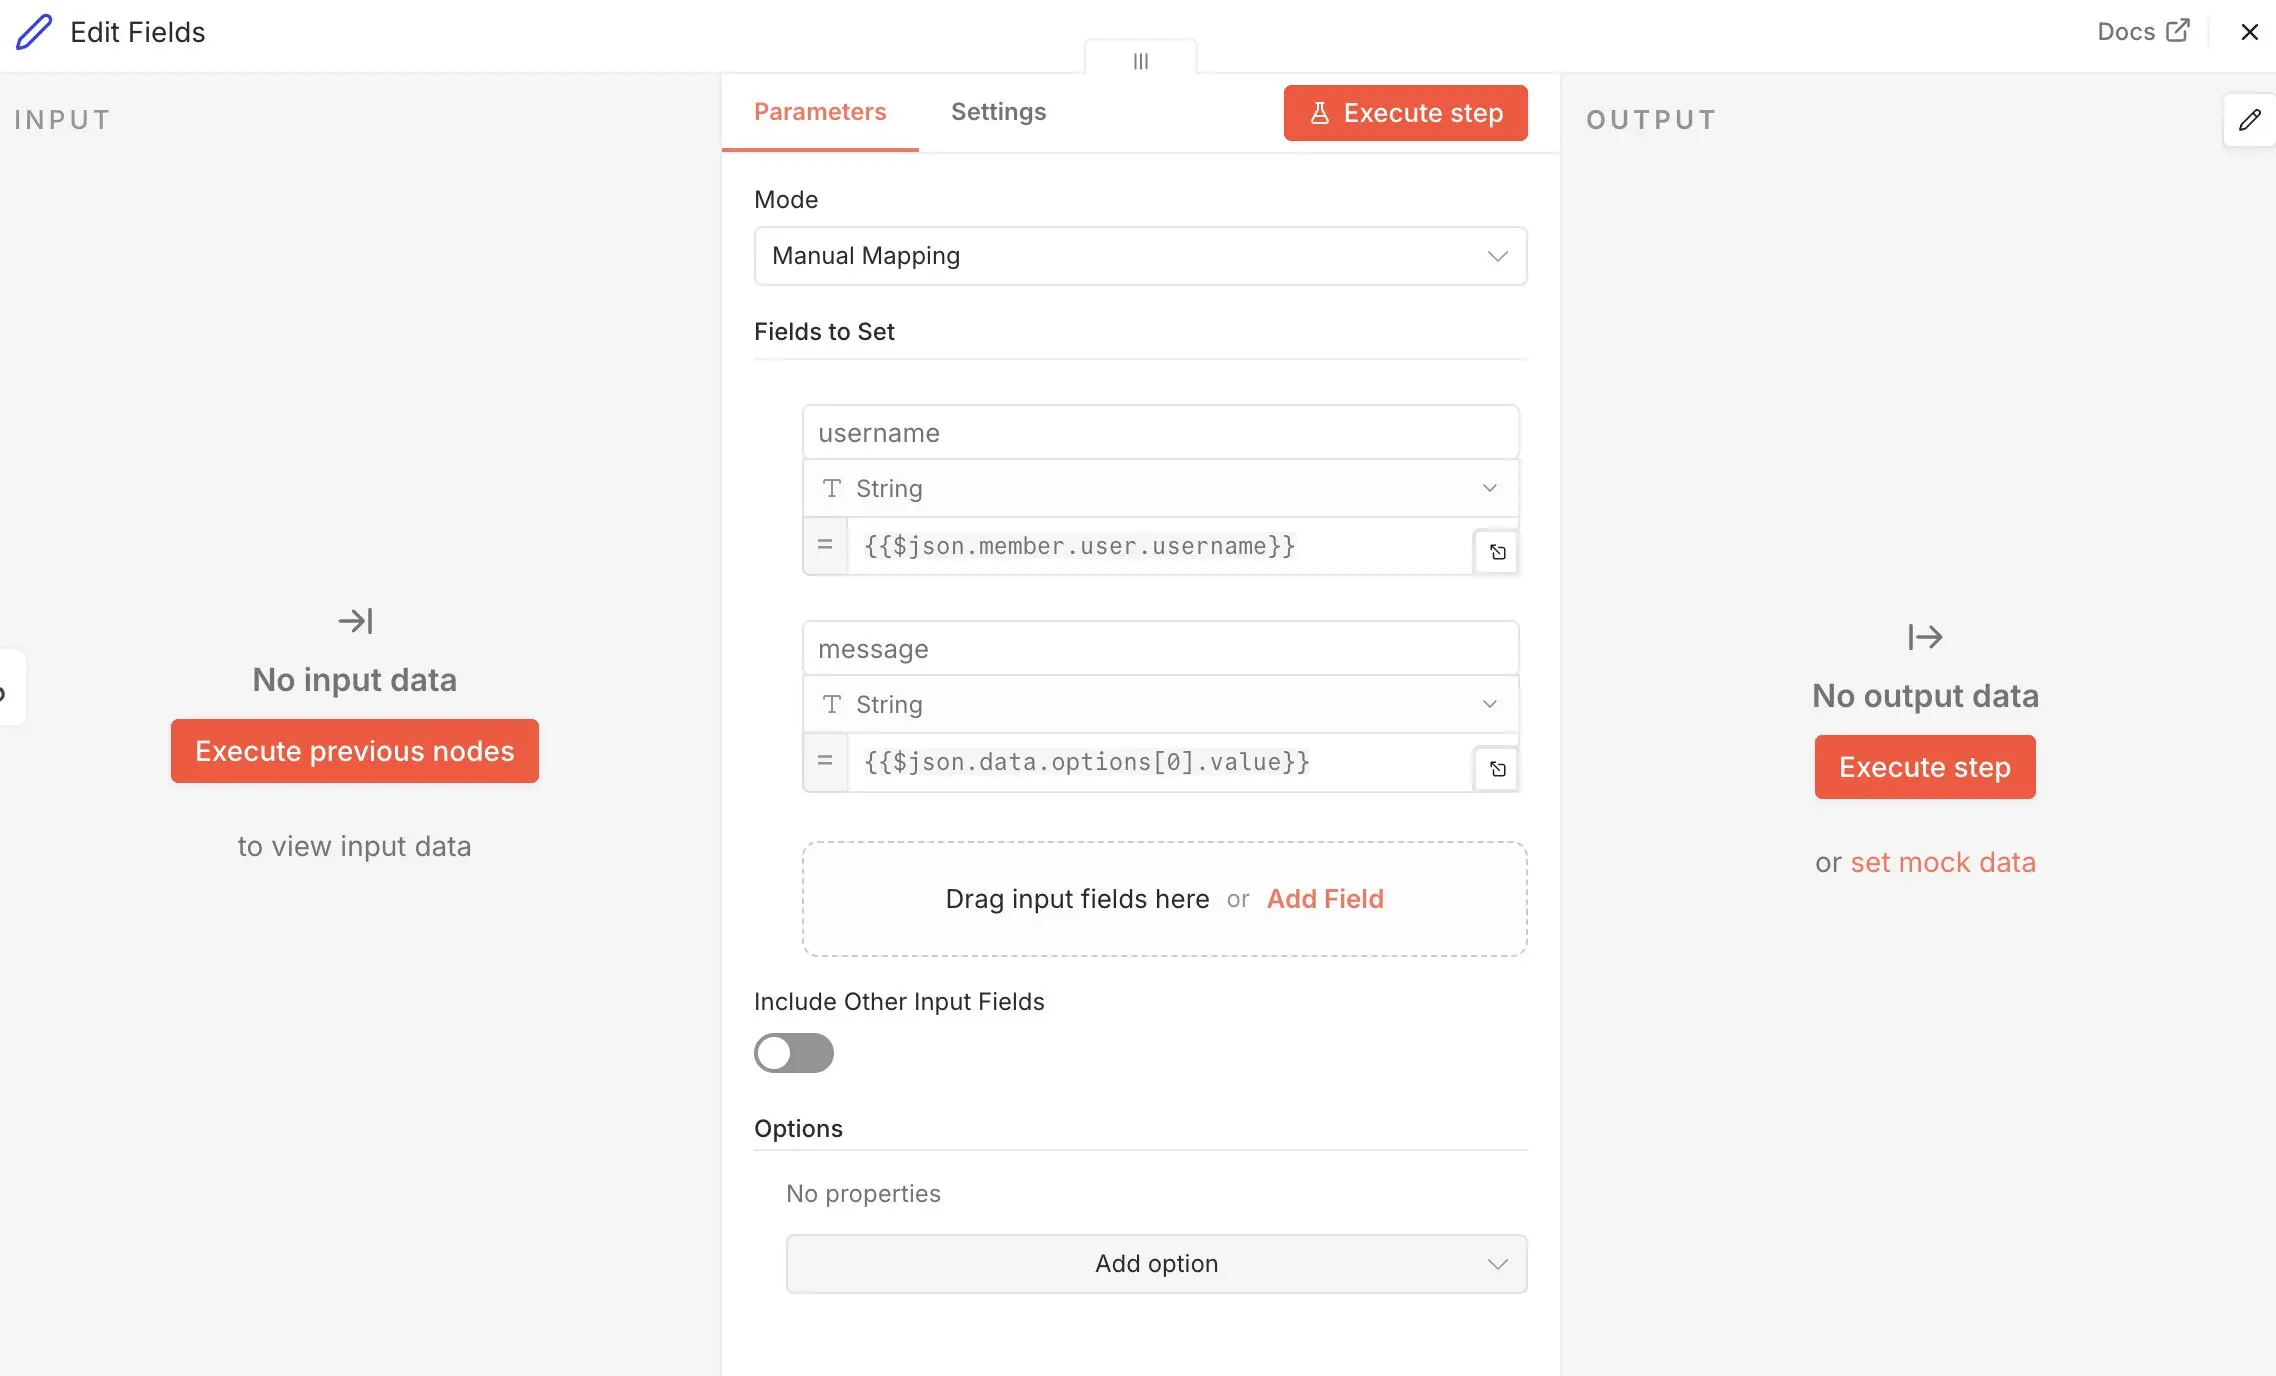
As soon as a slash command is executed, Discord sends a structured request to your webhook. To further process the included information, add a Set node after the webhook. There, extract the relevant data, especially the username and the entered message, using JSON expressions.
Example:
{
"username": "{{$json.member.user.username}}",
"message": "{{$json.data.options[0].value}}"
}This gives you the most important information in a clear, well-organized format.
The exact fields can vary depending on the command type, context, and option structure, so always check the actual output of the last execution in n8n.
Step 10: Pass the message to an AI model
In the next step, connect your workflow to an LLM. In n8n, you can either use the OpenAI node for this or directly call an API with an HTTP Request node. The current OpenAI node in n8n supports the OpenAI Responses API. For beginners, the easiest way is usually the OpenAI node.
If you are using the node for the first time, you must first add your credentials. In the node, click “Credentials” and select “Create New Credential.” Enter your API key there and save the credentials.
Next, configure the node so that the incoming Discord message is passed to the model. Select a text or message operation and enter a prompt that defines the desired context for the AI. A simple template might be:
You are a helpful assistant in a Discord server.
Respond politely and clearly in a maximum of five sentences.
User: {{$json.username}}
Message: {{$json.message}}Make sure you don’t enter the username and message values manually. Instead, insert them as expressions from the previous node.
Step 11: Prepare the response for Discord
The response from an AI node in n8n often consists not only of plain text, but also of structural and metadata. To ensure that Discord later receives only the actual reply, you process the result in an additional step. Add another Set node after the AI node. There, create a new field named reply. In this field, insert the response text from the AI node’s result.
A typical example looks like this:
{
"reply": "{{$json.output[0].content[0].text}}"
}If your output is structured differently, you can easily check this by looking at the OpenAI node’s output after a test run. There you can see exactly where the actual response text is located.
Optionally, you can further format the response, for example with a prefix. This way, the raw AI reply can be turned into a slightly nicer Discord output:
{
"reply": "**AI bot:** {{$json.reply}}"
}Step 12: Return the response directly to Discord
This step is important because Discord interactions do not expect a generic webhook response. Your endpoint must return a valid interaction response to the slash command request.
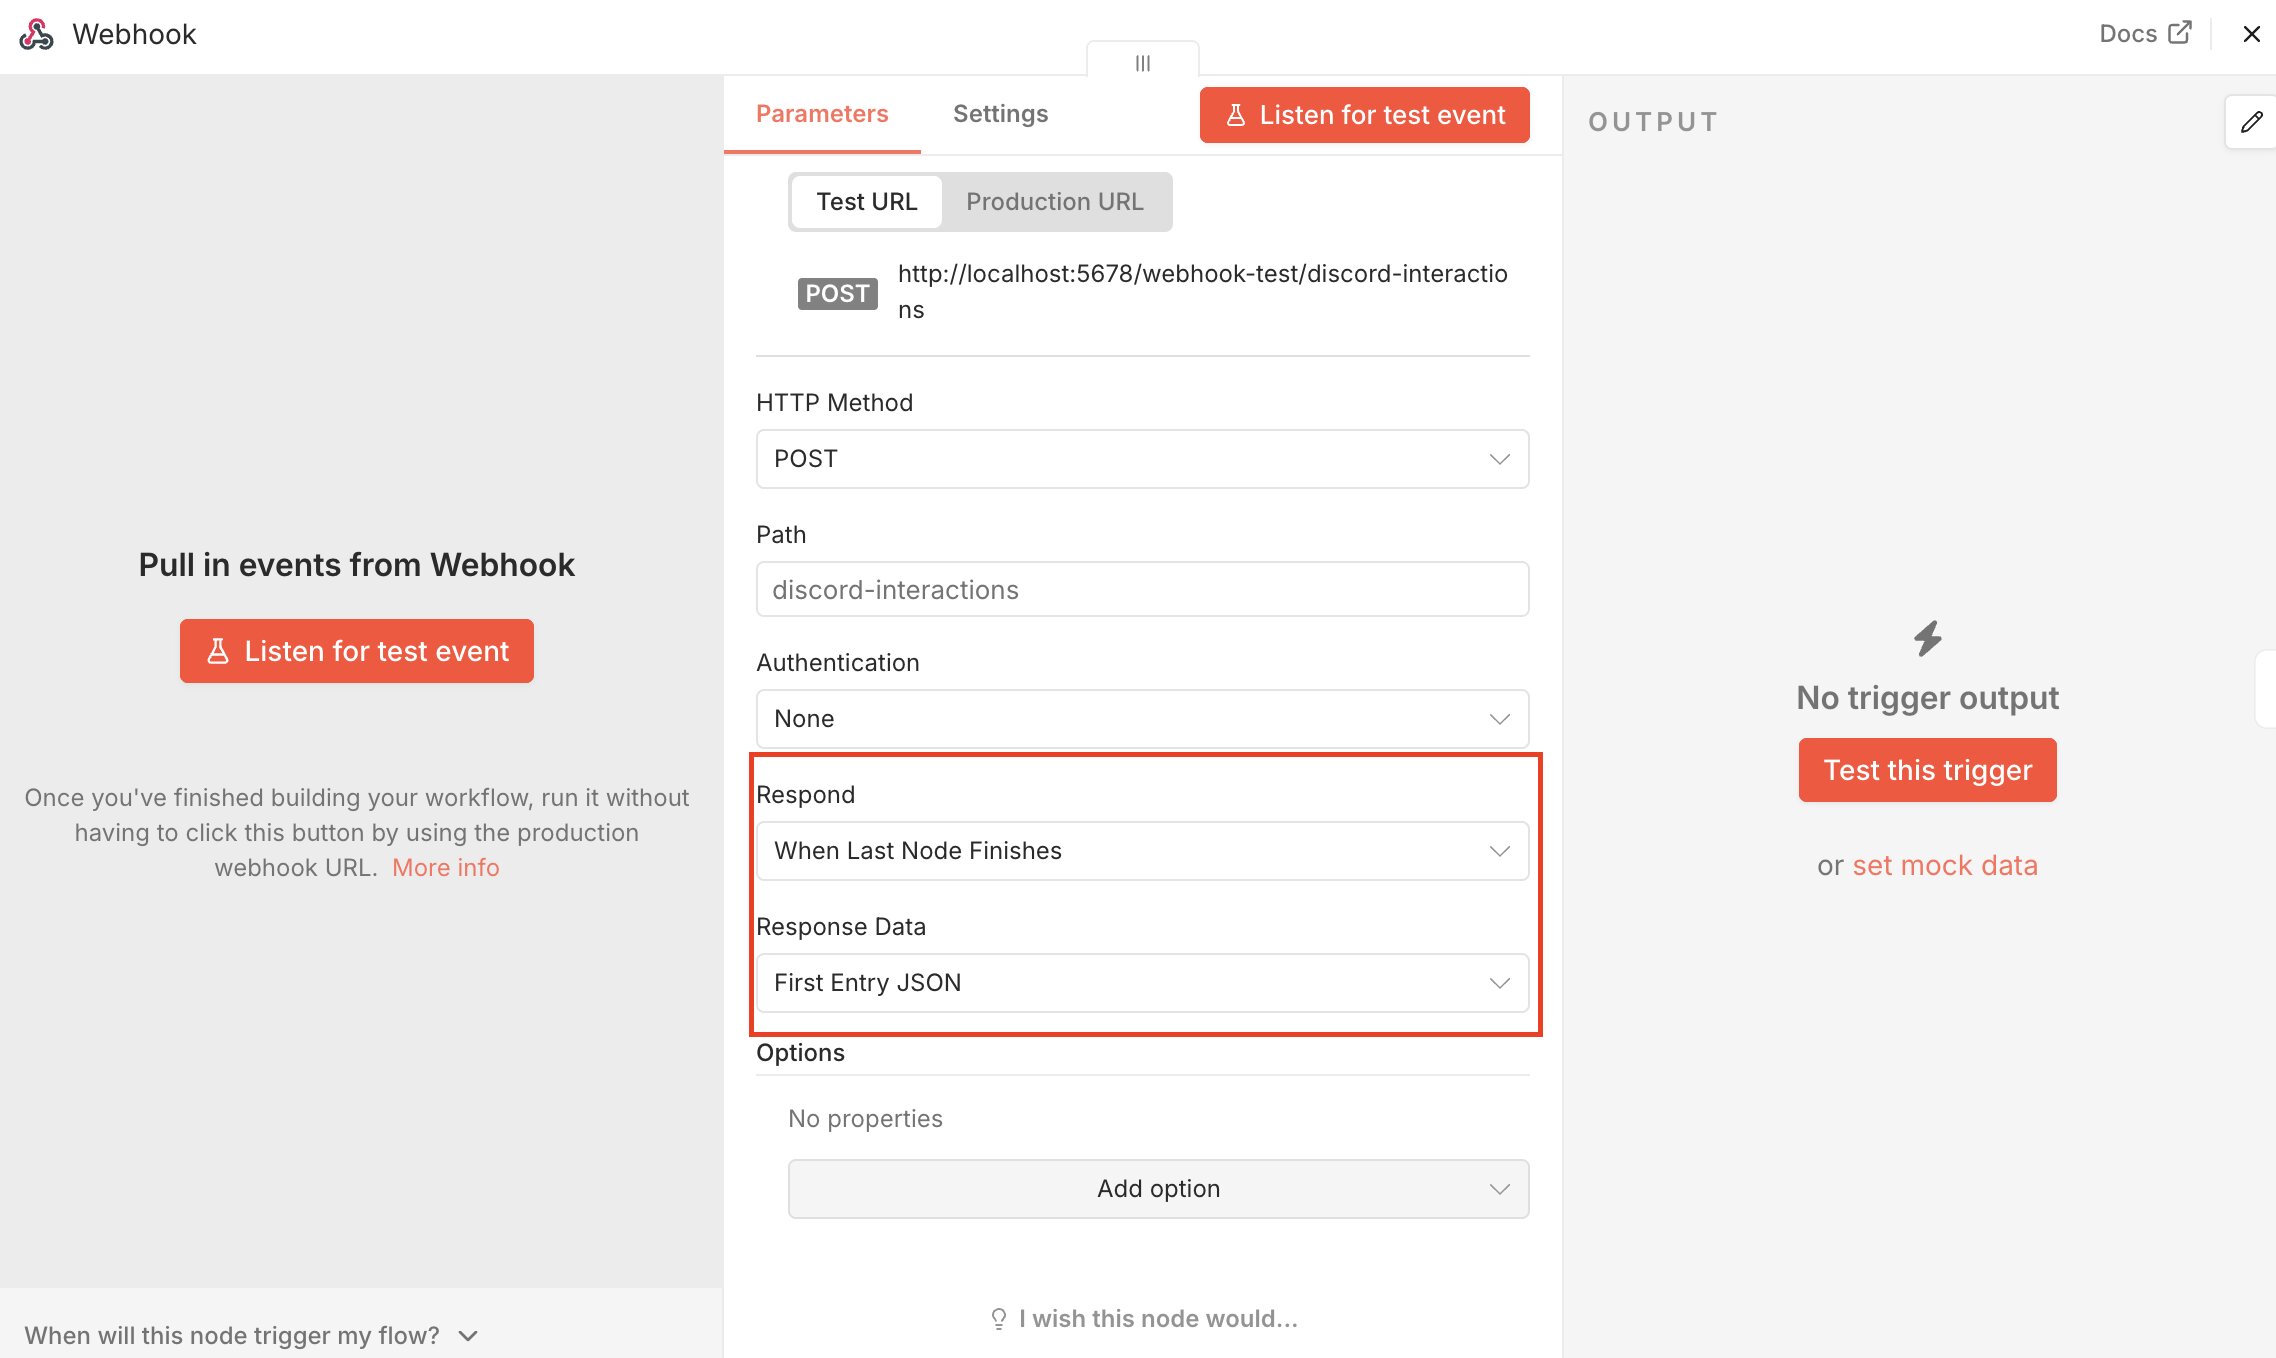
In n8n, you can handle this by making the webhook node wait until the workflow has finished and then return the result of the final step. This means the webhook node does not respond immediately, but only after the last node in the workflow has run.
Click the webhook node again at the beginning of the workflow. In the settings, look for the “Respond” section. Instead of selecting an immediate response, choose “When Last Node Finishes”.
Keep Discord’s rate limits in mind. Both webhooks and API calls are limited. Discord uses dynamic rate limits for webhooks and API requests, which vary depending on the endpoint and usage. If too many requests are sent in a short time, Discord returns an error with HTTP 429. To avoid issues, replies should be throttled or delayed instead of being sent without restraint.
Below that, you’ll find the setting for the response data. Select “First Entry JSON” so that n8n returns exactly the JSON object that comes from the last node.
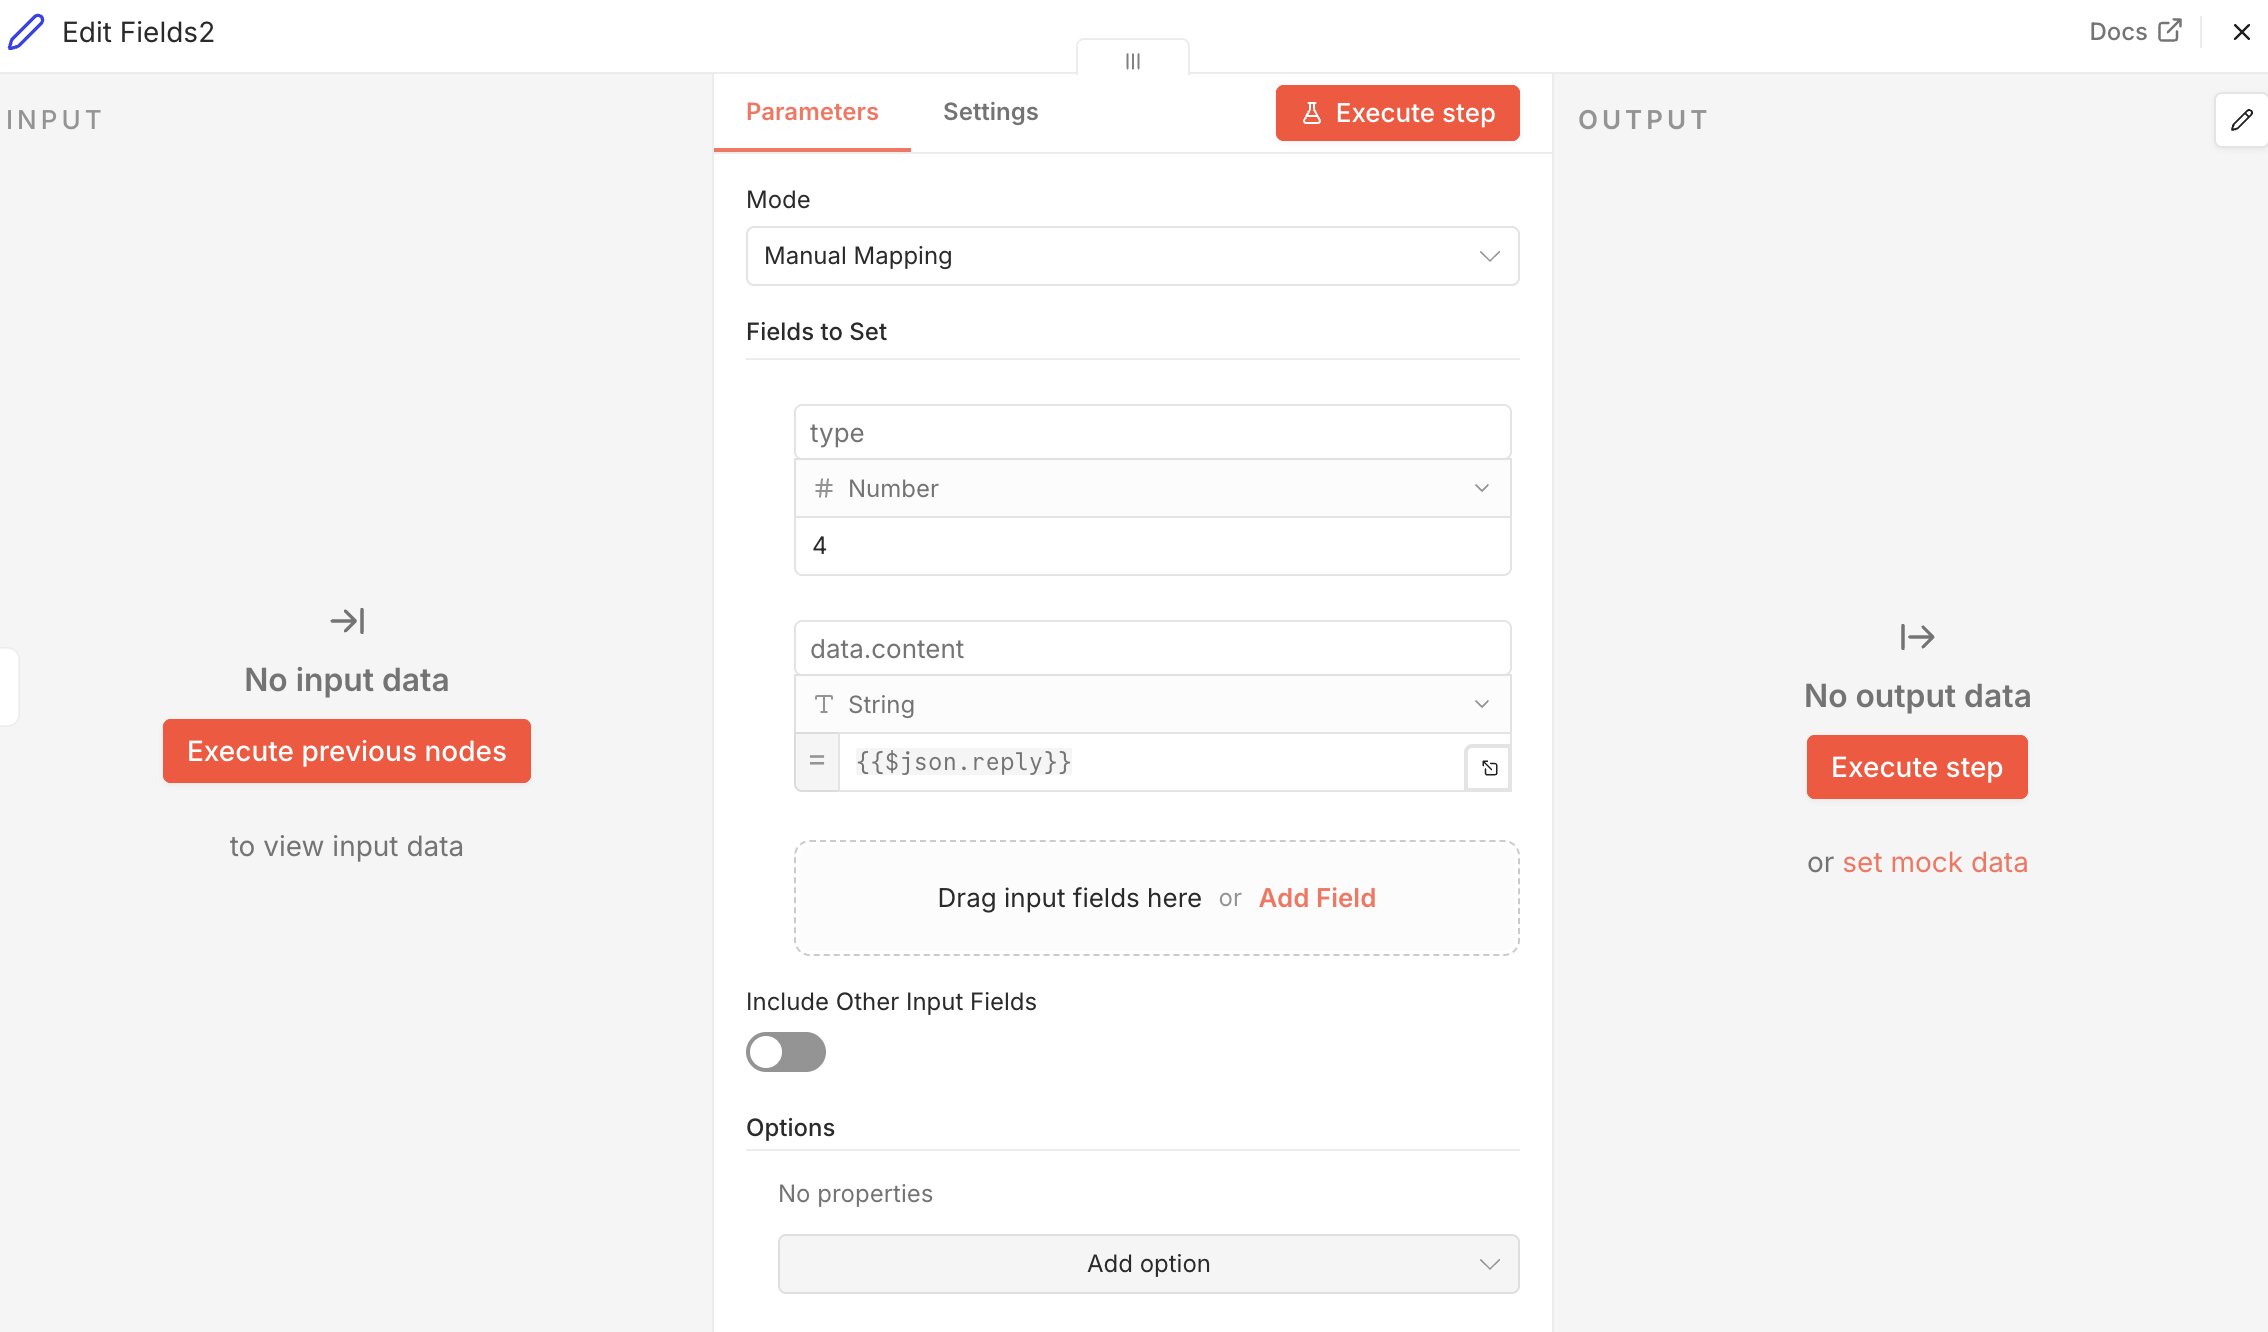
For Discord to accept the response, your last node must output a JSON object that looks roughly like this:
{
"type": 4,
"data": {
"content": "{{$json.reply}}"
}
}In practice, this means you add another Set node after your existing reply node. In this final node, you set up the fields so that this exact structure is created. A field called type gets the value 4. Another field called data in turn contains the subfield content with your AI response.
Discord interactions have an important limitation. Your endpoint must return an initial response within 3 seconds. If no valid response is sent during that time, Discord discards the request and the interaction token becomes invalid. This can become an issue when using AI models, because processing often takes longer.
In these cases, it’s better not to send the full reply immediately, but to first return a deferred response.
To do this, use the response type type: 5 (DEFERRED_CHANNEL_MESSAGE_WITH_SOURCE). This tells Discord that the request was received and that the actual reply will follow later. You can then send the completed response as a follow-up message. The interaction token remains valid for up to 15 minutes for this purpose.
Step 13: Thoroughly test the workflow
Before you use the bot permanently, you should carefully test the entire process. First, activate the workflow, because production webhook URLs in n8n only work when the workflow is active. n8n also clearly distinguishes between test and production URLs. The production URL is the correct address for Discord. Then switch to your Discord server and enter the slash command, for example:
/ask question: What is n8n?As soon as you send the command, Discord should forward the request to your interactions endpoint. Then open the execution list in n8n. There, you can click through each step and check which data was received and how it was processed. If everything is working correctly, a reply will appear in Discord.
Practical use cases for n8n Discord Bots with AI
With n8n, you can build not just a simple reply bot, but automate many different Discord workflows. The following examples show three practical ideas that are also easy for beginners to follow.
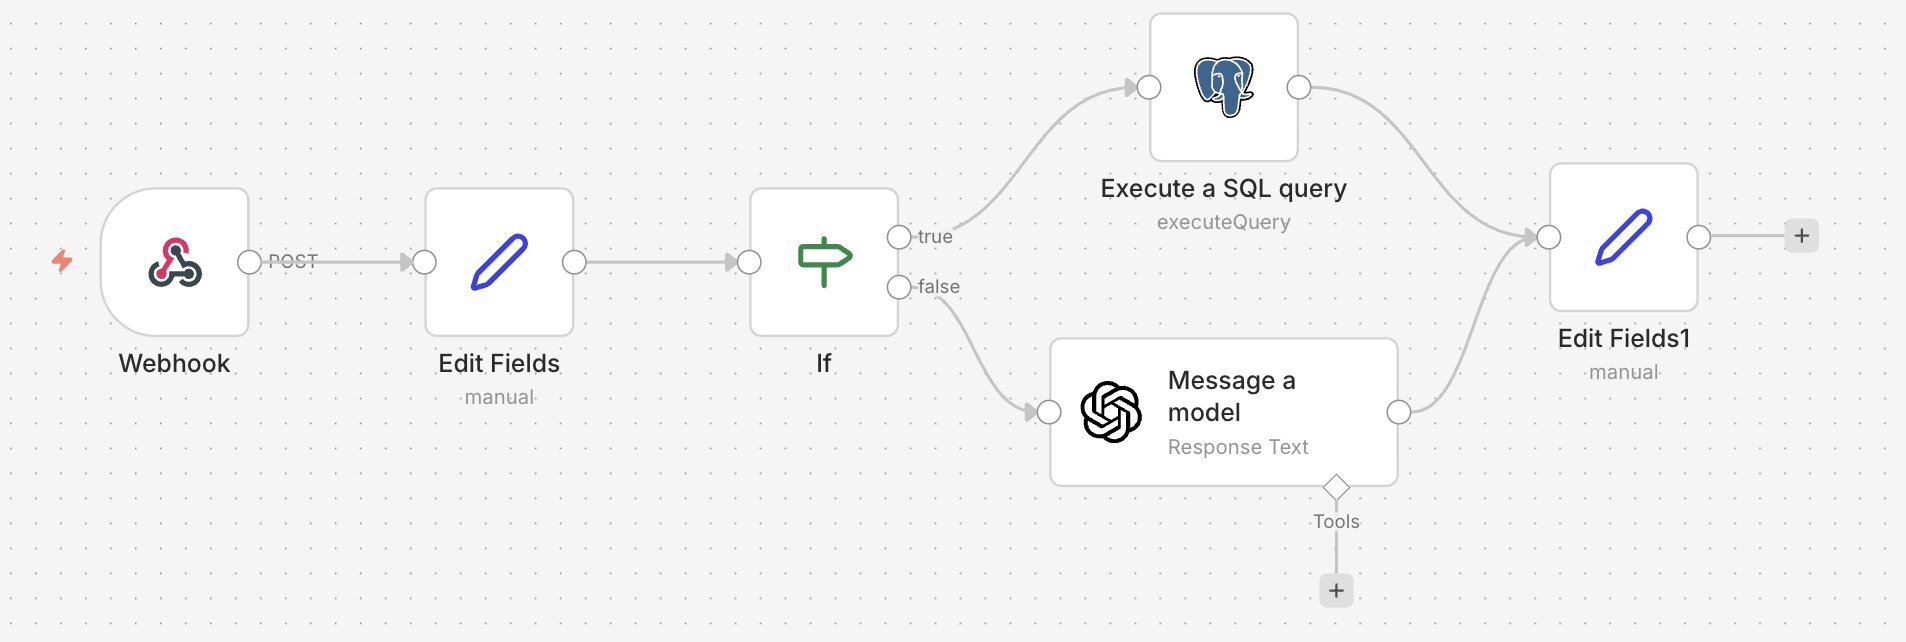
Example 1: FAQ bot for community questions
An FAQ bot automatically answers recurring standard questions. This is especially useful if similar questions about products, rules, opening hours, or processes keep coming up on your server. The AI can interpret an incoming question and answer it in a friendly, concise way. Optionally, you can also retrieve fixed, stored information from a table, a database, or an internal document. This way, users get answers faster without moderators having to respond to every question manually. This saves a lot of time, especially on support or community servers.
Example 2: Moderation bot for pre-checking messages
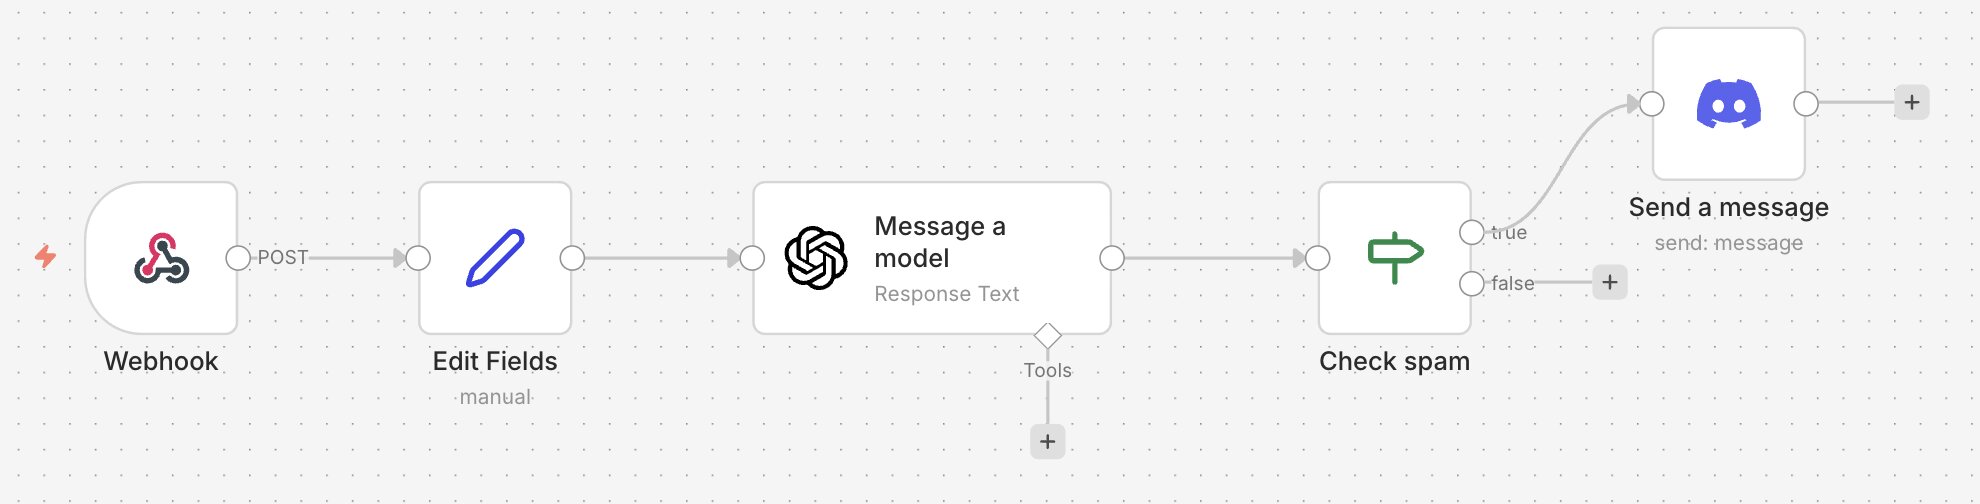
A moderation bot can analyze new messages and detect problematic content at an early stage. The AI can check, for example, whether a message is offensive, spam-like, or off-topic. In n8n, you can then define rules for what should happen in each case. For instance, you can send a warning to a moderation team or forward a message to a review channel. The bot does not replace human moderation, but it can help sort content more quickly. This can significantly reduce moderation effort, especially in larger communities.
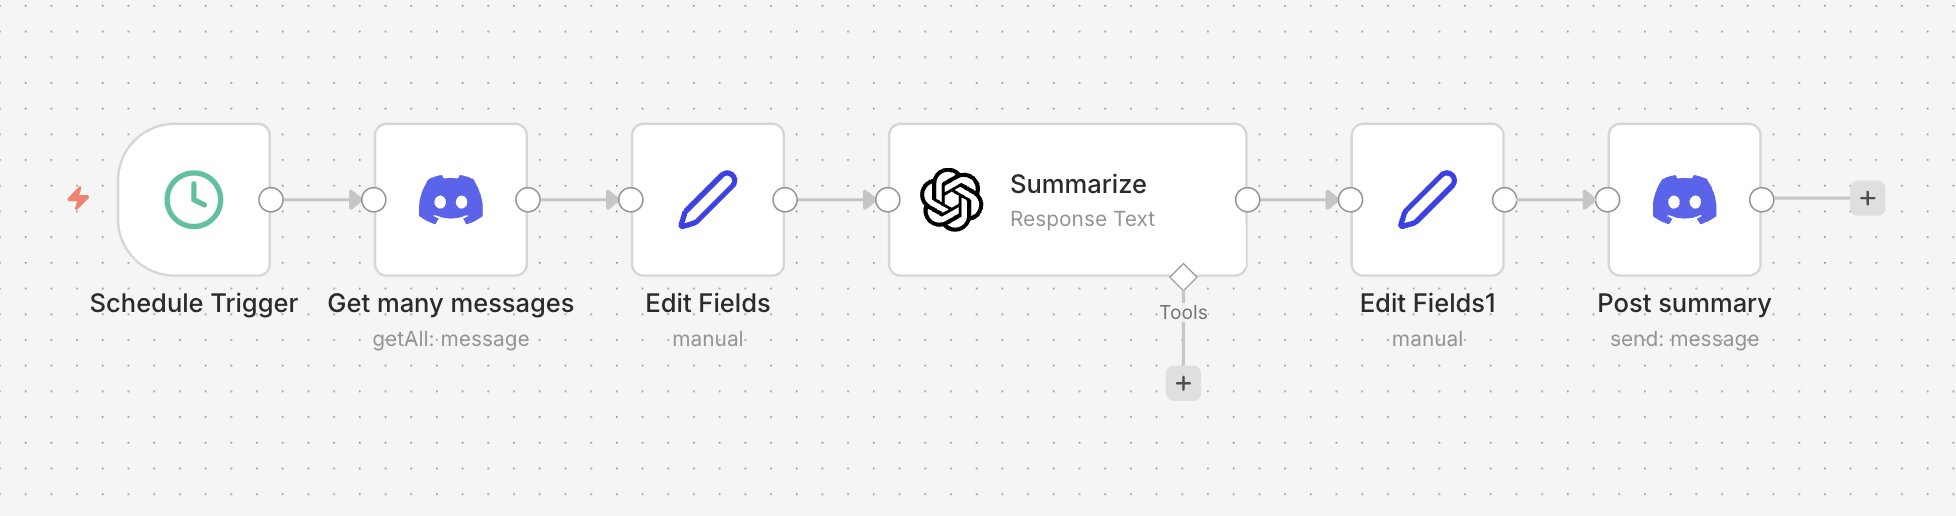
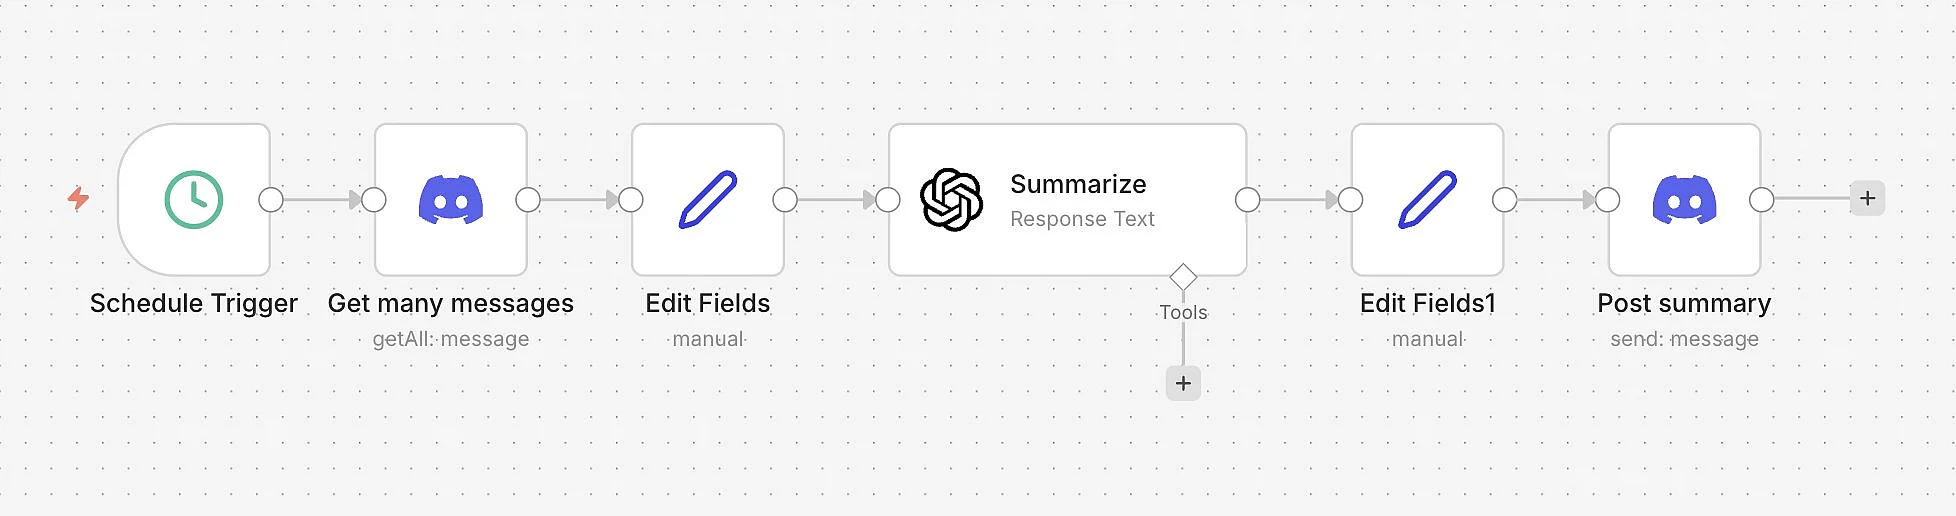
Example 3: Summary bot for longer discussions
On active Discord servers, important information can quickly get buried in long message threads. A summary bot can bundle multiple messages at regular intervals or on request and turn them into a short overview. This is useful for project servers, learning communities, and internal team channels. n8n collects the relevant messages, sends them to the AI, and posts the summary in a defined channel. This saves users from having to read every conversation in full and makes key information easier to find.
Reviewer

Christian Heldmaier
Christian Heldmaier is an experienced online marketing and SEO specialist from Karlsruhe. He has been working as an SEO Manager at IONOS since July 2020.