How to schedule a shutdown in Windows 10
Scheduling when your Windows 10 PC shuts down makes everything more convenient and secure. Simply set a shutdown timer and once your PC has been inactive for a certain period of time, the system will shut down. This protects your PC from unwanted access and unnecessary energy waste. It’s also useful for scheduling an update overnight or when you forget to shut down your PC after finishing work.
How to set the shutdown timer for Windows
The shutdown timer will automatically deactivate the PC’s system after a certain period of inactivity. However, you should be aware that unsaved files or settings may be lost after a scheduled shutdown. This is why it is important to save changes whenever you leave your computer.
Complete the steps below if you want to set a shutdown timer in Windows 10 after a certain amount of time has elapsed. Scheduling a shutdown in Windows 11 follows a similar procedure.
How to set the shutdown timer for your PC using Command Prompt
Step 1: The Windows shortcut [Windows] + [R] opens the Run menu. Use the CMD command “cmd” and confirm with the shortcut [Ctrl] + [Shift] + [Enter] to open the command prompt with administrator rights.
Step 2: Enter the command “shutdown -s -t XXXX -f”. “XXXX” is a placeholder for the specific time in seconds after which your PC should shut down. For example, if you enter “shutdown -s -t 900 -f”, your PC will shut down after 900 seconds, or fifteen minutes. If you replace the “-s” with “-r” in the command, the PC will restart again after a certain period of time. To schedule a specific time of day, enter the command “at time shutdown /s” and fill in the time parameter. For example, if you want your computer to shut down at 10:00 p.m., enter the following: “at 22:00 shutdown /s”.
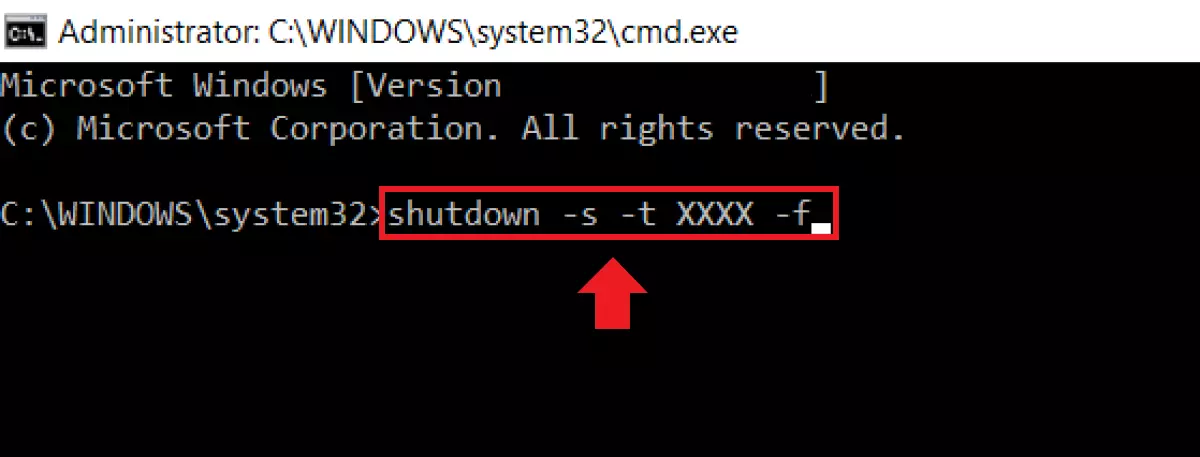
The shutdown command offers other options in addition to scheduling shutdowns. For example, you can define a period of idle time required for a restart, force open applications to close, or activate hibernation mode. You can view the command options by typing “shutdown” and pressing [Enter].
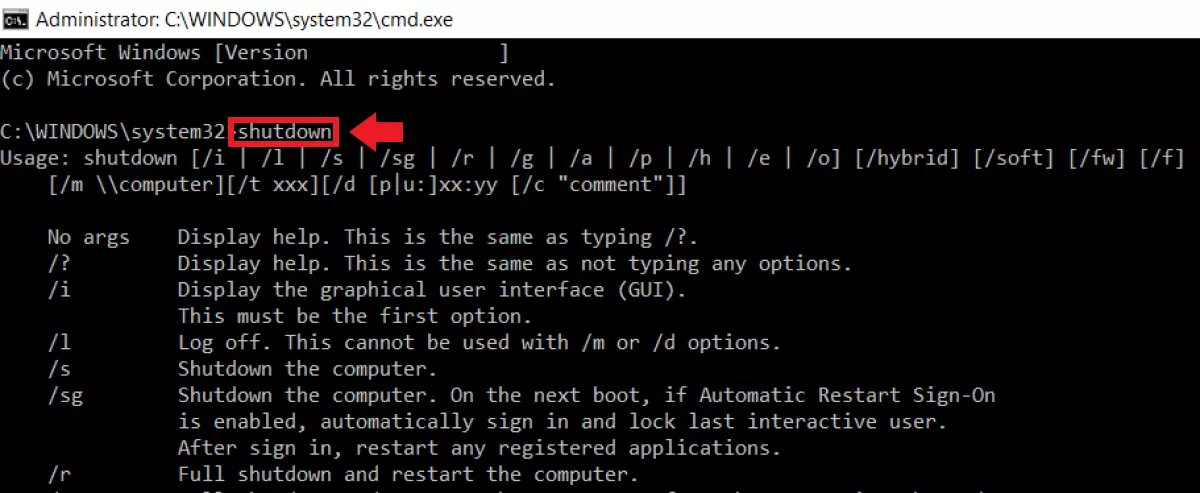
How to set the shutdown timer using the Windows search bar
Step 1: You can use the Windows search bar to bypass the Run dialog and set a time period for shutdown immediately. Enter the command “shutdown -s -f -t (time)”. In the placeholder “(time)”, you can designate how much time (in seconds) should pass before your PC shuts down. For example, enter “shutdown -s -f -t 900” if you want your PC to shut down after fifteen minutes of inactivity. Keep in mind that this is a complete shutdown, and any unsaved changes may be lost.
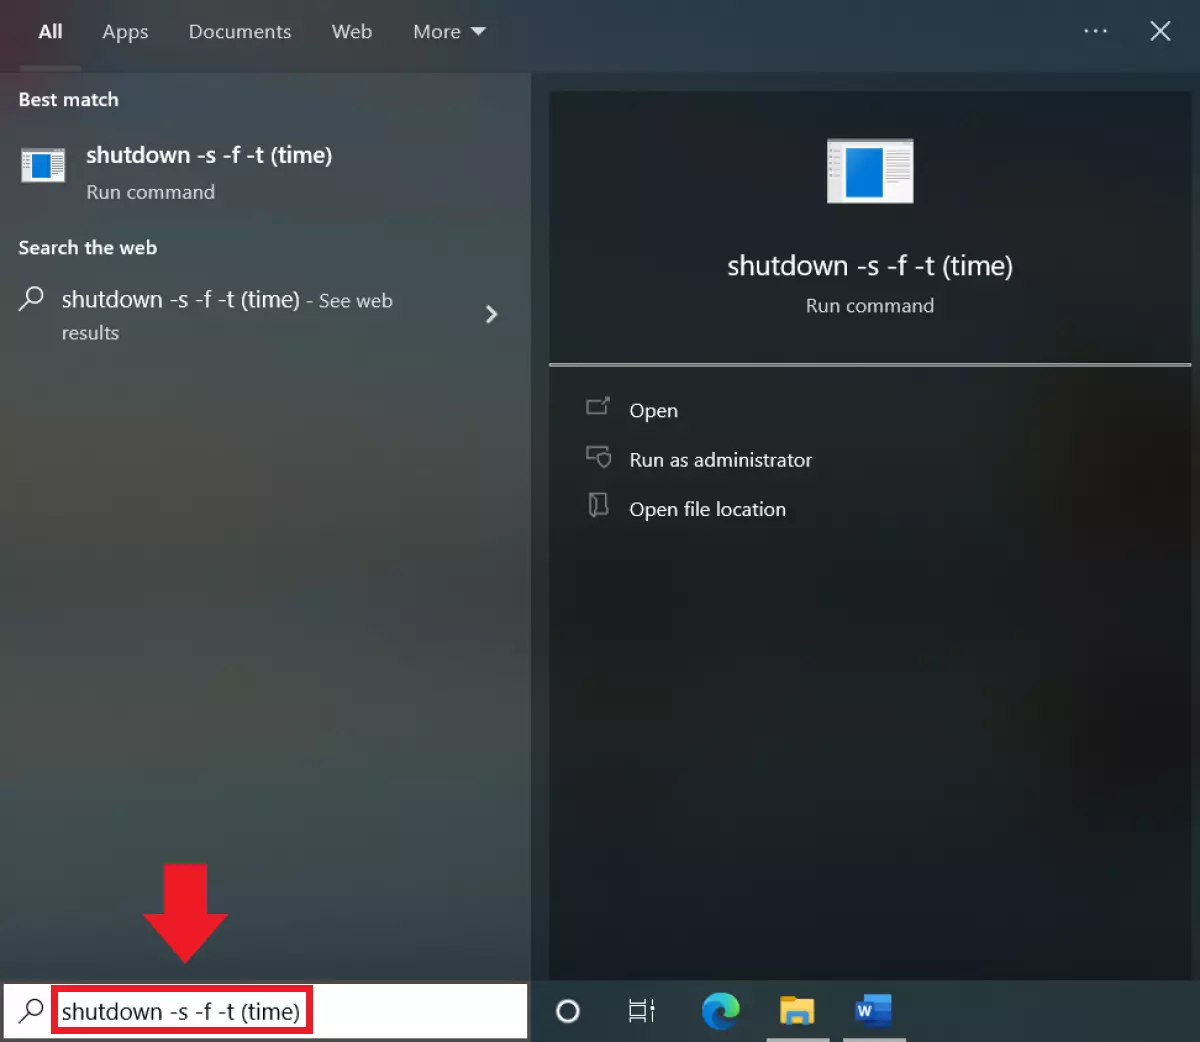
Step 2: If you want to stop a scheduled shutdown, enter the command “shutdown -a” in the search bar. The “-a” stands for “abort”.
How to set the shutdown timer for your PC using Power Options
In addition to giving users the possibility to make Windows 10 faster, the Power Options menu gives users the options to schedule a shutdown, use the hibernate mode in Windows 10, or change startup programs in Windows 10.
Step 1: Type “Edit Power Plan” into the Windows search bar and then click on it.
Step 2: Select Change advanced power settings from the menu window.
Step 3: The Power Options menu will appear. Click Sleep and then click Hibernate after in the dropdown menu. On battery and Plugged in are listed as well. Here, you can set the amount of time in minutes, accounting for differences in power supply.
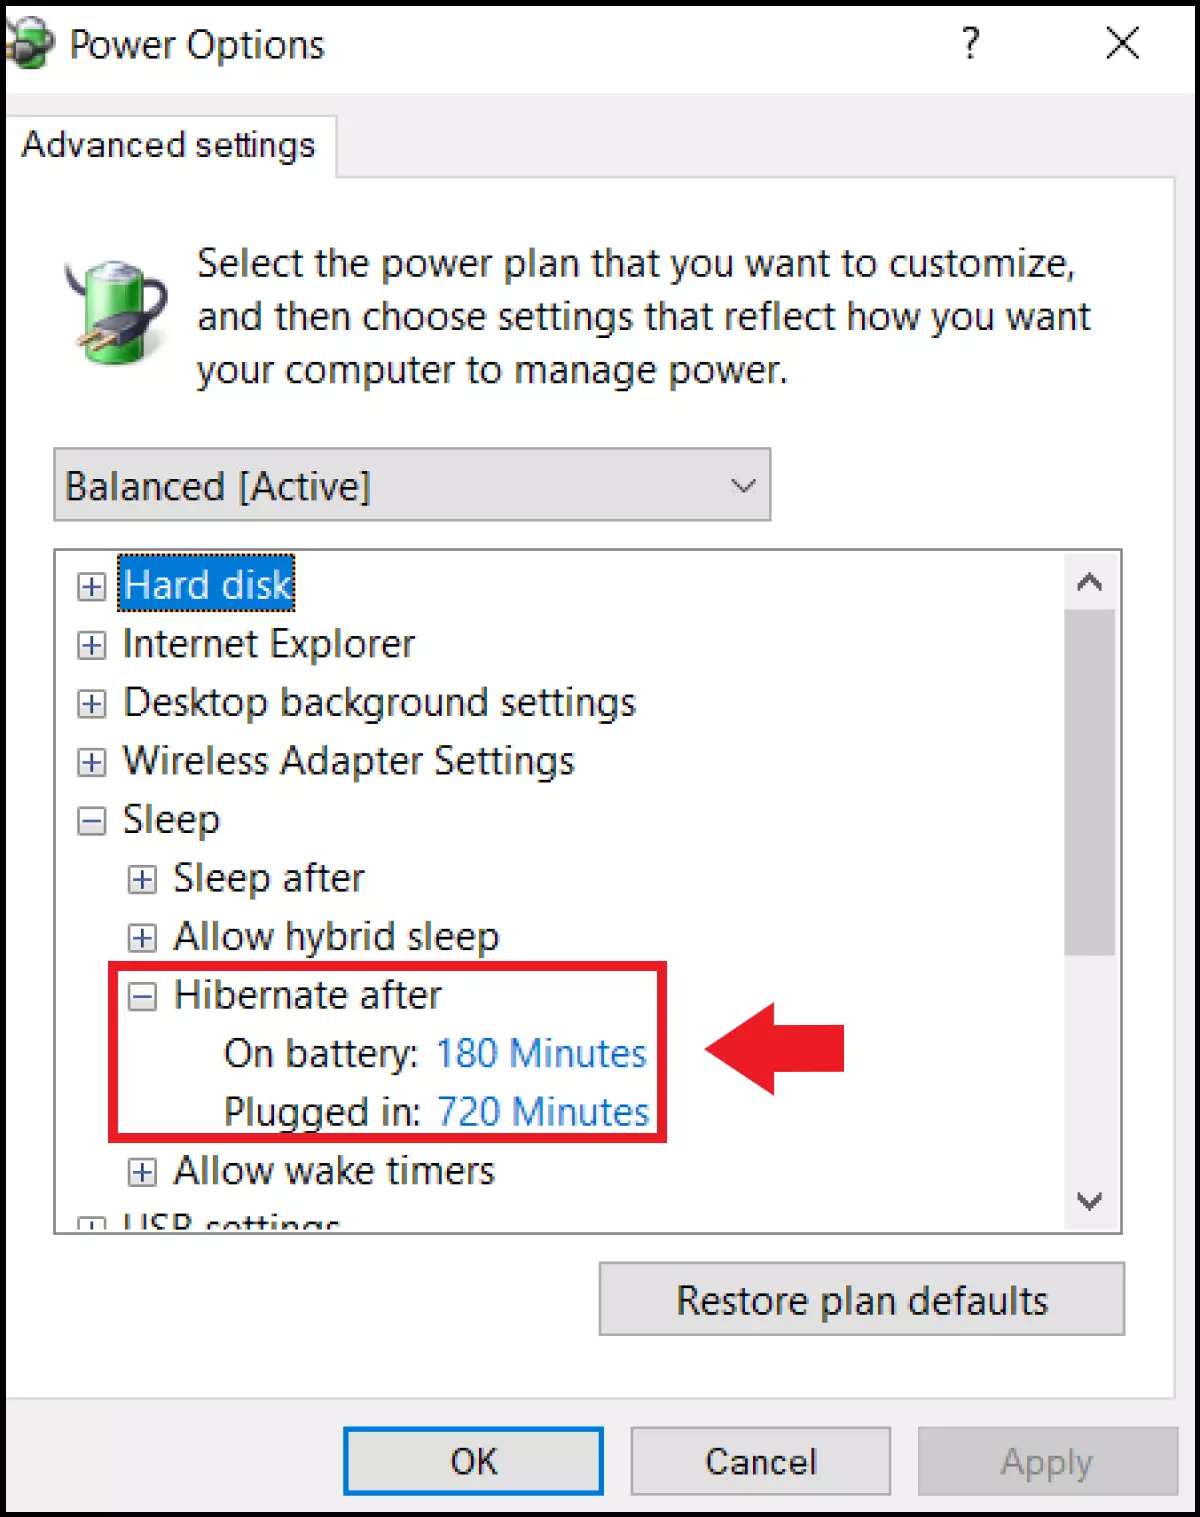
Step 4: Confirm the changes with OK.
How to set the shutdown timer using Windows Task Scheduler
You can use Windows Task Scheduler if you want your PC to shut down not only after a period of inactivity, but at regular intervals or at set times.
Step 1: Type “Task Scheduler” into the Windows search bar to open the menu.
Step 2: Now click on Create Task… in the menu on the right side of the window.
Step 3: Go to the General tab and give the task a name in the Name field. Click on the Run whether user is logged on or not option. This means that the PC will not wait for a login to perform the task. You can also tick the Run with highest privileges box. This ensures that the PC shuts down even if there are active programs. Select Windows 10 in the Configure for dropdown menu.
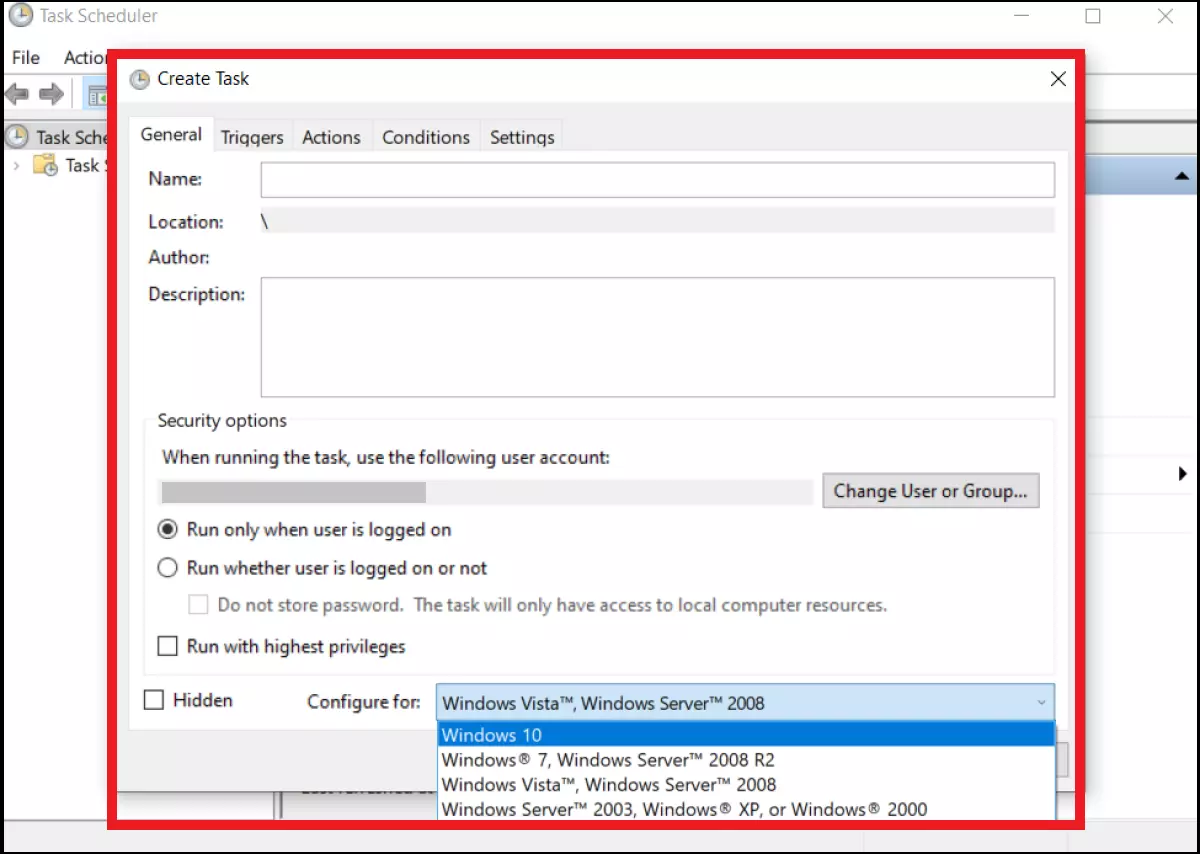
Step 4: Go to the Triggers tab. Click on the New… field. This is used to set a trigger mechanism for the new task.
Step 5: In the dropdown menu next to Begin the task, select On a Schedule. You can decide in Settings whether the task should be completed One time, Daily, Weekly or Monthly. In the menu on the right, you can decide the date and the time the task should start.
Step 6: Check the Enabled box and confirm with OK.
Step 7: Now, it’s time to choose the type of task. Go to the Actions tab and click New…. The menu window New Action will appear. Select Start a program. Enter the command “shutdown” in the Program/script field. Under Add arguments, enter “/S /F” and confirm with OK.
Step 8: Finally, specify the conditions under which the task should take place. Go to the Conditions tab and activate the Start the task only if the computer is idle for option. Enter the time after which the task should be triggered. You should also activate the options Stop if the computer ceases to be idle and Restart if the idle state resumes. Confirm with OK.

