Flush DNS: how to clear your DNS cache
Operating systems such as Windows automatically generate temporary entries of visited websites in a so-called DNS cache. The information contained in the cache is valid for a defined period of time. A DNS flush, i.e. emptying of the cache, removes the data from the system before the time limit expires.
- Simple registration
- Premium TLDs at great prices
- 24/7 personal consultant included
- Free privacy protection for eligible domains
What is a DNS flush?
DNS flush is the process of manually deleting the temporary entries of a DNS cache. Without a direct intervention in the cache, the entries exist until their defined life span (“time to live”, TTL) has expired.
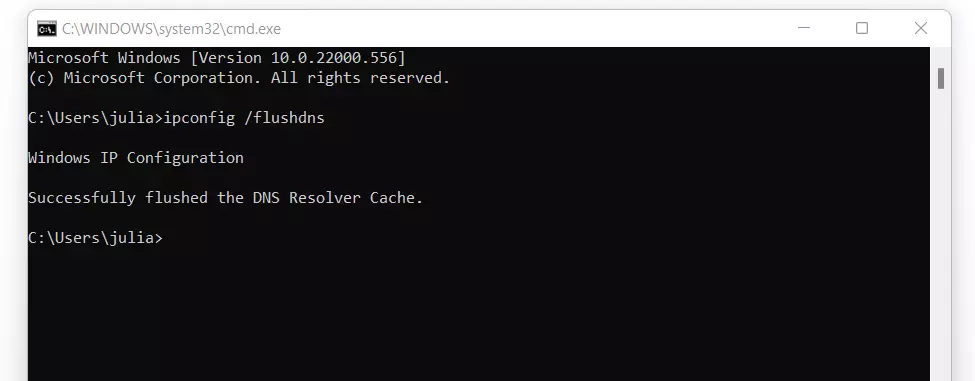
Generally, the deletion process is completed using system-specific flush DNS command line tools. On Mac, for example, you use Terminal and the appropriate command for the particular version of the Apple system. In Windows, you flush the DNS via CMD, i.e. via the command prompt, and using the command “ipconfig /flushdns”.
What is the DNS cache?
DNS servers are used to convert domain names such as www.example.com into numerical addresses. These “name servers” are contacted by default via the browser each time the corresponding projects are accessed, which slightly increases their loading time and can also lead to a DNS server overload in the case of a high number of visitors. Error messages like “DNS Server Not Responding” are a common and despised consequence.
For this reason, operating systems like Windows and macOS attach their own cache for accessed and resolved addresses – the DNS caches. These save all information that’s relevant for name resolution such as an IP address, host names and protocol versions. Each entry remains valid for a given time. Within this time, corresponding queries are answered directly from the cache without requiring a detour to the DNS server.
Various applications, such as web browsers or name servers from Internet service providers, also have their own DNS cache for speeding up name resolution.
Why is a regular DNS flush useful?
There are three reasons for regularly setting the DNS register to zero with a DNS flush, regardless of the actual validity period of the individual records:
- Hide search behavior: Recorded addresses including additional information such as validity period provide an approximate overview of your page history. The more extensive the collection of cached addresses, the more you reveal about yourself.
- Security against manipulation: If cybercriminals gain access to the DNS cache, they could manipulate entries and redirect you to fake websites. So-called DNS spoofin (or DNS cache poisoning) is intended to tap sensitive login data, for example, user details for online banking.
- Solve technical problems: A DNS flush can resolve technical problems when accessing web applications, e.g., if an incorrect version of the called website is displayed due to outdated entries. Following a flush, the request is answered again by the responsible DNS server, and the connection setup to the web project works as planned again.
You can display the DNS cache currently stored on your system at any time. In Windows, for example, simply open the command prompt just as you would for a flush DNS command and enter the command “ipconfig /displaydns”.
Clear the DNS cache: how-to
There’s no rule about when the perfect moment for a DNS flush is – unless there’s an urgent problem that can be solved by emptying the cache. Once you decide to clear the DNS cache, the process is quick and straightforward. Windows users, for example, can proceed as follows:
Step 1: Call command line
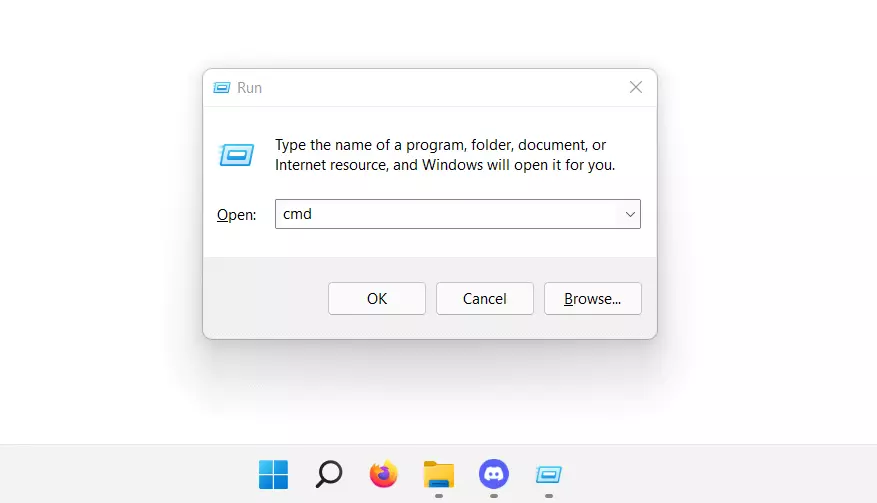
Use the key combination [Windows] + [R] to call the “Run” dialog. Then execute the command “cmd” to start the command prompt.
Step 2: DNS flush with “ipconfig /flushdns”
To flush the DNS via CMD, use the command ipconfig. To do this, enter the following command and confirm it with enter:
ipconfig /flushdnsYou don’t need to worry about a DNS flush having any negative effect on your web experience: after resetting the cache, only the first access of a web project should take a bit longer than usual if it was previously loaded from saved resource records.


