How to print an Outlook email – tips for quick and simple printing
Despite reader-friendly screens and comprehensive storage options directly on computers, on USB sticks, or in the cloud, there are still many users who like to read their emails on paper. With Microsoft Outlook, probably the world’s most popular email program, there are many ways to print out emails. But because the “Print” function in Outlook has taken a back seat in the newer versions in favor of numerous other functions, it’s not so easy for some beginners to print Outlook emails at first glance. We provide tips and assistance.
In addition, in this article we’ll show you how to “pin” your print icons to the toolbar and to the menu bar (ribbon) in Outlook 365. This will increase your ease of use – especially if you frequently print Outlook emails.
- 2 GB+ storage
- Sync across all your devices
- Spam filter and ad-free
Quick instructions: how to print your Outlook emails
The simplest two ways to print emails in an Outlook program installed on your computer are as follows:
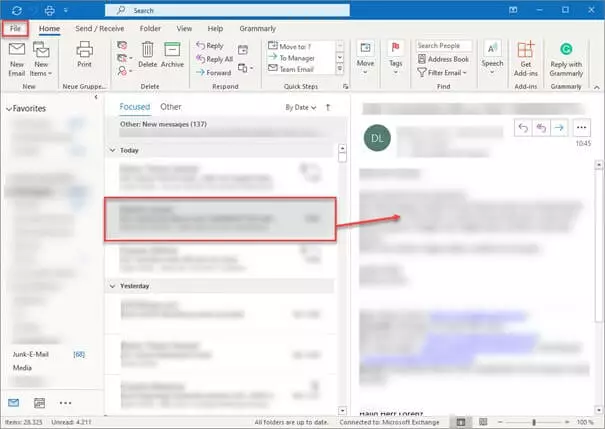
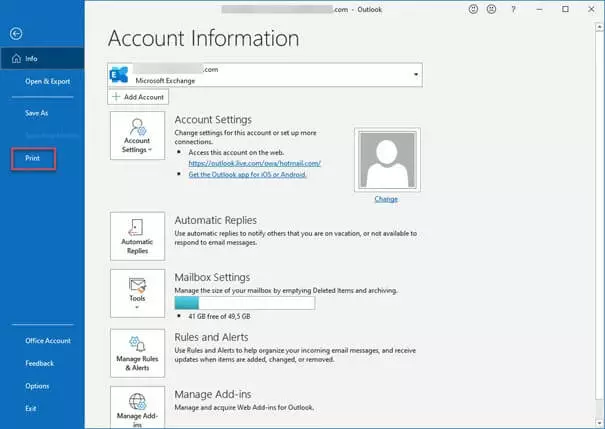
- Print Outlook email via “File” + “Print”: Click on the email to be printed with the mouse pointer, then go to the “File” tab in the Outlook menu bar at the top and select “Print” in the menu that opens.
- Print Outlook email with [Ctrl] + [p]: Click the email you want to print with the mouse pointer and then press [Ctrl] + [p] on your keyboard.
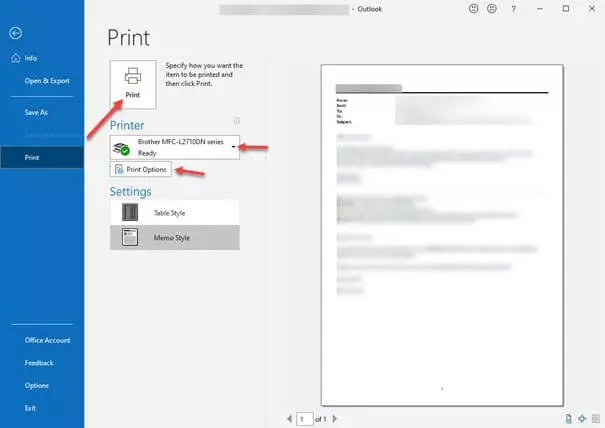
With both options you will reach the “Print” window at the end, where the document you want to print will be displayed again. If you click on the rectangular “Print” box, your Outlook mail will be printed. We’ll explain the process in detail with accompanying screenshots below.
These two options basically work with all Outlook versions installed on a computer – although we are using the current version of Microsoft 365 here. How to print emails in the online version of Outlook is also explained below.
Printing emails with installed Outlook software (Microsoft 365)
Below, we’ll show you step by step how to print your emails if you have Outlook installed on your computer.
Print Outlook emails with “File” and “Print”
This is the most common way to print emails in an Outlook program that’s installed on your computer. Just follow these steps:
Step 1: First, highlight the email you want to print by using your mouse pointer. The email will then appear in the right half of your Outlook window for you to read.
Step 2: Click on the “File” tab in the top-left corner. If you have already opened the email in its own window, basically proceed in the same way – more about this below.
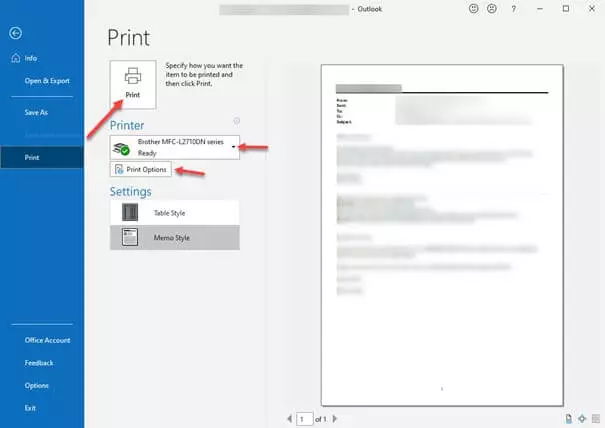
Step 4: Now the window with the title “Print” opens, where you can initiate the printing process. On the right side of the screen, you will see a preview of the email as it will be printed. To print it, simply click on the rectangular “Print” box at the top just next to the sidebar. Below this box you will see the name of the printer that will be used to print the email. If there are several printers connected to your computer, you can select the one you want by clicking on the small arrow. In the “Print Options” area below, you can define additional settings before getting started. For example, if you want to print your email more than once, specify this there.
After you’ve clicked “Print”, your printer should respond and print your email. If this is not the case, please check if the device is connected, switched on, and installed correctly, and if you have selected the correct printer.
If you already have the email you want to print open in its own window, there’s a similar process:
Step 1: Click on the “File” tab in the top left menu bar. Instead of the “Account Information” window, a window will open with special information on your email.
Step 2: In this version, too, you will find the left-hand menu bar with the option to “Print”. Click on this option to reach the “Print” window displayed above. Here you can define your settings and initiate the printing process.
Step 3: Just as described above, all you need to do is click on the rectangular “Print” button to start printing.
Print Outlook emails with the key combination [Ctrl] + [p]
Printing an Outlook email is even quicker when you use the key combination [Ctrl] + [p]. Proceed as follows:
Step 1: Select the corresponding email as described above or open it in a separate window.
Step 2: Press [Ctrl] and [p] simultaneously on your keyboard. As a result, the “Print” window opens directly.
Step 3: You can use the selection fields to define further printing settings. Click on the rectangular “Print” box to initiate the printing process.
Set up print icons for fast printing in Outlook
If you frequently print out emails from Outlook, then you should consider customizing the blue toolbar or ribbon at the top of your Outlook program accordingly.
Add the “Print” icon to the toolbar
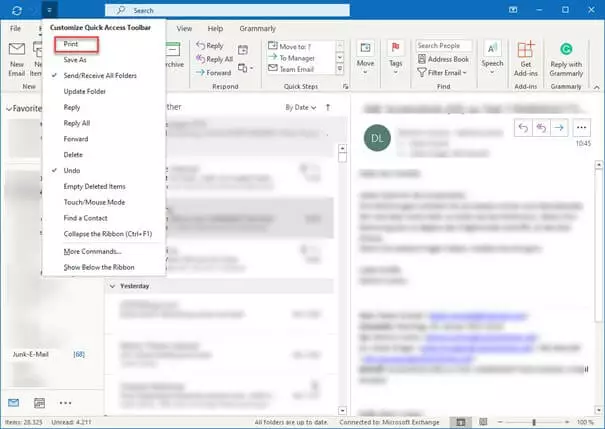
The easiest way to add a “Print” icon is via the blue Outlook toolbar at the very top. To do this, click on the small “Customize quick access toolbar” icon at the top of the blue toolbar in Outlook’s basic settings. This will open a menu where you select “Print”. And that’s all there is to it.
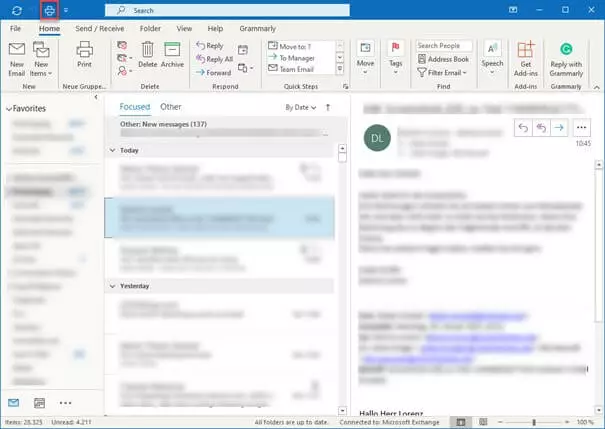
The new “Print” icon is now located in the blue toolbar. Clicking on it will take you directly to the “Print” window, where you can define settings and initiate the printing process. To ensure that the “Print” icon also appears for emails that have been opened in a separate window, you must repeat this process once there. Now, the “Print” icon in the blue toolbar will also appear for all other emails opened in their own window.
Add the “Print” button to the Outlook ribbon
If you prefer to have your “Print” button a bit bigger in the ribbon below the blue toolbar, then this is also possible in a few steps. However, it can get a bit crowded in the ribbon due to the many functions available. Just follow these steps:
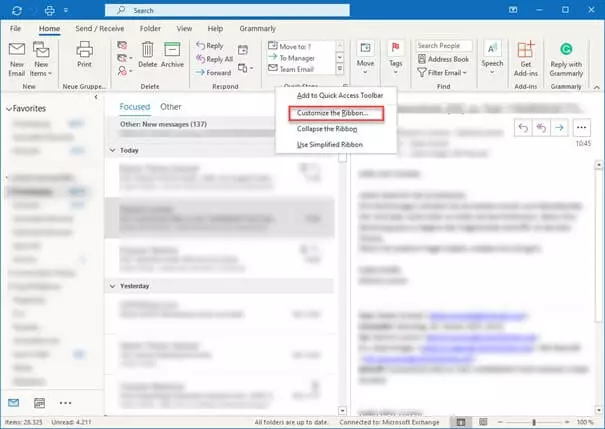
Step 1: Click on the ribbon with the right side of your mouse so that a selection menu appears. In it, click on “Customize the Ribbon...”.
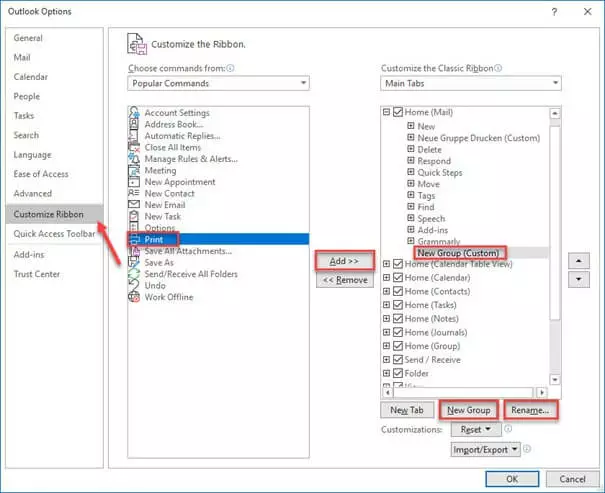
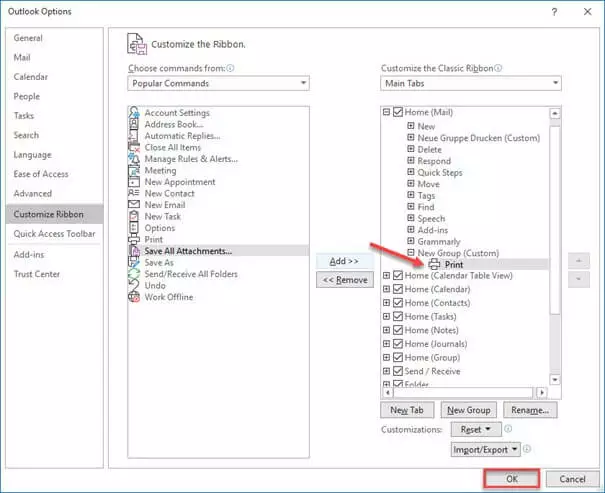
Step 2: After clicking “Customize the Ribbon...” the “Outlook Options” window will open with a sub-menu that contains two columns. Here, you first create a new group by clicking the “New Group” button at the bottom right.
Step 3: “New Group (Custom)” will now appear in the right column. By holding down the mouse button, you can move the position of this new group up or down. This determines where in the ribbon the new item will be seen.
Step 4: Once you’ve marked the new group with a mouse click, you can also change the group name. To do this, click on the “Rename” button in the bottom right. We have given this new group – for the sake of clarity – the name “New Group Print (Custom)”. You can also simply name the group “Print”.
Step 5: Click on the group again and then select the “Print” function in the left of the two columns. Both the new group and the “Print” function are now highlighted in blue and gray. Now, click on the “Add” box between the two columns.
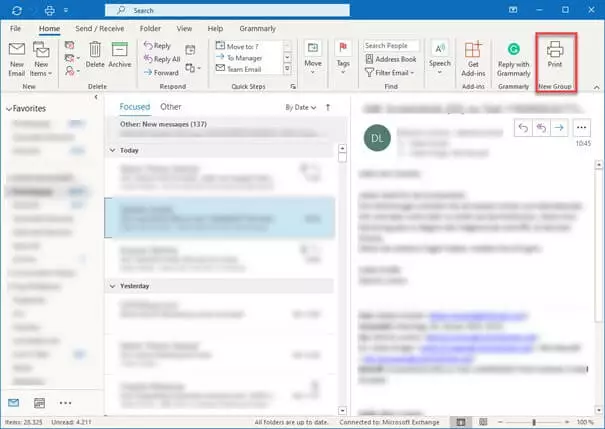
The “Print” command now appears at the top of your ribbon. Its position depends on where you positioned the new group during setup. Clicking on the “Print” icon will take you directly to the “Print” window, where you can initiate the printing process.
In order for the “Print” command to appear even if you open an email in a separate window, you must repeat this process in the ribbon for an individually opened email.
- Store, share, and edit data easily
- Backed up and highly secure
- Sync with all devices
Printing Outlook emails – online
If you have your own Microsoft account, then you usually also have access to the web version of Outlook. You can easily access it by going to outlook.com and logging in or registering a new account.
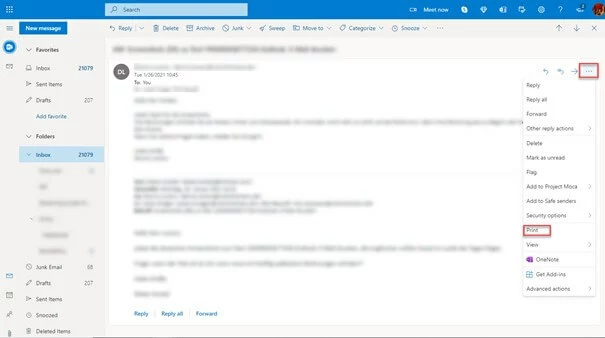
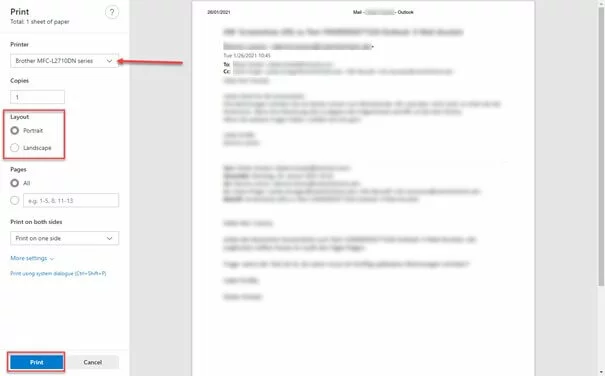
The easiest way to print an email in the web version of Outlook is to open it and then click on the small three dots in the upper-right corner. Once you’ve done that, a menu will open where you can go to “Print”.
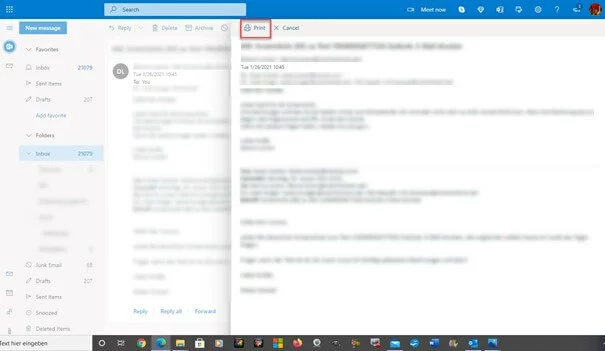
Next, a separate window with the title “Print” opens. Similar to the Outlook versions on the computer, you can define a couple of settings before finally clicking on the “Print” button at the bottom to start the printing process.
There are also other ways in the web version of Outlook to get to the “Print” window, for example via the previously mentioned key combination [Ctrl] + [p] or via the right mouse button. However, when you opt for one of these, it can happen that the email isn’t displayed completely and things like Outlook smileys are missing. So, before launching your printing process, make sure to check the print view of your email.
Microsoft Outlook on the desktop or online?
In general, the web version of Outlook should be seen as a slimmed-down version and an interim solution. It is useful, for example, if you want to check your emails on the go or from a different computer. However, anyone who works with Outlook on a regular basis will not be able to avoid the desktop version. Nowadays, it offers numerous options to customize how your emails are managed exactly to your needs – for example, the ability to create Outlook rules, to set up Outlook read receipts, or to archive emails with Outlook.
If you’re looking to flexibly store your files online, then HiDrive Cloud Storage from IONOS is also an option worth considering.
Are you working with a very limited budget? Naturally, you can also test out one of many free Outlook alternatives.


