How to connect a Shopify domain
With a custom Shopify domain, your online store gets a meaningful and professional looking web address. Once you’ve purchased a domain for Shopify, you can link it in just a few steps via the settings.
How to set up your Shopify domain quick guide
- Register a suitable domain for your Shopify shop.
- Navigate to the Domains menu in the Shopify settings.
- Click on Connect existing domain and enter the registered domain.
- Verify the connection by updating the DNS settings in your domain provider account.
- Free Wildcard SSL for safer data transfers
- Free private registration for more privacy
- Free 2 GB email account
How to buy a Shopify domain
Shopify offers its own domain service, which you can use at any time to purchase an address. However, this domain cannot be easily used for other web projects – a domain transfer is required for this. For greater flexibility using your domain, it’s recommended to go through a domain registrar like IONOS.
When picking a domain name, the more it fits your store, the stronger the marketing impact will be. Choosing a top-level domain like .shop, .store or .boutique can give your Shopify domain that perfect finishing touch. The registration process is quick and usually takes just a few minutes. Here’s how you can get your unique web address with IONOS:
- Open the IONOS website in the browser of your choice.
- Click on “Domains & SSL” at the top and select “Domain Names” from the menu.
- Use the domain checker to find your desired address (subject to availability).
- To purchase the desired Shopify domain, simply add the address to your shopping cart and complete the checkout process.
After the purchase, you’ll receive a confirmation email along with your account details for logging into your IONOS customer account. From the web profile, you can manage all important settings, including connecting your Shopify store with the domain.
How to set up your Shopify domain step by step
To link Shopify with your domain, you need to set up domain forwarding. This configuration is done in the account of the provider where you registered your web address. Below are the steps for IONOS customers, but the process is similar for most domain registrars:
Step 1: Access Shopify settings
First, open the Shopify website and log in with the account you use to manage your shop. Once logged in and you see the administration panel, click on the Settings button at the bottom left to access the general options for the shop platform.
Looking to try a different eCommerce solution? Check our separate article on the best Shopify alternatives.
Step 2: Start the Shopify domain connection
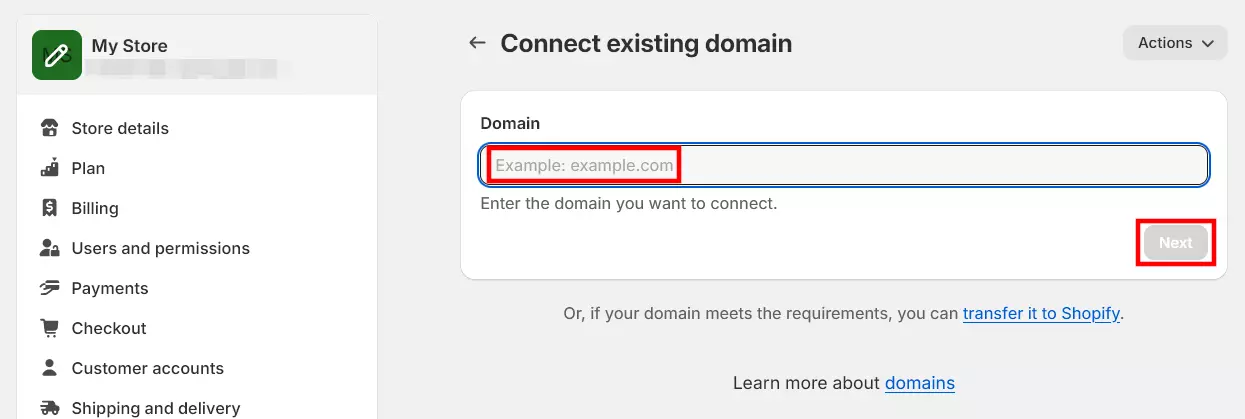
Among the numerous options, you’ll find the entry “Domains”. Clicking on this menu item will take you to the domain menu, where you can purchase a domain via Shopify and connect an existing domain. Since you already own an address, click on the button of the same name “Connect existing domain”.
Enter the Shopify domain you purchased and click “Next” to connect.

Step 3: Connect domain with Shopify
As a final step, activate the Shopify domain link from your customer account. Click the “Automatically connect” option from the menu of the eCommerce platform. Alternatively, follow the link in your IONOS account to connect Shopify and your domain.
Finally, select the domain you’ve registered and previously specified in the Shopify settings. Click “Connect” to ensure that the necessary adjustments are made to the A record and CNAME record. Your online store is now linked to your own domain in Shopify.

The domain is now connected to your Shopify store. A summary of the individual steps can be found in the “Connect domain to Shopify” instructions in the IONOS Help Center.

