How to set up a Valheim server using Docker
If you use the right container, you can install and set up Valheim on Docker and enjoy this Nordic open-world survival game even more. The most important thing is that you have a good server and the right hosting hardware to host the container.
Valheim Docker server on your own PC or in a data center?
If theory, you can run a dedicated server for Valheim using your personal computer while you take part in the multiplayer adventure on the same device. However, this will use a large amount of your PC’s resources. We’d only recommend you doing this if you have a high-end PC. Although the problem with this is that as soon as you shut down your PC, the Valheim server will no longer be available.
But, if you choose to host the server elsewhere you can keep the application running and keep it online. On top of that, by using a professional data center you will benefit from top-class broadband connectivity which far exceeds those speeds offered via a private connection and give you the best gaming experience.
What are the system requirements for a Valheim server on Docker?
The requirements for installing a Valheim server on Docker depend on three different things, which are the Docker engine, the Valheim server and the operating system. You will need sufficient CPU, memory and hard-drive memory to cover your needs for all three. When it comes to Valheim, it also depends how many players are actively on the server and whether you’re using any mods.
You should have the following minimum system requirements in any case:
- Processor: 2.4 GHz (2 vCores) for 2–3 players; 2.8 GHz (4 vCores) for 4 or more players
- RAM: 4 GB RAM for 2–3 players; 8 GB RAM for 4 or more players
- Hard disk drive: 60 GB+
When it comes to the operating system you have the choice between classic Linux distributions such as Ubuntu or Debian or Microsoft servers (from Windows Server 2016). The majority of the available Valheim Docker container images as used in this tutorial are assuming you use UNIX/Linux systems.
If you want to create your own server without Docker or Windows, then read our article “Creating a Valheim server”.
Set up a Valheim server with IONOS
You can rent hardware to set up your own gaming server with IONOS. To do so you have three different options with their own characteristics, such as price and performance. In each case, you’ll be guaranteed an external broadband connection of at least 400 Mbit/s.
- vServer (VPS): You can use our vServer (VPS) for a complete virtualized hosting environment. This means multiple customers share the same hosting system. This is for a fixed monthly price.
- Cloud server: The cloud servers from IONOS are also completely virtualized. This means that the resources come from the cloud via multiple host systems. You will be billed by the minute for the services you use.
- Dedicated server: With a dedicated server from IONOS you rent a fixed hardware setup”. The enterprise components (high single-core CPU) can only be used by you. This is also billed by the minute.
With a dedicated server from IONOS you get much more than a Valheim Docker setup. You can use it for other gaming servers or other applications.
Possible Valheim Docker scenarios and suitable IONOS offers
The most important aspects when it comes to the server are the number of players and mods. Other important features when choosing the right option include whether the server should be available 24/7 and if you want to use it for other purposes. The following table contains some examples so you know which IONOS option would be best for you.
| Valheim Docker server | Suitable IONOS option (with Linux operating system) |
|---|---|
| 1–3 players; permanently online | Virtual Server Cloud L (VPS L) |
| 4–5 players; using mods; always online | Virtual Server Cloud XL (VPS XL) |
| 6–10 players; using mods; occasionally or always online | Dedicated Server AR6-32 SSD |
Step by step to setting up your Valheim server on Docker
As soon as you have decided on your hosting solution and have your login details you can begin setting up your own server for Valheim using your Docker container. In the following tutorial we will set out what you need to do. These examples are primarily aimed at IONOS customers using cloud server, vServer or dedicated server and the Linux distribution Ubuntu (20.04).
Step 1: Connect with your rented server
To install the Docker engine and the server on your rented hardware, you need to create a remote connection to it. As a IONOS customer you can create a remote connection directly via your browser using your web-based customer portal. To do so you can use the built-in KVM console.
Just follow these steps to create a remote connection to your Linux server.
- Log in using your personal data to the IONOS login page.
- Click on “Servers & Cloud”.
- Select your IONOS plan and where you wish to install the Valheim Docker server.
- Click on “Actions” and select “Access KVM Console”.
- Log in using your “Server login data” which you can find on the “Login data (username and initial password)” overview page.
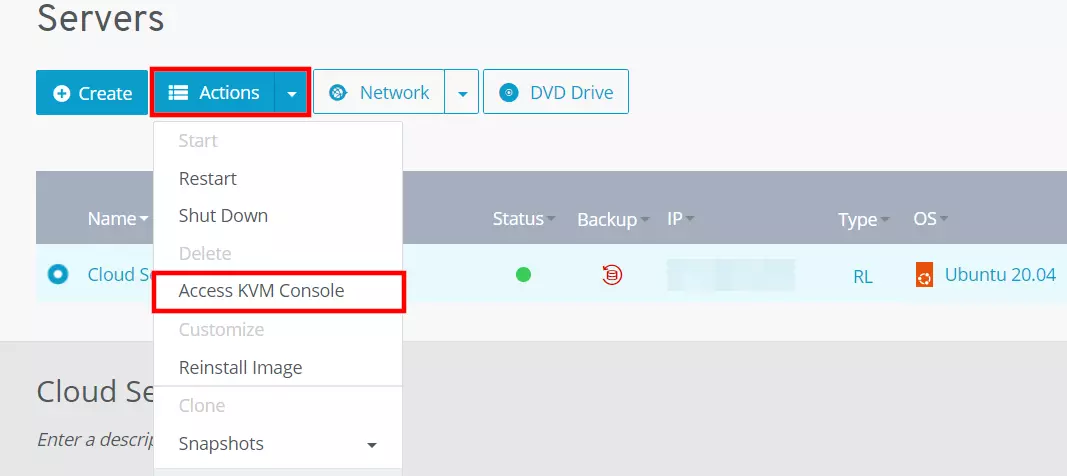
You can also connect to your Linux server using classic desktop clients such as SSH, if you want to avoid using the IONOS Cloud Panel.
Step 2: Set up the Docker engine directory
Once you’ve logged in to your Linux server you will need to set up the directory for the Docket container engine from the terminal. The first thing you’ll need to do is update the Packagemanagers apt directory:
sudo apt-get updateTo access the Docker files using HTTPS, you’ll then need to install some packages:
sudo apt-get install \
    ca-certificates \
    curl \
    gnupg \
lsb-releaseThe second to last step is to add the security key (GPG) for the Docker engine:
sudo mkdir -p /etc/apt/keyrings
curl -fsSL https://download.docker.com/linux/ubuntu/gpg | sudo gpg --dearmor -o /etc/apt/keyrings/docker.gpgFinally you can set up the Docker directory:
echo \
 "deb [arch=$(dpkg --print-architecture) signed-by=/etc/apt/keyrings/docker.gpg] https://download.docker.com/linux/ubuntu \
$(lsb_release -cs) stable" | sudo tee /etc/apt/sources.list.d/docker.list > /dev/nullStep 3: Install Docker
Once you’ve prepared the directory, you need to update the package index again:
sudo apt-get updateBy using this command, you can get the latest version of the engine (including all containers and Dockers) on your system:
sudo apt-get install docker-ce docker-ce-cli containerd.io docker-compose-pluginYou can check the success of the installation by starting the “Hello World” container which should reply simply:
sudo docker run hello-world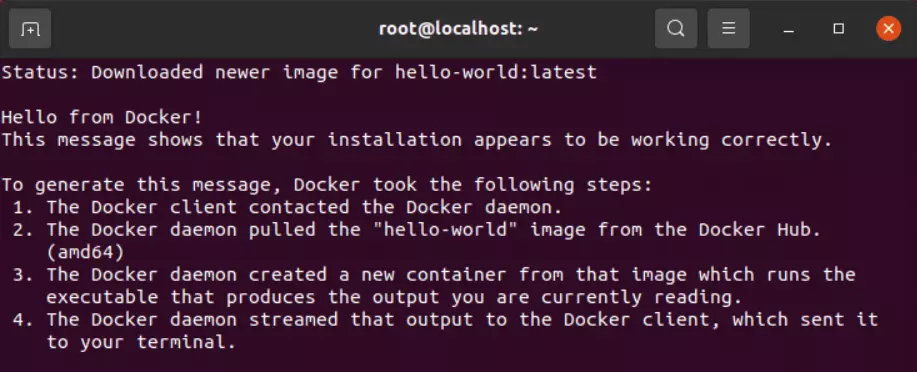
In the Docker tutorial you will get a full guide on how to use the container software as well as other useful tips on installing and using the engine on Linux.
Step 4: Install the Valheim server via the Docker container
By using the engine and the matching container you can now install your Valheim server. We’re using the Valheim Docker image from lloesche, which you can integrate using the following pull command:
docker pull lloesche/valheim-server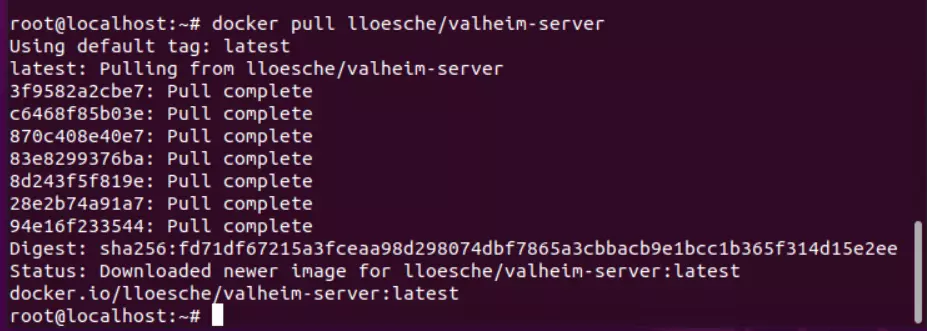
Step 5: Open ports
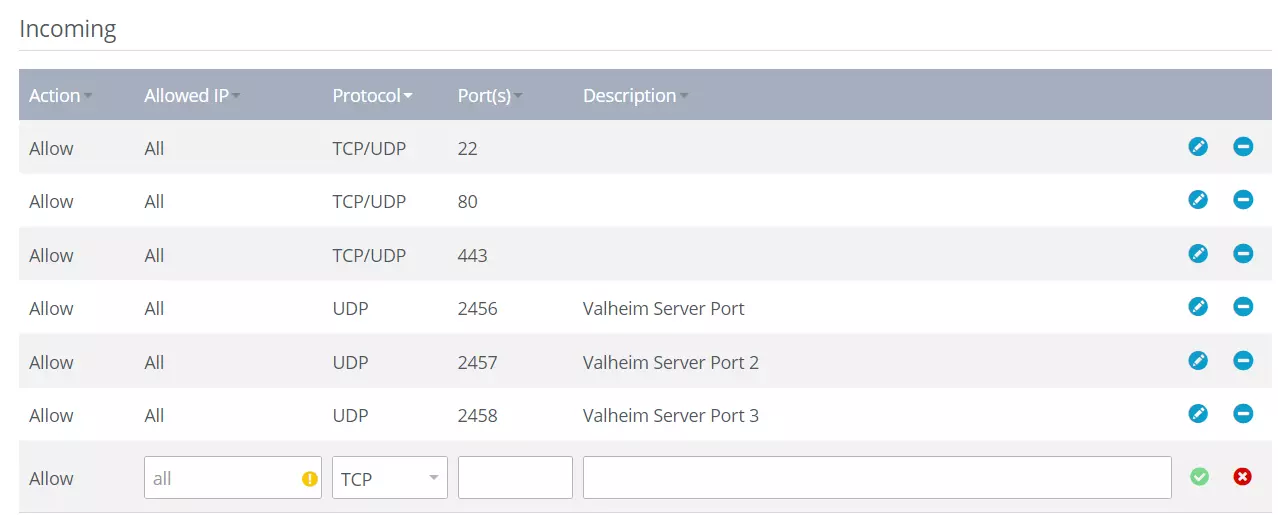
So that you can communicate with the server and it appears in the list of public servers, you need to change the port settings and open UDP port 2456 to 2458. IONOS customers can easily do this using the Cloud Panel.
- Log on to the IONOS Cloud Panel an.
- Select “Servers & Cloud”.
- Click on the server where you set up the Valheim Docker installation.
- From the menu on the left-hand side, click on “Network” and go to “Firewall rules”.
- Under “Incoming” create the rules for the three UDP ports 2456, 2457 and 2458. Use “Create rule” to save the changes to the firewall settings.
- Wait a couple of minutes so that the server ports are open for online connectivity.
Step 6: Configure and start your Valheim Docker server
In the user directory you can now create a new directory for the configuration file for your server. To do so, use the following command:
mkdir valheim-server-configFor the basic configuration you can now start the Valheim server on the Docker image with the following settings:
docker run -d --name valheim-server -p 2456-2458:2456-2458/udp -v $HOME/valheim-server-config:/config -e SERVER_NAME="Server name" -e WORLD_NAME="World name" -e SERVER_PASS="Server password" -e SERVER_PUBLIC="true" lloesche/valheim-serverYour server will now be set up in the directory you stipulated. It will contain the server ports and the four settings needed to recognize the server:
SERVER_NAME: In between the quotation marks you can enter the name of your Valheim server.WORLD_NAME: You can use this parameter to name your game. Here you also need to enter the name between the quotation marks.SERVER_PASS: Now you can set a password for your game which players need to enter to connect to your server. This needs to be between the quotation marks.SERVER_PUBLIC: Use this parameter to display your server publicly. If you don’t want to do this, simply ignore this setting.
Step 7: Connect to your installed Valheim server
You can now use the Valheim server you created at any time. Start the Valheim client and click on “Start Game”. Select the character you want to use or choose a new one. Since you don’t want to create a new world, simply click on “Cancel” in the next step. Instead, choose “Join Game” and do one of the following to connect to your game:
- Select “Community” and look for your server using the filter function. Remember that you need to have added the SERVER_PUBLIC setting. It might take a while until you see your server in the menu.
- Then click on “Add server” and enter the IP address of your server with the corresponding port. Finally click on “Connect”.
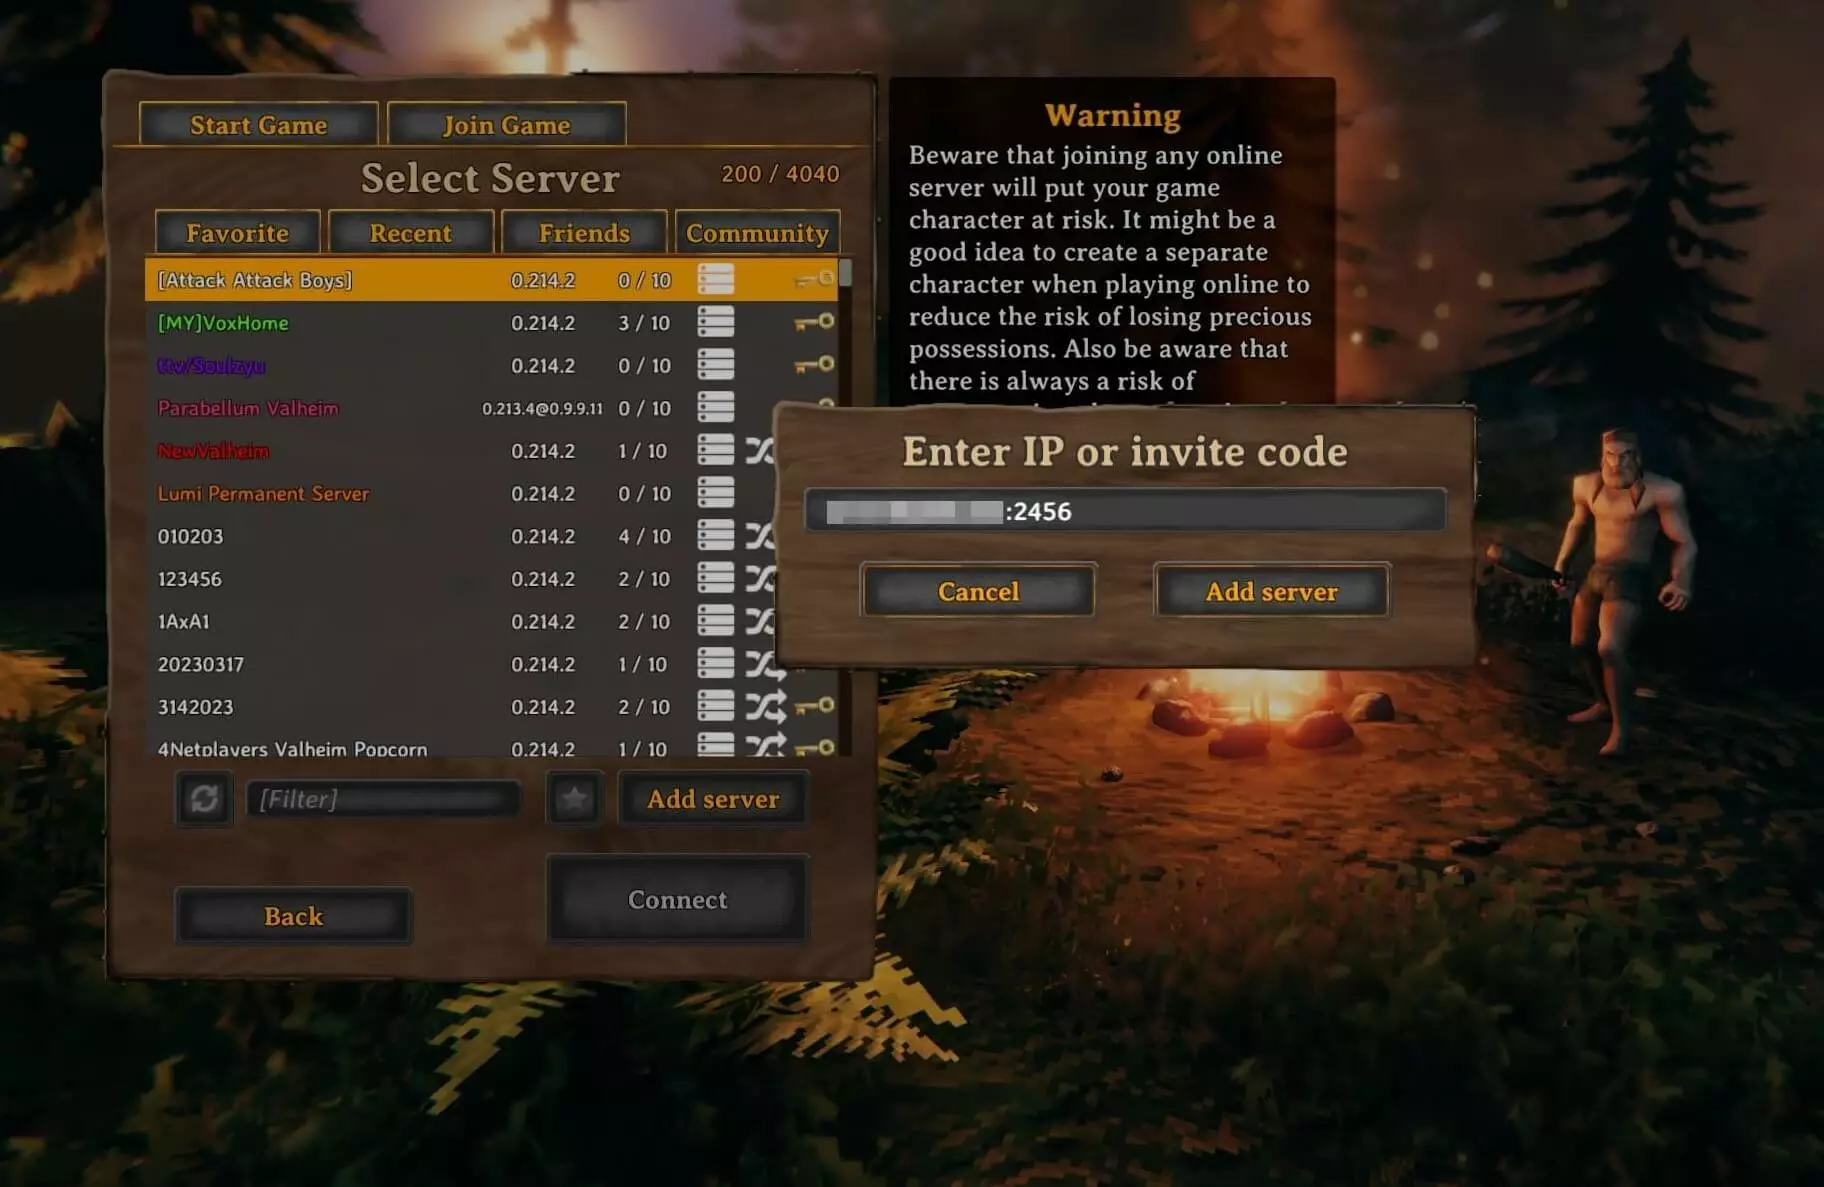
After a short connection and when set up, you will be able to use the password to enter your Valheim world. As long as your coplayers have entered the server name and password, you will be able to play together.
