SteamCMD: how to install the command line client
SteamCMD is quick to install on Linux and Windows. Simply download the appropriate installation package and unpack it to a directory of your choice. Initiate the installation via steamcmd.exe. In combination with the appropriate server hardware, you will generate the perfect basis for hosting dedicated servers of popular Steam games.
Try out your VPS for 30 days. If you're not satisfied, you get your money back.
Install SteamCMD: step-by-step tutorial for Windows and Linux
SteamCMD is the command line version of the Steam client. The tool is used to download dedicated server applications of popular Steam games quickly and easily for running your own Valheim server or Rust server, for example. Below, we explain how to install the application on Windows and Linux step by step.
Install and update SteamCMD on Windows
First, create a directory for SteamCMD, for example, under C:\.
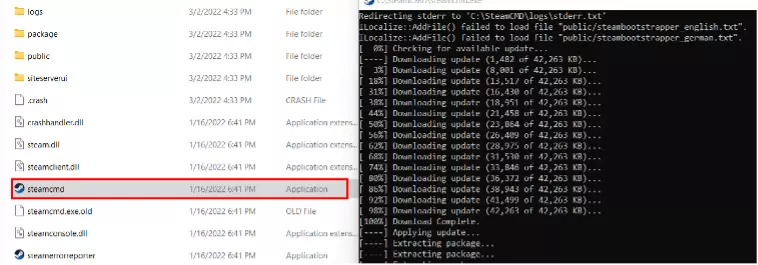
C:\steamcmdDownload the installation package to the directory. To do this, click on the SteamCMD download link. Once downloaded, simply open the ZIP file or unpack it.
Double-click on the steamcmd.exe to begin downloading the additional SteamCMD files and installation of the command line client. Windows automatically launches the command prompt for this purpose.
Following installation, you’ll see the Steam input line “steam>”. To shut down the tool properly, type the command “quit” into this line.
If you wish to update the software at some point later, simply restart steamcmd.exe. Each restart of the client is preceded by it checking for updates.
Looking to host a dedicated server of your favorite Steam game? With IONOS you can rent your own Gameserver to prepare the hardware for your online adventure.
Installing SteamCMD on Linux
It is recommended not to run SteamCMD as a root user on Linux devices. Therefore, first you should create a new user named “steam” and add a password for using the command line client. To do this, open the terminal and run the following commands:
sudo useradd -m steam
sudo passwd steam
Then create and swap to a new designated directory for SteamCMD:
cd/ home/steamIf you are using a 64-bit system, run the following commands in order to add the Multiverse repository, upgrade the system, and download the SteamCMD installation file:
sudo add-apt-repository multiverse
sudo dpkg --add-architecture i386
sudo apt update
sudo apt install lib32gcc-s1 steamcmdIn other system architectures, the command “sudo apt install steamcmd” is sufficient to install the command line application.
Now link the downloaded file to run the SteamCMD installation on Linux to the new directory:
sudo ln -s /usr/games/steamcmd /home/steam/steamcmdLog in with your previously created user account:
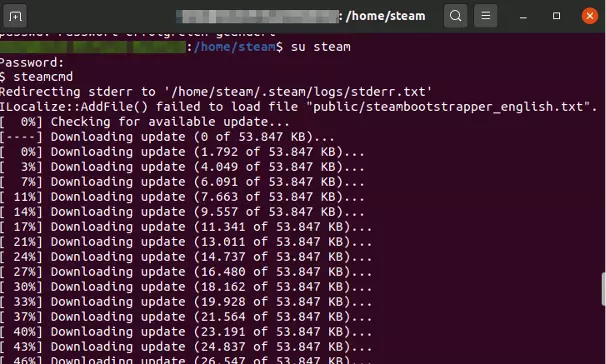
su steamOnce logged into the Steam directory, begin installation:
steamcmdFollowing successful installation, you will see the Steam input line “Steam>”. Close the tool with “quit”. During each restart of SteamCMD, i.e., whenever you login using your account details and enter “steamcmd” in the SteamCMD directory, the system is automatically updated.
Get the “SDL not found” message when you restart SteamCMD on Linux for the first time? This means that the library with the same name (Simple DirectMedia Layer) is not installed. Under Ubuntu, use the “sudo apt-get install libsdl2-2.0” command to install it!
Create your own gaming server with SteamCMD and IONOS
As previously mentioned, SteamCMD is the best place to download dedicated server applications of various Steam games. In this capacity, the command line client is almost indispensable when setting up multiple gaming servers. Usually, you just need the appropriate server hardware and server operating system and in rare cases a valid license for the desired game.
Want to host your own solution for group chats and calls? Learn how to create a TeamSpeak server with our guide.
In principle, you could install SteamCMD and the respective server on your PC. From a performance point of view, however, it is advisable to rent resources from a provider. IONOS, for example, offers three server models with different performance plans to this end. Find out more about them in our summary.
Cloud Server
Want to set up a new gaming server for a small group of players, without committing to using a server? You can’t go wrong with a Cloud Server from IONOS. The virtual resources are shared with other users and billed by the minute. So, you only pay when the server is actually running.
vServer (Virtual Private Server, VPS)
Have a more precise ideas of the gaming server(s) you need? Want to host via SteamCMD and know how many players there are? Reach for a vServer from IONOS. The hardware of this server model is also virtualized. It is billed at a fixed monthly rate which makes the plan a better option for those running servers all the time.
Virtualization technology of IONOS cloud servers and vServers lets you increase CPU, RAM, and disk space as and when you need them. You are just as flexible in scaling back on performance.
Dedicated Server
A dedicated server is recommended for an ambitious multi-server scenario. In this case, you access powerful hardware reserved exclusively for you that handles parallel operation of various server instances. Because of high single-core power, the dedicated server is the best choice for hosting gaming servers designed as single-core applications such as a CS:GO server.
100 percent enterprise hardware, unlimited traffic, and billing by the minute. With a Dedicated Server from IONOS, you have access to state-of-the-art storage and processor technologies with top connectivity and flexible pricing structures.


