How to create and host an Abiotic Factor server
With an Abiotic Factor dedicated server, you can confront the dangers of The Order and enemies from portals together with up to 23 other players. Once you have the right hosting hardware, you can quickly set up a server using SteamCMD.
What are the requirements for an Abiotic Factor server?
There are two hosting options for setting up an Abiotic Factor server. You can run the server software on your own computer or rent external hardware. Using your own device can be practical, but should only be done if you have a very high-performance setup. In addition, the server will only be accessible when your computer is on. If you rent server resources, you won’t have to worry about availability and performance.
A simple Abiotic Factor dedicated server requires the following:
- Processor (CPU): Quad-core with at least 2 GHz
- RAM: at least 2–3 GB
- Hard drive storage: 4 GB
The operating system will add some additional requirements. Abiotic Factor server software is designed for Microsoft systems. If you use Windows Server 2022, you’ll need an extra 1.4 GHz CPU, 512 MB or 2GB RAM (without or with graphic interface, respectively) and 32 GB hard drive storage.
You can set up an Abiotic Factor server on Linux using the WINE runtime environment. WINE provides implementation of Windows API functions on GNU/Linux systems.
What options does IONOS have for an Abiotic Factor server?
With the wide range of options out there, choosing the right provider for server hosting is no simple task. IONOS offers two suitable models, each with different plans:
- vServers (VPS): Low-cost vServers from IONOS are based on the entirely virtualized resources of a fixed hosting system, providing you with 100% performance at all times. You’ll be billed at a fixed monthly rate.
- Dedicated servers: Dedicated servers from IONOS are based on fixed enterprise hardware and therefore cost more than vServers. They’re also available with virtualization. Dedicated servers are billed by the minute.
- Dedicated enterprise hardware
- Configurable hardware equipment
- ISO-certified data centers
What are the best IONOS plans for an Abiotic Factor server?
It’s not always easy to get an overview of the large selection of plans and server models available. In the table below, we list three conceivable use cases for an Abiotic Factor dedicated server and give the most suitable IONOS server plan for each of them.
| Abiotic Factor dedicated server use case | Suitable IONOS server plan |
|---|---|
| Server for 3–6 players | VPS Windows L |
| Larger server for 7–10 players | VPS Windows XL |
| Server for any scenario up to 16 players | Dedicated Server AR6-32 SSD |
How to save money as a beginner
If you just want to start with a co-op adventure, a low-cost VPS plan will be sufficient. Should you decide you want to increase the number of players, you can simply upgrade your plan.
The most affordable plan with sufficient performance is Windows VPS M.
Try out your VPS for 30 days. If you're not satisfied, you get your money back.
How to create an Abiotic Factor server step by step
Below we describe step-by-step how to install your own Abiotic Factor dedicated server – from connecting to the hardware to installation to configuration to establishing a connection. We describe the steps from the perspective of an IONOS user (vServer or Dedicated Server) with Windows Server 2022.
Step 1: Connect to the server remotely
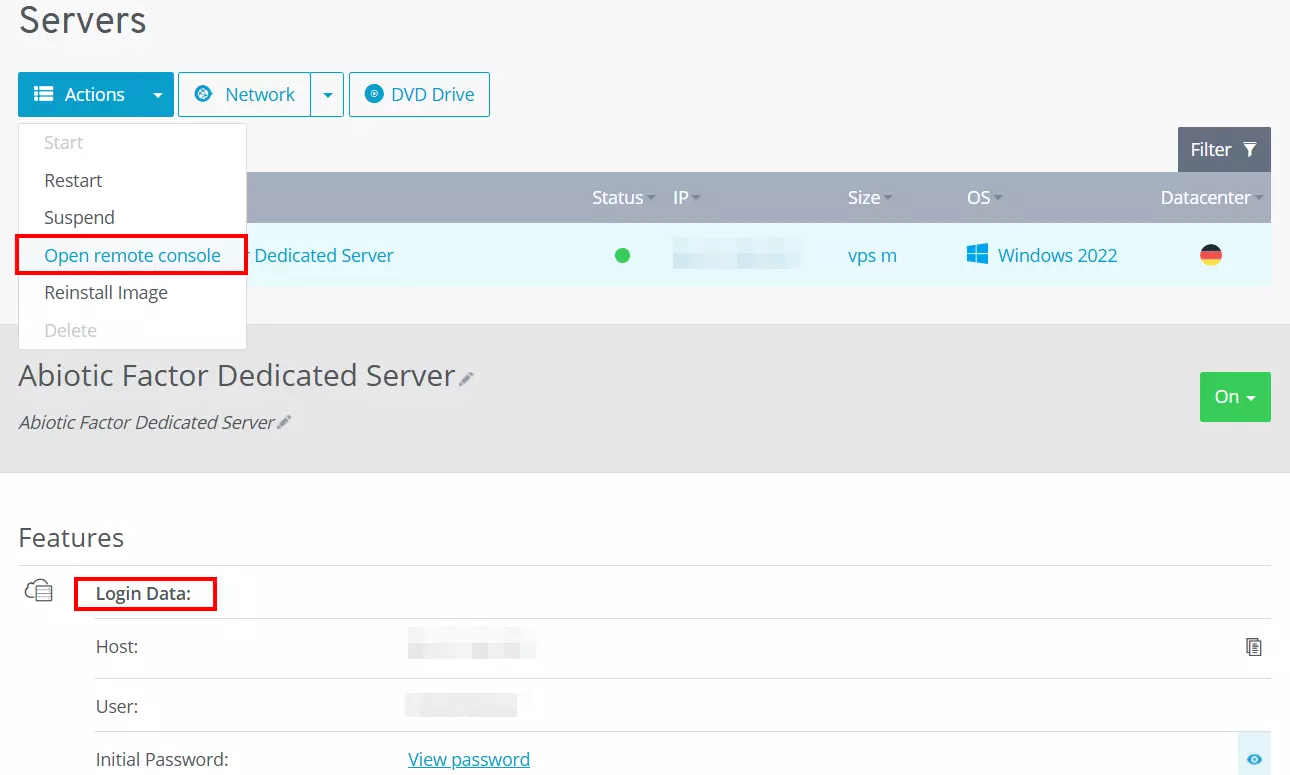
The first thing you’ll need to do is establish remote access to the hardware. In the IONOS Cloud Panel, you can do this using the remote console:
- Log in to your account on the IONOS login page.
- Click on Server & Cloud.
- Select the server hardware that you rented for your gaming server.
- Click on Actions and then Open remote console.
- Log in with your server login information, which you can find on the overview page for your server under Login Data.
Windows’s Remote Desktop Connection tool is a powerful and user-friendly alternative to the remote console in the IONOS Cloud Panel. The article “Connecting to a Windows Server with Remote Desktop” in the IONOS Help Center explains how to use it.
Step 2: Install SteamCMD
Next, install SteamCMD. SteamCMD is a command line client that allows you to connect directly to Steam’s public servers. You can then get the dedicated server application for Abiotic Factor from those servers.
Download SteamCMD using this download link, and unzip the ZIP file in a directory of your choice (for example, C:\SteamCMD). Then double click on the unzipped file named steamcmd.exe. The install will start automatically. If the process was successful, you’ll see the input line Steam> in the command prompt.
Step 3: Install the Steam app “Abiotic Factor dedicated server”
Now create a directory for the program files for your Abiotic Factor server. To do so, execute the following command in the command prompt:
force_install_dir C:\abiotic-factor-server\You can also select a different directory than the one we used here. Next, log in to the public Steam server anonymously:
login anonymousThen download and install the server’s program files using the command app_update and the Abiotic Factor server app ID (2857200):
app_update 2857200 validate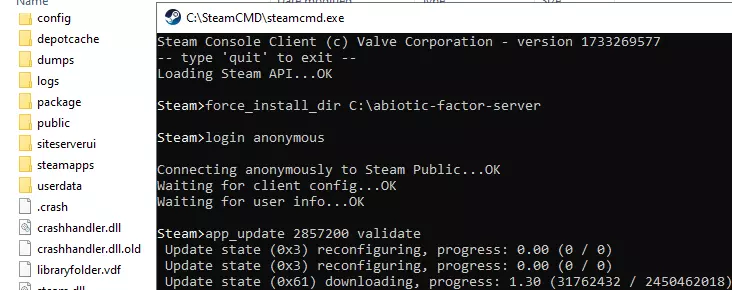
Once the application has been installed, log out using the command quit and exit SteamCMD.
Step 4: Open server ports
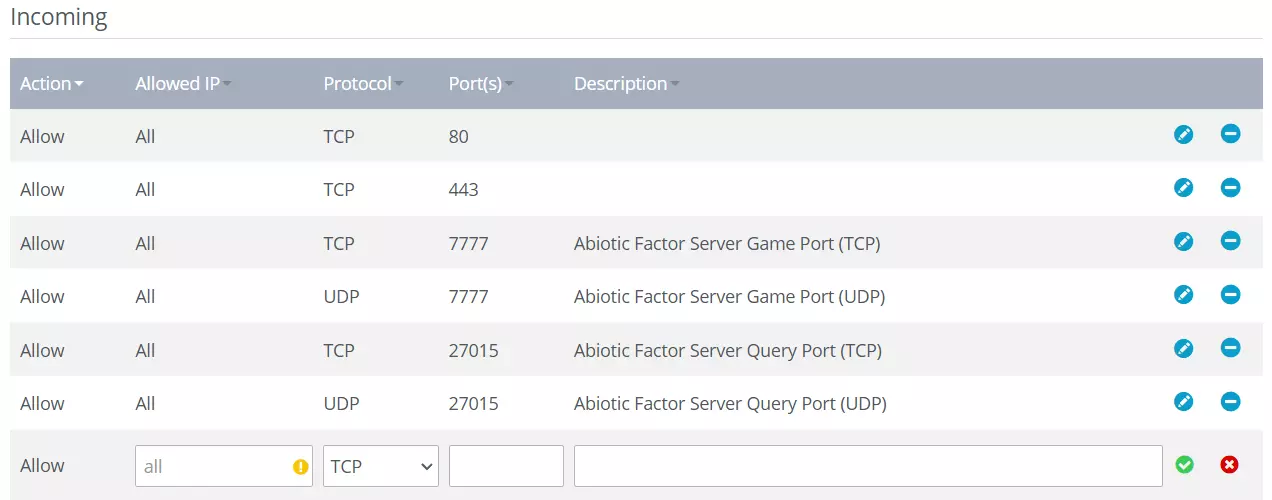
To enable incoming connections to the server, you need to open TCP/UDP ports 7777 (Game Port) and 27015 (Query Port) in the firewall settings. With an IONOS server, you can do that in the Cloud Panel with the following steps:
- Log in to your account on the login page.
- Click on Server & Cloud.
- In the left side menu, click on Network and then on Firewall Policies.
- Under Incoming create new firewall rules for the TCP/UDP ports 7777 and 27015.
Step 5: Configure the Abiotic Factor server
Now you can turn to the settings for the game world and gameplay. To do so, first start AbioticFactorServer.exe in the main directory in order to generate the folders for SaveGames and Worlds. You can then close this server instance right away (e.g. using Task Manager).
Open the following path in the server folder: .\AbioticFactor\Saved\SaveGames\Server\Worlds\Cascade. Create a new file there with the nameSandboxSettings.ini` and paste the following into that file for a standard setup:
[SandboxSettings]
GameDifficulty=1
LootRespawnEnabled=false
PowerSocketsOffAtNight=true
DayNightCycleState=0
DayNightCycleSpeedMultiplier=1.0
WeatherFrequency=3
SinkRefillRate=1.0
FoodSpoilSpeedMultiplier=1.0
RefrigerationEffectivenessMultiplier=1.0
StorageByTag=true
StructuralSupportLimit=5
EnemySpawnRate=1.0
EnemyHealthMultiplier=1.0
EnemyPlayerDamageMultiplier=1.0
EnemyDeployableDamageMultiplier=1.0
DetectionSpeedMultiplier=1.0
DamageToAlliesMultiplier=0.5
HungerSpeedMultiplier=1.0
ThirstSpeedMultiplier=1.0
FatigueSpeedMultiplier=1.0
ContinenceSpeedMultiplier=1.0
PlayerXPGainMultiplier=1.0
ItemStackSizeMultiplier=1.0
ItemWeightMultiplier=1.0
ItemDurabilityMultiplier=1.0
DurabilityLossOnDeathMultiplier=0.1
ShowDeathMessages=true
AllowRecipeSharing=true
AllowPagers=true
AllowTransmog=true
DisableResearchMinigame=false
DeathPenalties=1
FirstTimeStartingWeapon=0
GlobalRecipeUnlocks=false
HostAccessPlayerCorpses=trueYou can read about each value in detail on the official Abiotic Factor Wiki on wiki.gg.
Step 6: Create start script
To ensure you can start your server smoothly, create a start script in the main directory of your Abiotic Factor server. To do that, make a new file with the name Start.bat and open it with an editor of your choice. Then copy the following into the file and save the script:
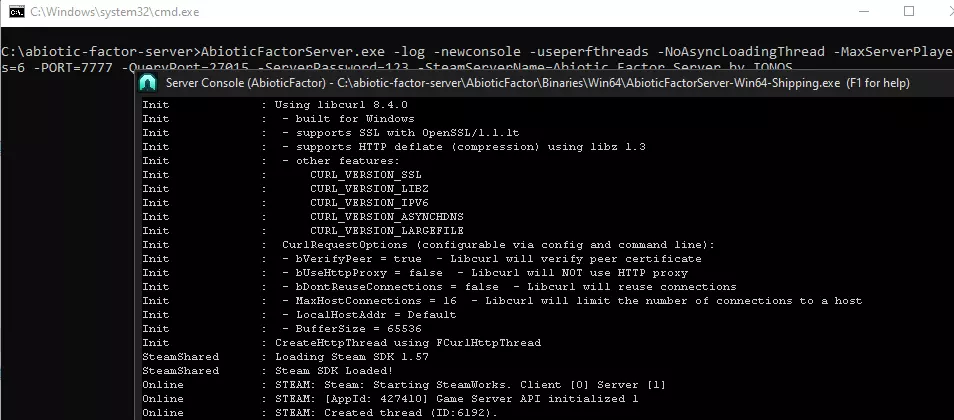
AbioticFactorServer.exe -log -newconsole -useperfthreads -NoAsyncLoadingThread -MaxServerPlayers=6 -PORT=7777 -QueryPort=27015 -ServerPassword=PASSWORD -SteamServerName=SEVERNAME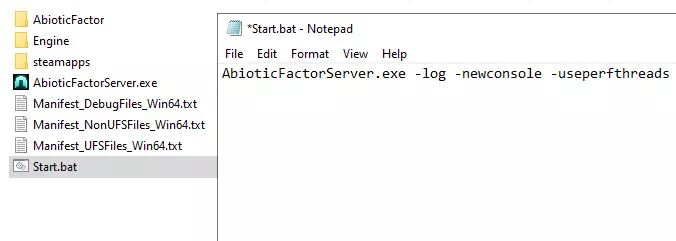
Step 7: Start the server
You can now start your Abiotic Factor server anytime by double clicking on the script. The command prompt and the server console will open automatically. In the server console, you can follow the server status in real time. If you close the console window, the server will automatically go offline.
Step 8: Join the Abiotic Factor server
Once the server is running, you and the other players can connect to it anytime. To do so, just follow these steps:
- Start Abiotic Factor and click on Enter the facility in the main menu.
- Click on Join a server.
- Search for your server.
- Join the server.
If you don’t find the server in the server menu, you can also join it manually with the IP address:
- Open the Display menu in the Steam client.
- Select Game Servers.
- In the server menu, click on Favorites and then on the plus button.
- Enter your server’s IP address (which you can find in your account) and confirm.
- You should now be able to see an entry in the game server browser. Click on it and the click Connect.
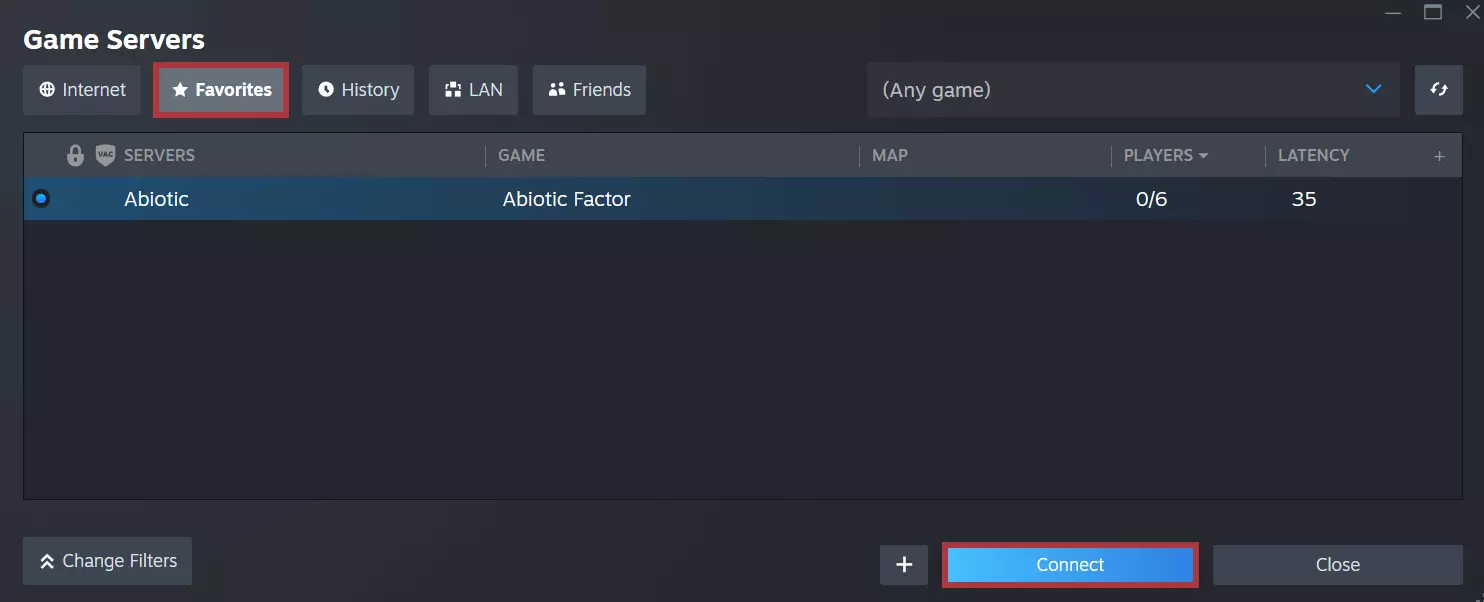
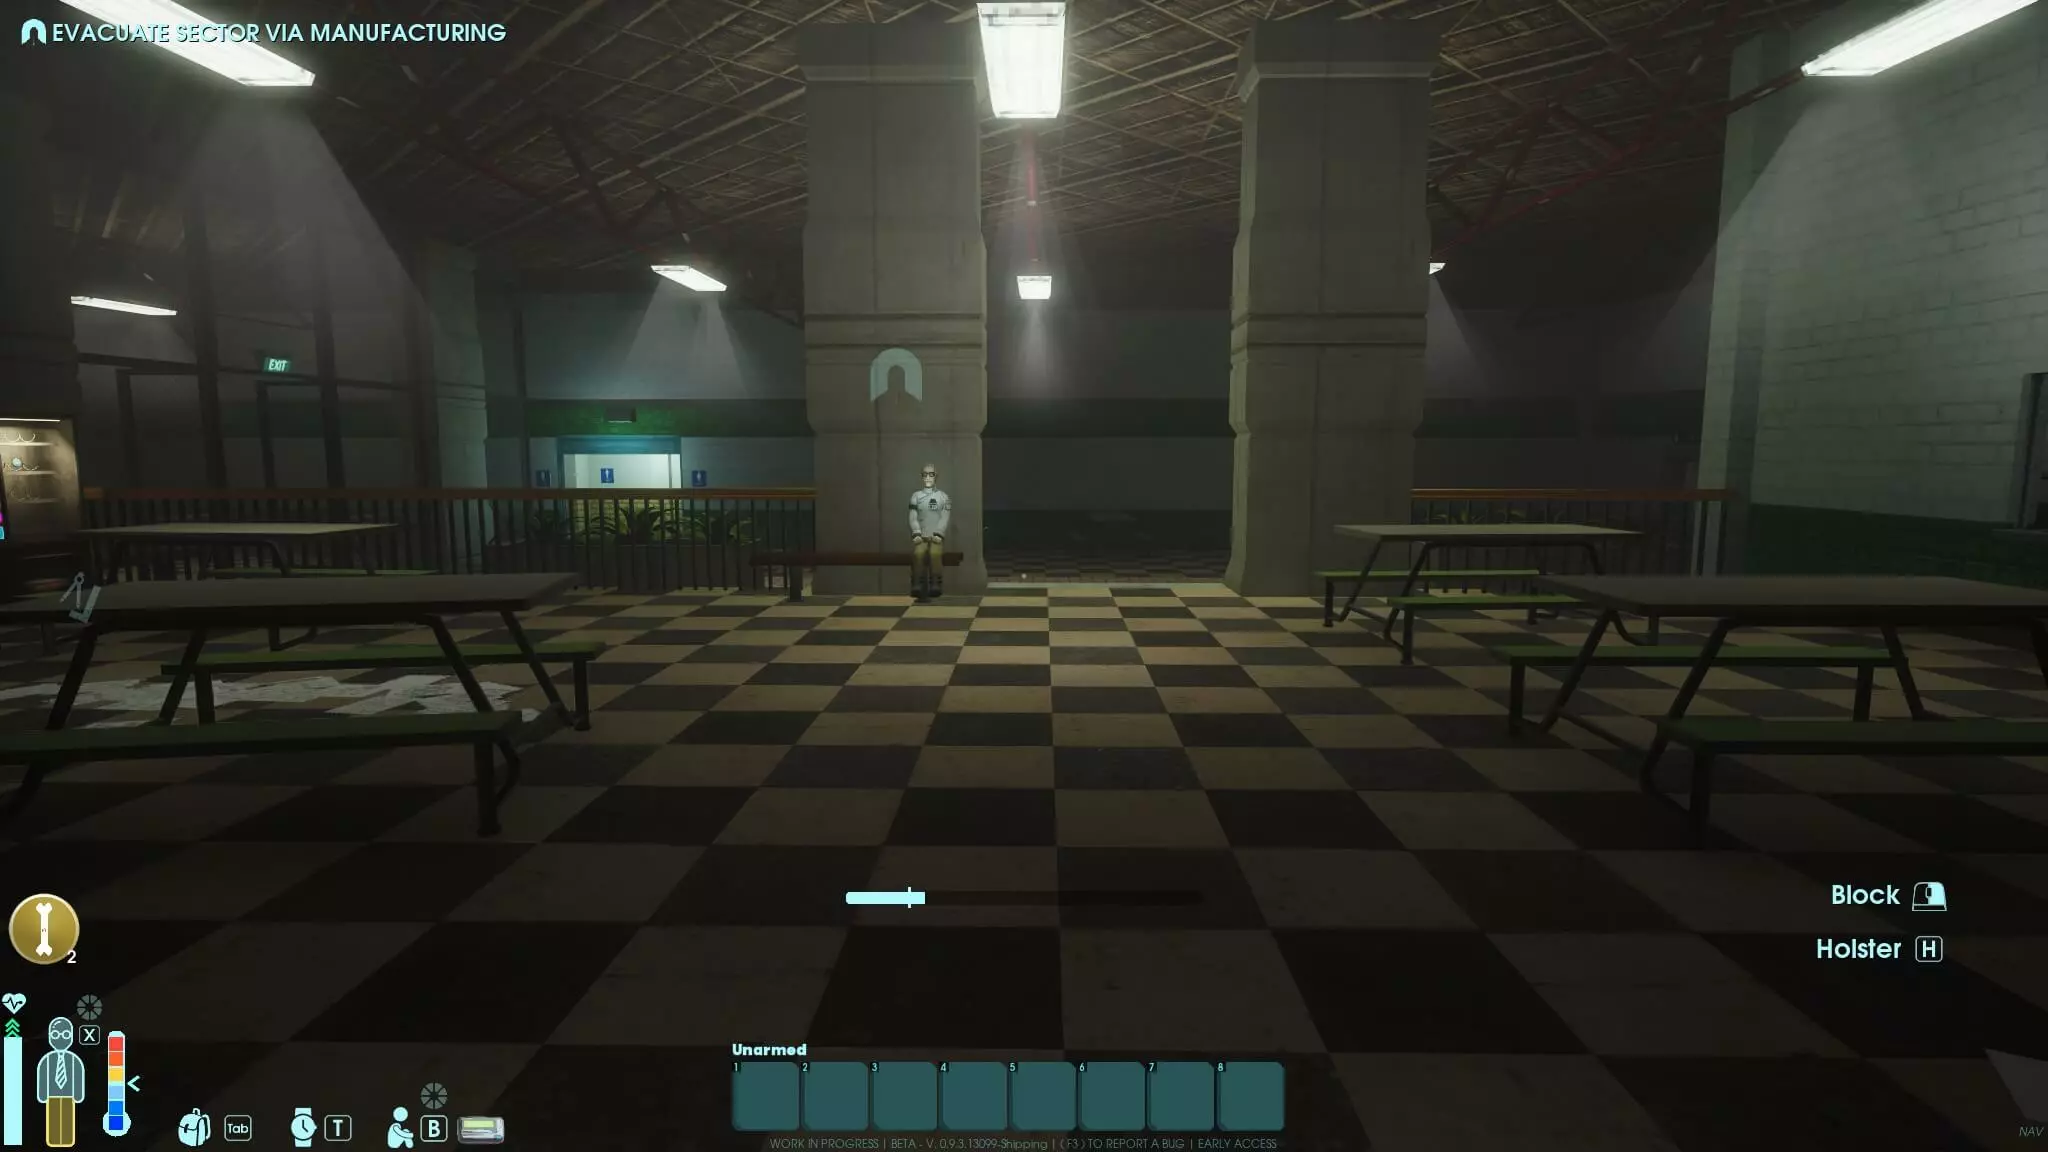
If you choose the second option for connecting to the server, it will take a second before the game and the server are loaded. If you set a password for the server, you’ll need to enter it before you can start your adventure.
You want to bring your server to the next level and simplify manual connection to it? Consider choosing an individual server address rather than a classic IP. Use the Domain Check from IONOS and combine your preferred name with a domain like .games or .zone!

