How to screen record on Mac
Whether a screencast, video tutorial, or a webinar – you can easily record the screen on your Mac. As of macOS Mojave, launched in September 2019, there’s an integrated option that lets you capture a video of your Mac screen.
Screen recording on Mac as of macOS Mojave
Thanks to the extended screenshot symbol toolbar in macOS Mojave, recording the screen on your MacBook or another Mac device can be activated in just a few steps. That’s because Apple has extended its Mac screenshot tool with a screen recording feature.
When holding down the shift + command (⌘) + 5 keys at the same time, the symbols toolbar will launch all its controls. Before you start recording your Mac screen, you can configure the following settings via the “Options” tab:
- Save as: Define where the recording should be automatically saved once you’ve completed your video.
- Timer: Define the time when the video should be started.
- Microphone: While your screen is being recorded on your Mac, you also have the option to record your voice or other audio sources. To do this, simply select the correct microphone.
- Show floating thumbnail: When activated, a miniature thumbnail of the recorded video will appear at the bottom right of the screen.
- Save last selection: This saves your last selection of settings as standard for future screen recordings on your Mac.
- Blend-in mouse clicks: Visualizes mouse clicks with a black circle in the screen recording.
After saving your settings, select one of the following options to begin screen recording on your Mac:
Option 1: Record the entire screen
Option 2: Record a section of your screen
- Using your mouse, pull a shape around the field that you want to record. To move the field, simply click on any area within the field and pull it to your area of choice.
- To start recording, click on “Record” in the symbols toolbar.
To stop screen recording on your MacBook or iMac, follow one of these three options. Click “Stop” in the Touch Bar, or click on the “Stop recording” icon from the menu bar:
Alternatively, screen recording can be stopped by pressing the key combination command (⌘) + shift + esc.
Once the recording is finished, a small thumbnail will be displayed at the bottom right of the screen. The screen recording will be saved without requiring any further action. If you want to shorten or split the recording, click on the thumbnail to enter editing mode.
Screen recording on Mac before macOS Mojave
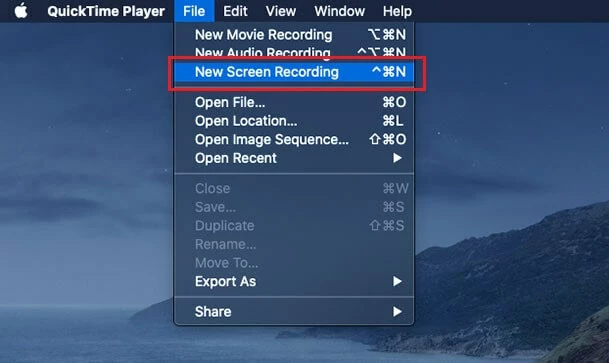
If you have not yet upgraded to macOS Mojave or if your computer doesn’t support this version, you can still make a screen recording on your Mac. The QuickTime Player offers a simple solution for this.
- Open QuickTime Player. From the menu bar, under “File”, select “New Screen Recording”:
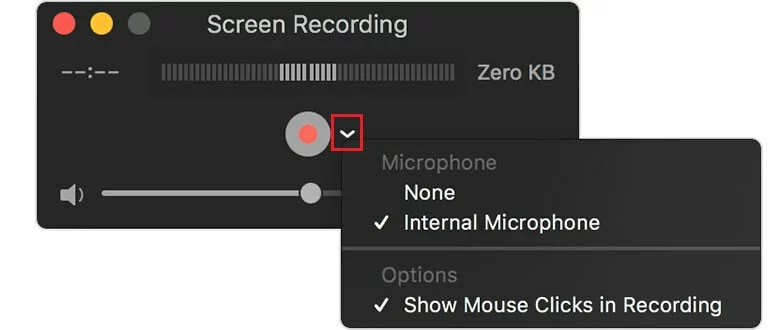
- The “Screen Recording” window will now open. Use the small arrow next to the record button to define whether you want to screen record your Mac with audio and whether QuickTime Player should show the mouse click in the recording with a black circle.
- To record your Mac screen, click the red record button in QuickTime Player. You can then click anywhere on the screen to start recording the entire screen. If you want to record only part of the screen, simply drag the frame with your mouse and click the record button in that area.
- Stop the screen recording either by clicking on the “Stop recording” icon in the menu bar or by pressing the key combination command (⌘) + control + esc.
- QuickTime Player will automatically open the recording once it’s finished, making it all the easier to play, edit, or share your video.
- Store, share, and edit data easily
- Backed up and highly secure
- Sync with all devices


