How to take a screenshot on a Chromebook
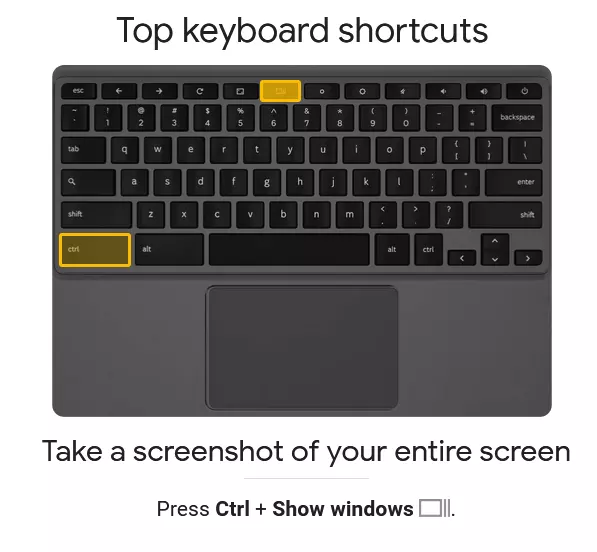
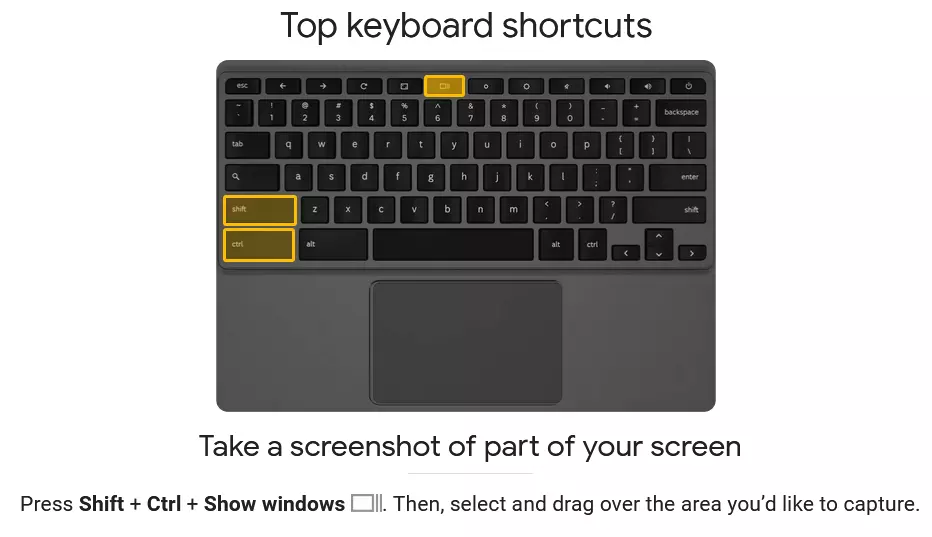
To take a screenshot on your Windows computer, you can use the [Windows] + [Print] shortcut. But if you want to screenshot on Chromebook, you’ll need to use [Ctrl] + [Show windows] for the whole screen or [Ctrl] + [Shift] + [Show windows] for a selected area of the screen.
How to screenshot on Chromebook: A step-by-step guide
Chromebooks come preinstalled with Google’s Chrome OS operating system. As such, common Windows and Mac applications won’t work on Chromebooks. This has advantages and disadvantages. Chromebooks include all the popular Google applications like the Chrome browser, Gmail, Calendar, Maps, Documents, and Meet. In addition, they also come with 5GB of free cloud storage in Google Drive. Chromebooks are designed for online and cloud services. Their slim configuration ensures a smooth performance. However, Chromebooks are a little different to use and this applies to taking screenshots on them as well.
For example, to take a Windows 11 screenshot, the shortcut [Windows] + [Print] is handy. To take a screenshot on a Mac, use [Shift] + [Command] + [3] instead. On a Chromebook, the keyboard shortcuts are different.
To take a screenshot on a Chromebook, follow these steps:
How to take a screenshot of the entire screen
Step 1: Press [Ctrl] + [Show windows]. The [Show windows] key is located in the top row on the Chromebook keyboard. It can be identified by the icon containing a window with two additional dashes to the right of it. If you’re using a Windows keyboard with your Chromebook, press [Ctrl] + [F5] instead.
Step 2: Chrome OS will now take a screenshot of the entire screen and store it automatically in “Downloads”.

How to take a screenshot of a section of your screen
Step 1: Press [Ctrl] + [Shift] + [Show windows].
Step 2: The cursor should now become a crosshair. Use this to specify the area you would like to take a screenshot of. You may need to select “Screenshot” in the menu and then select whether you want to screenshot the entire screen, a section of the screen, or a specific window.
Step 3: Once you’ve taken the screenshot, you can find it in your “Downloads” folder.

How to make a recording of your screen
Step 1: To record your screen, press the shortcut [Ctrl] + [Shift] + [Show windows] and select the menu option “Record screen”.
Step 2: When recording your screen, you also have the option to record the entire screen, a selected section of the screen, or a specific window.
Step 3: When you are ready to stop recording, you can click on “End recording”. The recording will automatically be stored in the “Downloads” folder.
How to find screenshots in the default location
The “Downloads” folder of your Chromebook serves as the default folder and location for screenshots and screen recordings. To change this or to search for specific screenshots and recordings, press [Ctrl] + [Shift] + [Show windows]. Then go to “Settings” or the gear icon and “Select folder”. Now, you can determine where you want your recordings to be automatically stored in the future.
If you are interested in creating screenshots in the Chrome browser, and not specifically on a Chromebook, you can simply use the default screenshot shortcut on your keyboard. For Mac, press [Shift] + [Command] + [3] and for Windows, press [Windows] + [Print]. You can also use Chrome screenshot extensions like the Chrome Capture tool.

