Password-protect your Excel files
Generally, there are two ways to protect your files by adding a password to Excel: you can protect the whole Excel file from unauthorized access or you can protect select Excel sheets or even individual cells from unwanted changes. With the first option, the entire file is encrypted and can only be opened by entering the password. With the second option, the password serves as read-only protection to ensure that data and content aren’t manipulated or accidentally edited. This doesn’t protect the file from being viewed by others. We'll show you how to set up both.
Password protection for the whole Excel file in just a few steps
The steps below detail how you can password-protect an Excel file so that it can only be opened by people who know the password.
Quick start guide: Add a password to an Excel file
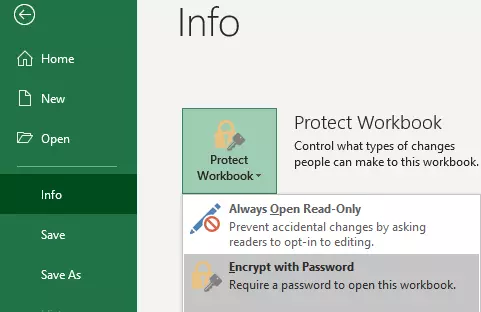
- From the “File” menu access “Info” > “Protect Workbook” > “Encrypt with Password”.
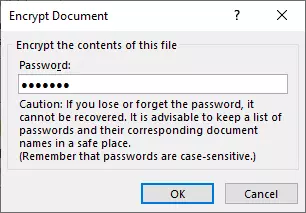
- Choose a secure password.
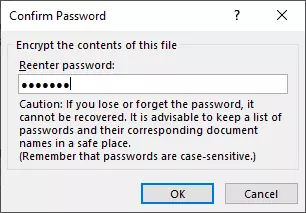
- Repeat your chosen password to confirm the selection.
Step 1: To get started password-protecting your select Excel file, click on “File” and then “Info” in Excel. Then click on “Protect Workbook” and select “Encrypt with Password”.
- 2 GB+ storage
- Sync across all your devices
- Spam filter and ad-free
Step 2: You’ll be prompted to provide a password for your document. Choose a secure password and store it in a suitable place. You can use a password manager to make it easier to manage multiple passwords. A warning pops up and this should be taken seriously: without the password, you won’t be able to access the content of your Excel file later. Make sure you don’t accidentally switch on capitalization (Caps Lock) on your keyboard.
It’s best to refrain from using your wedding date or a pet's name as a password. If data security is important to you, choose a truly secure password.
Step 3: You’ll be prompted to repeat your password to confirm the selection. Encryption is only completed if the two passwords match. If you make a mistake, you’ll receive a message stating that the two passwords are not identical. Try again or start over.
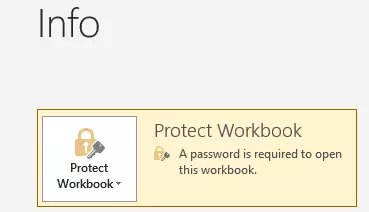
Now, the next time you open the file, you’ll be asked to enter the password. If you’ve selected a suitable password that’s neither too short nor easy to guess, your file is securely protected. Even Microsoft couldn’t crack a secure Excel password. But this also means if you forget your password, all contents of your file will be lost.
Beware: Protecting an Excel spreadsheet with a password is not the same as making an Excel file read-only. The latter only prevents editing, not opening a file, and can be bypassed relatively easily.
Want to password-protect multiple Excel files at the same time and store them in an archive? You can archive your files in a ZIP-compressed folder and encrypt the ZIP file.
Password-protect Excel worksheets
Instead of password-protecting the entire Excel spreadsheet, you can encrypt individual worksheets. However, this is less suitable for privacy and merely prevents inadvertent changes to a worksheet’s content. The access can be controlled down to the level of individual cells.
Quick start guide: protect Excel worksheets with password
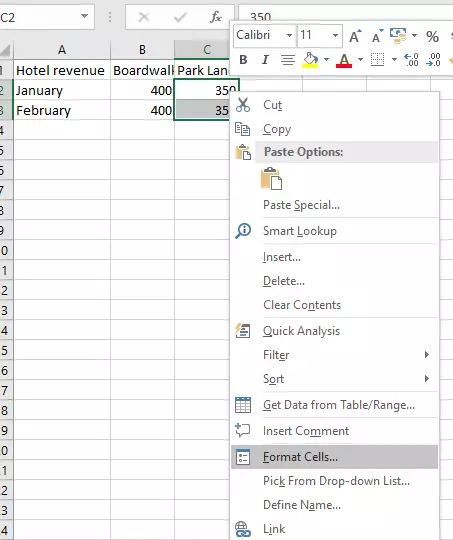
- To enable editing of select cells, mark the cells, right-click and select “Format cells”.
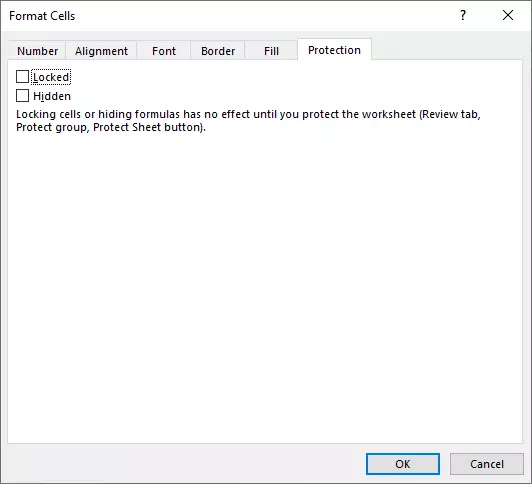
- From the “Protection” sub-menu remove the checkmark “Locked” and click on “Ok”.
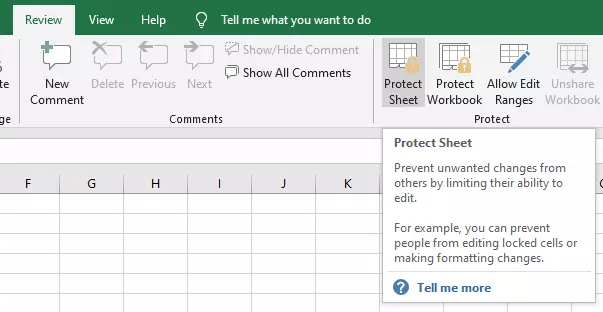
- In “Review” select “Protect Sheet”.
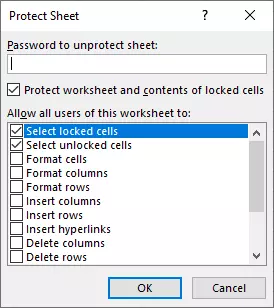
- Choose a password to protect your Excel worksheet.
Step 1 (optional): Select cells
Before activating sheet protection, you can specify individual cells in a sheet that won’t be password-protected so that only certain cells are editable, and the rest aren’t. If you skip this step, all cells in a worksheet will be protected from edits.
Mark the cells you want to remain editable. Right-click to launch the menu and select “Format Cells”. You can also access cell formatting options by using the Excel shortcut [Ctrl] + [1].
The changes are only activated once you activate sheet protection in the next step.
Step 2: Set protection
From the dialog, you can manage user options further. By default, sheet protection means that contents or formatting cannot be amended, added, or removed. If you want to allow for some changes to be made to a sheet, you can set up the details here. You’ll be asked to save a password to remove sheet protection. If you don’t set a password, any user can remove the sheet protection.
Result: Now, if you or other users try to enter new data in an encrypted cell, for example adding sales data for Park Lane (see image above), Excel will reject the entry and flag up a message to alert the user that the sheet is (password) protected.
This function is not intended as a security feature, but instead prevents unwanted or accidental changes to Excel worksheets. In addition, the sheet’s content and formatting remains fully visible.
Regardless of workbook or sheet protection, Excel macros are not or only partially activated by default for security reasons. To use macros you obtained from a reliable source, you’ll need to activate Excel macros.
Removing Excel password-protection
After you’ve password-protected individual worksheets or entire Excel files, you can remove the password-protection again just as easily. However, things can get complicated (or even impossible) if you don’t have the correct password to hand. That’s why it’s important to always store your passwords safely.


