Create Gmail filters and use Gmail rules to declutter your inbox
Declutter and organize your email inbox! When you create a rule in Gmail, you can filter incoming emails according to sender, subject, file size, and other criteria, and set automatic rules in Gmail (formerly Googlemail) to specify how filtered emails should be treated. Learn how to create, edit, and delete Gmail filters and rules here.
- Simple registration
- Premium TLDs at great prices
- 24/7 personal consultant included
- Free privacy protection for eligible domains
Quick guide: how to create rules in Gmail
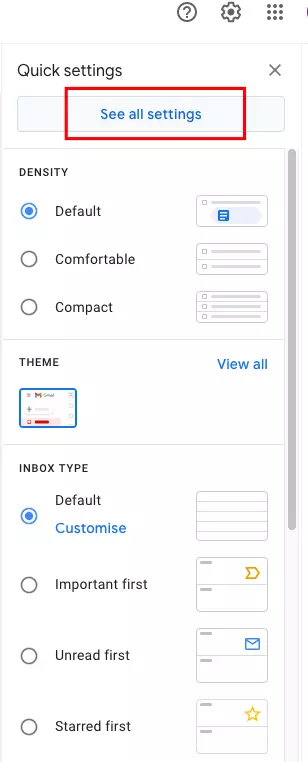
- Launch your inbox in the menu next to the search field.
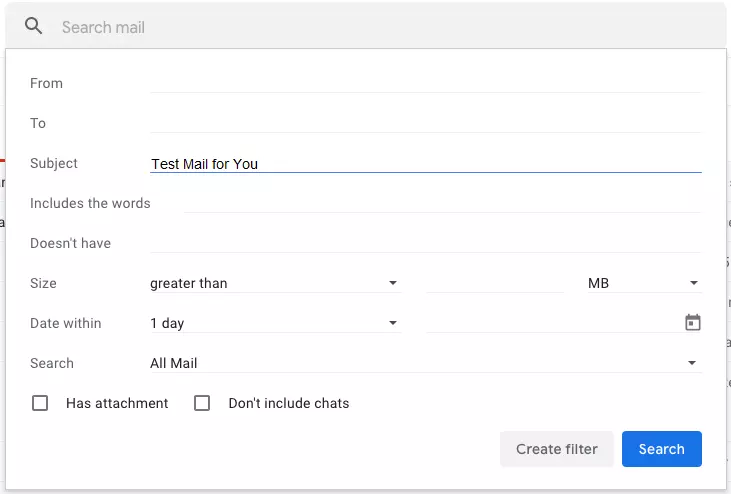
- Enter one or more search criteria and click “Create filter”.
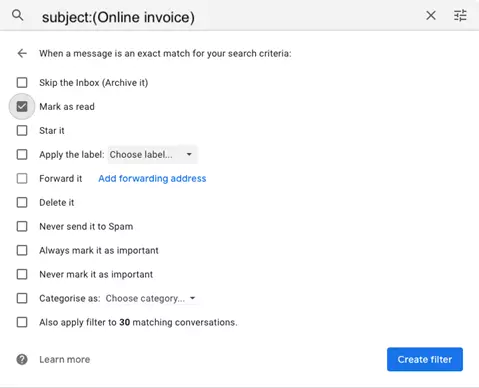
- Specify how filtered emails should be treated.
- Confirm your selection by clicking “Create filter”.
What are Gmail rules?
Rules in Gmail work similarly to rules in other popular mail programs, such as Outlook. Just specify one or more criteria according to which emails should be selected or filtered, and then specify what should happen with the emails you’ve selected. Alternatively, you can select an email to serve as a template for a filter. We explain both options in the paragraphs below.
In case of high email volumes, these Gmail filters and rules can be particularly useful. For example, you could automatically filter out less important emails or newsletters and sort them into subfolders (or assign Gmail labels). Gmail rules are applied to new but also existing emails. This is very useful when you’re looking to clean up your inbox.
Create a filter in Gmail: here’s how
In our example, we’ll filter emails by the subject “online invoice”, but you can also filter by a sender or words within the message and set restrictions according to size, date of the message and its (current) storage location. The latter is possible via the “Search” function. Simply specify whether all messages or, for example, all messages in the inbox, sent items, unread or only read messages should be affected by the rule.
Step 3: Confirm your Gmail filter by clicking “Create filter”. If you want to check in advance which emails are included in the filter, click “Search”.
Step 4: Another menu will launch. Here you can specify how filtered emails are to be dealt with. To do this, click the checkboxes next to the appropriate filter. Multiple selection is possible. In our example, we select “Mark as read”.
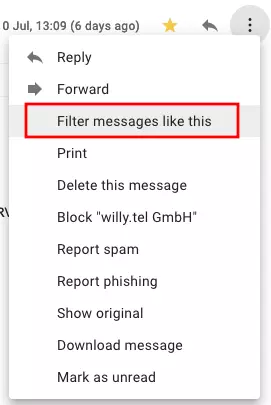
Create Gmail filter: Filter similar messages
Step 4: The search option menu described above will open. The sender of the message is set as a filter (preceded by Gmail search operator “from:”).
Step 5: Confirm your settings and/or select further/additional filter criteria before confirming the selection via “Create filter”. Repeat previous instructions from step 3 to add more filters.
Want to use Gmail and other Google products professionally? Get Google Workspace and use a neutral and ad-free email address including your preferred domain.
Gmail filter: What is a “label”?
Unlike Outlook and many other email programs, Gmail doesn’t have folders to sort emails to. Instead it uses so-called labels. You can assign as many labels and sub-labels as you like (which results in a folder-like structure) and add them to emails. You can also assign multiple labels to one email.
The main difference between a folder and a label is that labels do not duplicate content. This means that even if you assign multiple labels, the email will only exist once in your inbox. If you delete an email, it will be deleted from all labels. This may be different in a more traditional folder structure. In some circumstances, a separate copy of the email is stored in each folder.
Edit and delete Gmail rules
Want to find out what else you can do with Gmail? Check out more of our guides and tutorials to learn how to set up out-of-office notifications in Gmail, the Gmail read receipt, or how to recall Gmail emails.


