Learn PHP: a PHP tutorial
PHP is one of the most common programming languages for server-side programming. With time, it has become integral to contemporary websites and Internet technologies. Nevertheless, mastering PHP can be demanding for newcomers. In this PHP tutorial, we’ll show you the basics of the popular programming language, and its most important operators, loops and functions.
What you need to have before starting the PHP tutorial
Our tutorial is primarily aimed at newcomers. However, having a basic understanding of modern web development and HTML can be useful. To follow along and reproduce the examples on your own computer, make sure you have the following prepared:
- Web server including PHP interpreter
- PHP installed
- Web browser
- Text editor
As a server, we recommend the local test environment XAMPP, which Apache Friends provides free of charge for Windows, Linux and macOS operating systems. XAMPP is a pure test server. Web developers can use the software to set up test environments for scripts, HTML pages and stylesheets with ease. However, secure operation of the web server on the internet is not guaranteed. Detailed installation instructions can be found in our XAMPP tutorial.
- 99.9% uptime
- PHP 8.3 with JIT compiler
- SSL, DDoS protection, and backups
What is the syntax of PHP?
Once you’ve set up your local web server (for example, using XAMPP), it’s a good idea to test that PHP has been installed correctly and is ready to run scripts. A script is a program that’s not compiled into binary code. Instead, they’re executed by an interpreter. Open your preferred text editor and apply the following PHP script:
<?php
phpinfo();
?>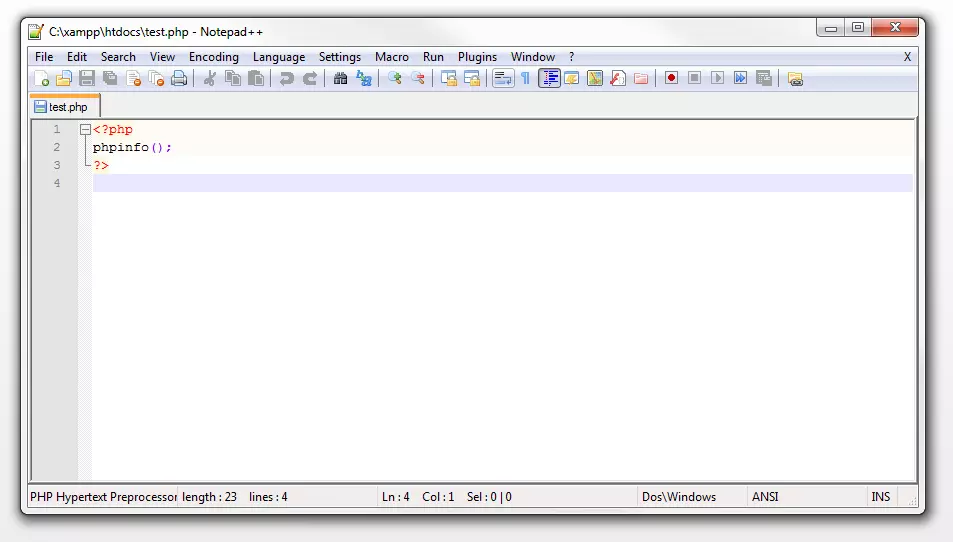
PHP scripts follow a specific structure. The opening PHP tag <?phpinitiates ascript environment. This is followed by the actual PHP code in the form of statements. In the example above, this is the call to thephpinfo()function. Most PHP functions require one or more parameters, which are enclosed in parentheses. Forphpinfo(), these parameters are optional:phpinfo(INFO_ALL). Each statement ends with a semicolon (;). To conclude the script, use the closing PHP tag:?>.
Functions are subroutines that make it possible to outsource parts of program code. To avoid repitition, recurring tasks can be defined once as a function and then called using a function name. Web developers use predefined PHP functions for this purpose or create their own subroutines.
Save the text file under the name test in the .php (PHP script) format and launch your web server. If you’re using the test environment XAMPP, save test.php in the XAMPP directory under htdocs (C:\xampp\htdocs).
You can access the sample file via the following URL in the web browser: http://localhost/test.php. If you use an alternate web server or an individual configuration of the XAMPP software, select the URL according to the respective file path.
When you enter the URL http://localhost/test.php, you prompt the web browser to request the test.php file from the web server. The Apache HTTP Server (or whichever type of web server software you are using) retrieves the file in the appropriate directory. The .php extension signifies that the file contains PHP code. At this point, the PHP interpreter that is integrated into the web server becomes active. It processes the document, encountering the opening PHP tag <?php, which signals the initiation of PHP code. The interpreter proceeds to execute the PHP code, generating HTML output that the web server transmits to the web browser for display.
If PHP was installed correctly, the execution of the script will result in the following web page:
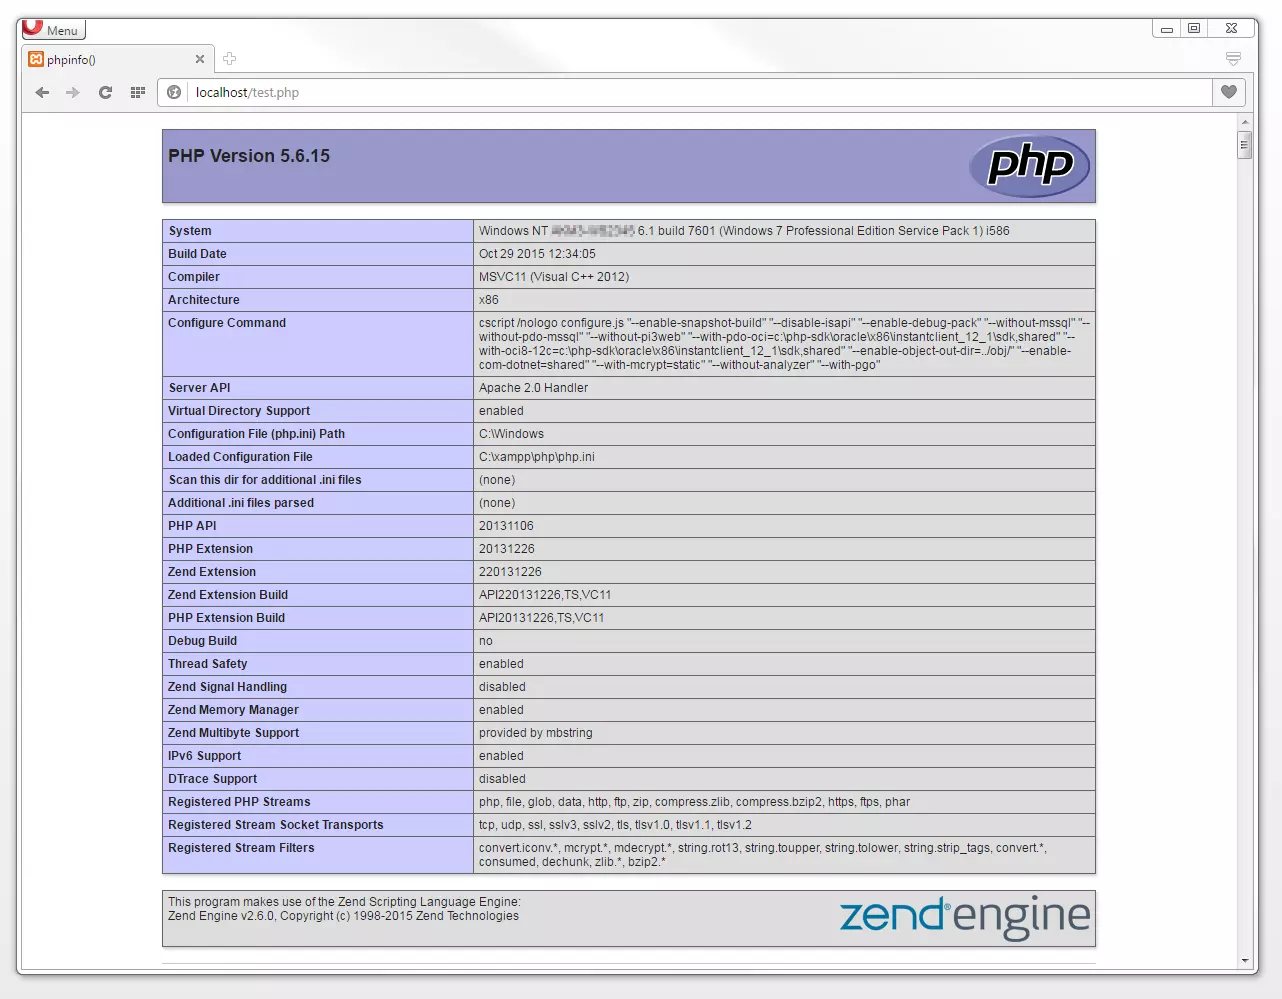
The phpinfo() function is shorthand for the default phpinfo( INFO_ALL ). This outputs detailed information about the PHP configuration of your web server. If no PHP version can be found, the web browser displays an error message or delivers the PHP code to the browser without interpreting it.
“Hello World!” – How to output text via echo
After successfully installing PHP, it’s time to write your first script. You can use PHP echo to do this. Unlike phpinfo(), echo is not a function. Rather, it’s a language construct that allows a subsequent string to be output as text.
Language constructs are statements used in PHP to control program flow. In addition to echo, language constructs include statements such as if, for, do, include, return, exit or the. Unlike functions, no parentheses are necessary.
For your first custom script, create a new PHP file and enter the following code:
<?php
echo 'Hello World!';
?>The opening tag <?php launches a script environment. It’s followed by the language construct echo and the string Hello World!, which is enclosed in single quotation marks. Use the tag ?> to end the script. Note the semicolon after the statement. Any text can be used in place of Hello World!.
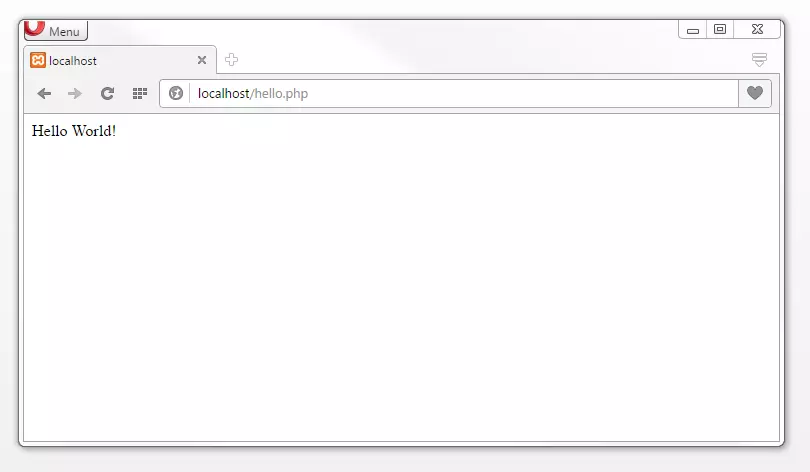
Save the script as hello.php within the htdocs directory on your web server. Then, access the file using the URL http://localhost/hello.php in your web browser. If the code was transferred accurately, the browser window should display the string you used:
Any text you generate with echo can incorporate HTML tags, as needed. These tags will be interpreted by the web browser in accordance with the HTML specifications. Experiment with this concept using the following script, for instance:
<?php
echo '<h1>Hello World!</h1>
<p>This is my first PHP page.</p>';
?>When called in the web browser, the result of script execution is displayed as follows.

The text Hello World!, which is enclosed in <h1> tags, is interpreted by the web browser as a primary heading. This is succeeded by an automatic line break and the text paragraph between the <p> tags.
Depending on your requirements, you can use echo with either single quotes (’) or double quotes (“). If you’re only outputting text, the choice of quotes doesn’t matter. However, this distinction becomes significant when dealing with PHP variables.
Variables
The echo language construct offers more than just text display. While text presentation can already be effectively accomplished using HTML. The true advantage of using the PHP echo language construct lies in its capability to dynamically produce text using variables.
PHP users frequently encounter variables in the following format: $example
Each variable consists of a dollar sign ($) followed by the variable name. Variables are utilized within PHP scripts to incorporate external data into web pages. They can encompass a diverse type of values, ranging from basic numbers and strings to complete texts or HTML document structures. PHP distinguishes between seven different variable types:
| Variable type | Description |
|---|---|
| String | A string is a sequence of characters. It can represent a word, a phrase, a piece of text or even the entire HTML code of a web page. |
| Integer | An integer is a whole number without decimal places. This can be positive or negative. |
| Float | A float is a floating point number. This is a numerical value with decimal places. PHP supports up to 14 digits after the decimal point. |
| Boolean | Boolean variables are the result of a logical operation and know only two values: TRUE (true) and FALSE (false). This type of variable is used when working with conditions. |
| Array | An array is a variable that can contain several elements. It’s a grouping of several similarly structured data that have been combined into an array. |
| Object | The variable type object allows programmers to define their own data types. It is used in object-oriented programming. We’ve included object variables in this PHP tutorial. |
| NULL | The NULL value represents a variable without a value. For variables of this type, NULL is the only possible value. |
Content centralization is typically managed through database systems. Nonetheless, variable values can also be directly assigned in the script. This type of assignment uses the following pattern:
$example = "value";The dollar sign is succeeded by the variable name (in this case example). It’s linked by the equal sign (=) with a value enclosed in double quotes. Integer and float type variable values are written without quotes (for example, $example = 24;and$example = 2.7;).
PHP provides flexibility when naming variables. However, certain restrictions do apply:
- Each variable begins with a dollar sign.
- A variable name is any string of letters, numbers and underscores (for example, $example_1).
- A valid variable name always starts with a letter or an underscore ($example1 or $_example), never with a digit (wrong: $1example).
- PHP is case-sensitive. The script language distinguishes between uppercase and lowercase ($example ≠ $Example).
- The variable name must not contain spaces or line breaks (wrong: $example 1).
- Strings reserved by PHP for other purposes cannot be used as user-defined variables (e.g. ,$this)
Let’s illustrate this with an example:
<?php
$author = "John Doe";
echo "<h1>Hello World!</h1>
<p>This dynamic web page was created by $author.</p>";
?>The opening PHP tag is followed by the definition of the variable. In this case, $author is assigned the value John Doe. Upon script execution, each instance of the variable $author within the script is substituted with the value John Doe in the script environment. A visual representation of this process in the web browser is illustrated in the following diagram:

If the webpage should be attributed to Max Mustermann, John Doe’s German colleague, and not John Doe, you can fix this by changing the $author variable.
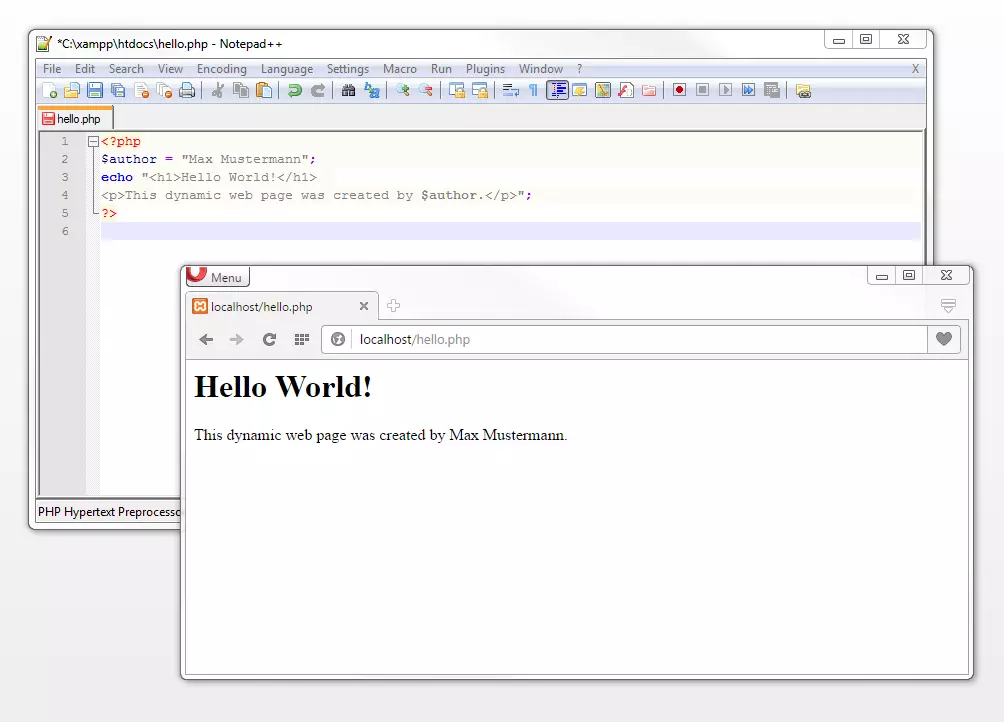
This is particularly efficient if a variable occurs several times within a script. In this case, a correction would only have to be made at a single point. Namely, where the value of the variable is defined.
This illustrates PHP’s prowess: Content can be embedded using variables. This characteristic forms the basis of dynamic web development. Unlike static web pages, which exist as pre-rendered HTML pages, dynamic web pages are generated only when the page is accessed. The PHP interpreter retrieves distinct elements of the requested web page from various databases through variables and compiles them into a tailored HTML page that aligns with the specific request.
The benefits of this approach are evident. When elements of the website (e.g., in the footer section) are modified, manual adjustments on each individual subpage aren’t necessary. Updating the corresponding entry in the database suffices. As a result, revisions are automatically applied to all web pages featuring the pertinent data as variables. If a variable is defined multiple times within a script, the new definition overwrites the previous one. A subsequent echo always outputs the current value of a variable.
<?php
$author = "John Doe";
echo "<h1>Hello World!</h1>
<p>This dynamic web page was created by $author.</p>";
$author = "Max Mustermann";
echo " <p>Supported by $author.</p>";
?>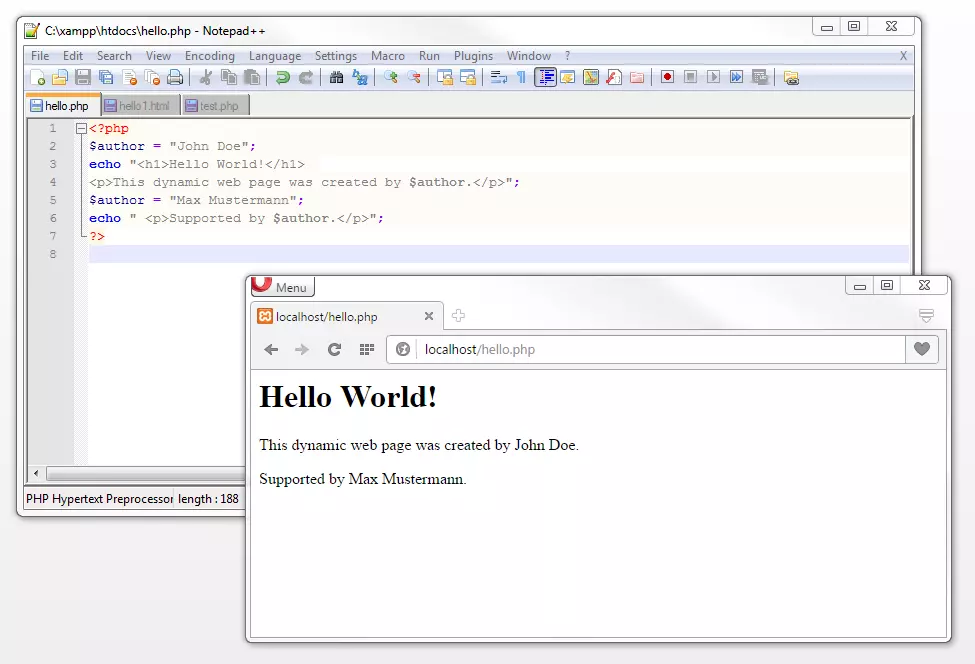
In the code example, the variable $author was first assigned the value John Doe and then replaced with the value Max Mustermann.
Now to the subject of quotation marks. Unlike strings, single variables do not need to be enclosed in quotation marks:
<?php
$author = "John Doe";
echo $author;
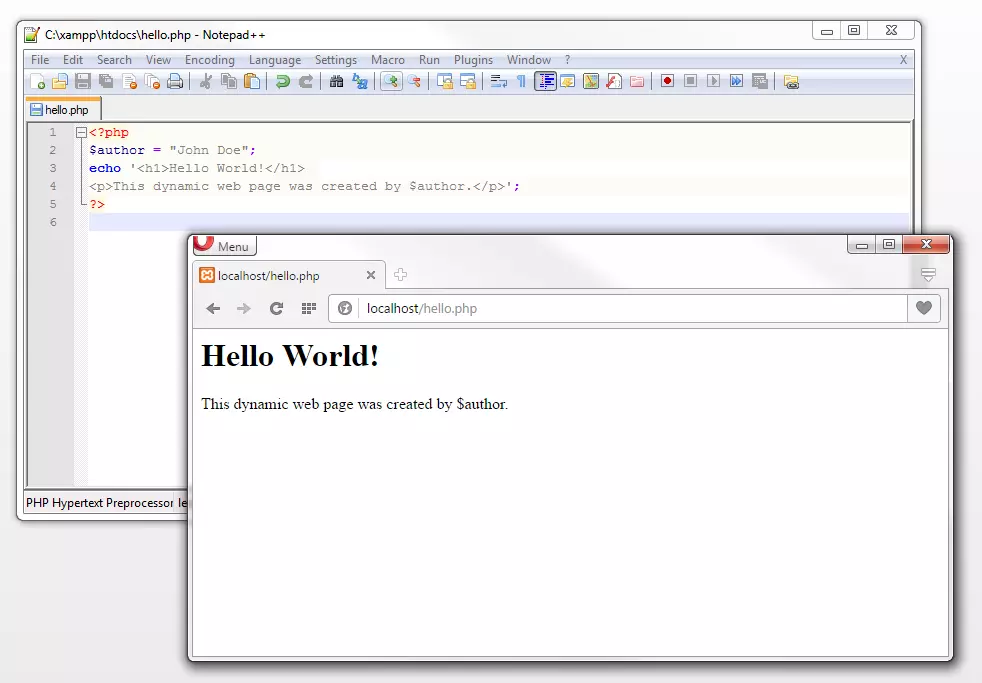
?>Except when the variable needs to be used within a string. In this case, work with double quotes (“). This instructs the PHP interpreter to scan the string for variables and replace them with their corresponding values as needed. Strings enclosed in single quotes (’) are interpreted and rendered as plain text information, even when they involve variables.
<?php
$author = "John Doe";
echo '<h1>Hello World!</h1>
<p>This dynamic web page was created by $author.</p>';
?>
You may now be wondering what happens if you omit the quotes altogether. In this case, PHP points them to a syntactical error.
Error messages and masking
If syntactical errors occur, there’s no valid PHP code and the PHP interpreter issues an error message. This can be expected, for example, if you use the echo statement with a string without quotes:
<?php
echo Hello World!;
?>Error messages in most cases contain information about where an error occurred, providing important information for how to eliminate it.
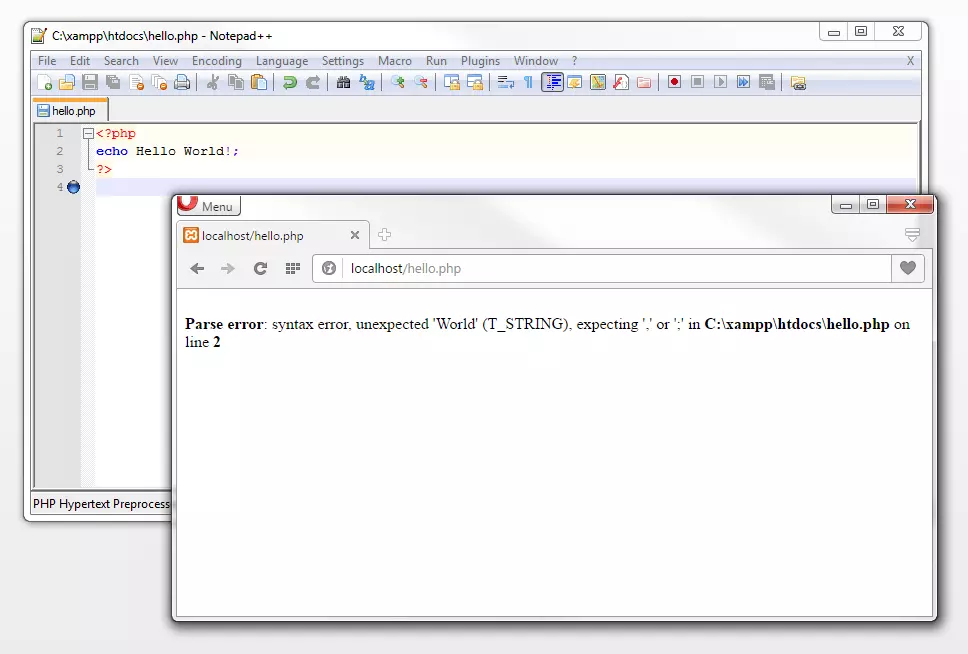
In the current example, an error is suspected in line 2 of our program code. This is exactly where we omitted the quotation marks.
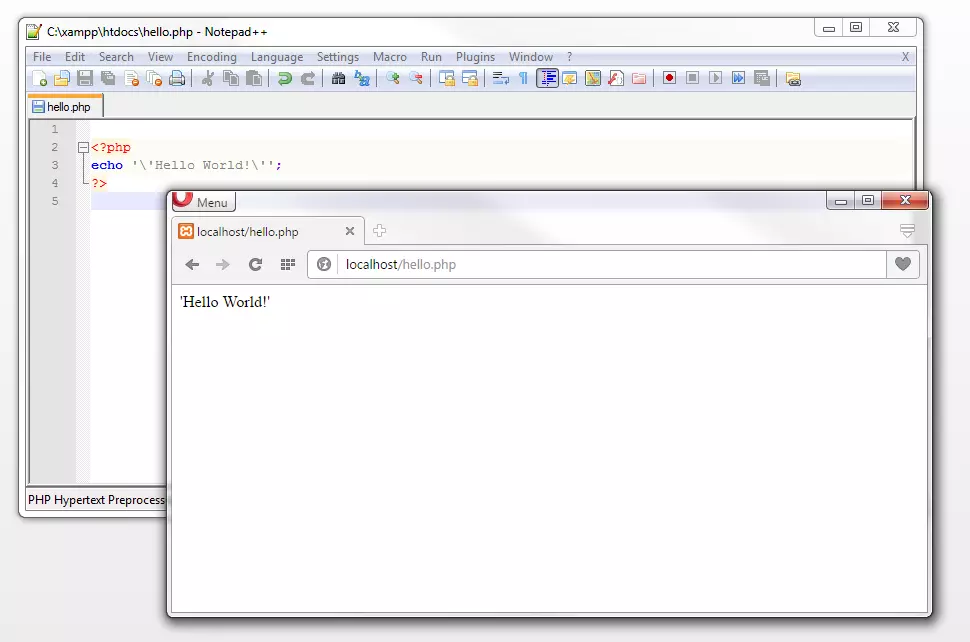
Syntactic errors also occur when you want to output characters as text that are associated with a specific task in PHP. An example of this is the quotation mark (’). Characters like this can only be output as text in PHP if you indicate to the interpreter that the character’s inherent function has been neutralized. In the case of single quotes, there are two ways to do this. You can enclose a single-quoted string in double quotes, or you can mask the quotes with a preceding backslash (\):
<?php
echo '\'Hello World!\' ';
?>
Combining single and double quotes is also a viable approach:
<?php
echo " 'Hello World!' ";
?>However, not this spelling:
<?php
echo ' 'Hello World!' ';
?>The spaces between the quotation marks have been inserted in the examples for readability purposes.
Concatenation operators
To output multiple variables within a PHP script at the same time, you could use what you’ve learned so far and do the following:
<?php
$author1 = "John Doe";
$author2 = "Max Mustermann";
echo "<h1>Hello World!</h1>
<p>This dynamic web page was created by $author1 and $author2.</p>";
?>Simply write both variables into the double-quoted string along with the rest of the text to be output. PHP automatically recognizes the variables by the dollar sign ($) and inserts the appropriate values.
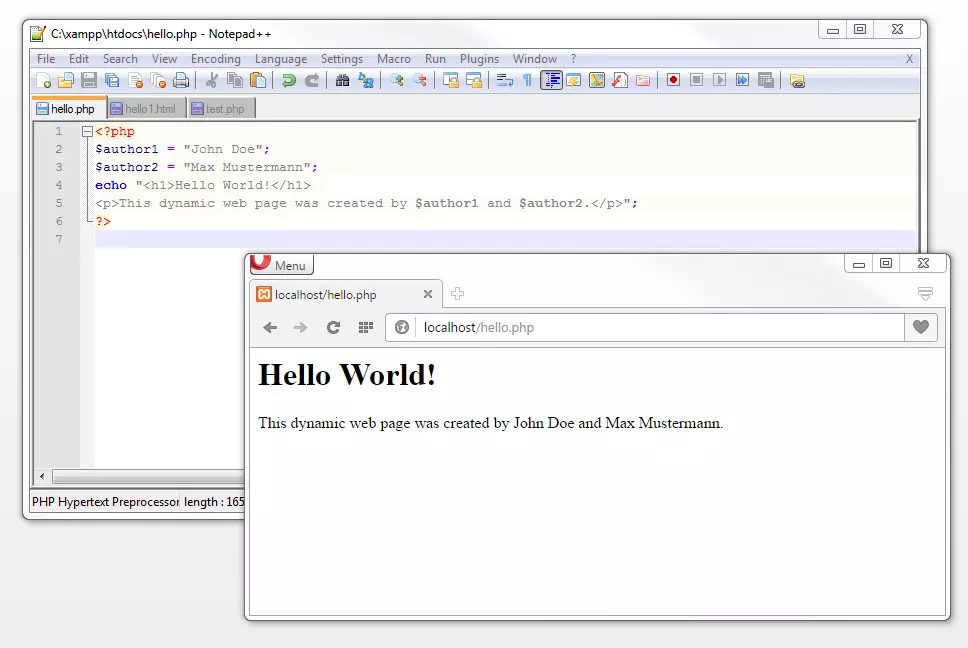
Among programmers, however, this procedure is regarded as unclean. There’s a programming rule that variables should not be part of the string. One reason for this is that many programming languages require this separation. More importantly, PHP also requires you to separate string and variable when working with function calls or more complex variables. Because of this, it’s best to keep them separated in plain text output as well, even if it’s not exactly necessary in this case.
When working with variables, you’ll always have to deal with several elements that have to be concatenated during output. In PHP, the concatenation operator (.) is used for this purpose. If programmed “cleanly”, the code for the above example should look like this:
<?php
$author1 = "John Doe";
$author2 = "Max Mustermann";
echo '<h1>Hello World!</h1>
<p>This dynamic web page was created by ' . $author1 . ' and ' . $author2 . '.</p>';
?>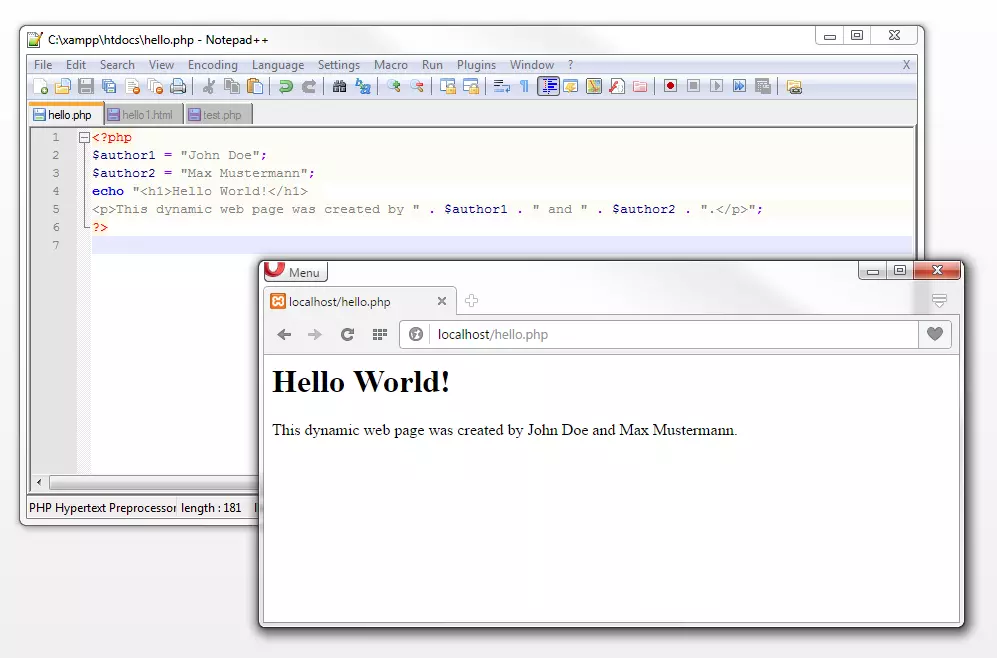
Here we are dealing with three strings and two variables that have been concatenated into one string.
| String1 | Variable1 | String2 | Variable2 | String3 | ||||
|---|---|---|---|---|---|---|---|---|
| ’<h1>Hello World!</h1> <p>This dynamic web page was created by ’ |
. | $author1 | . | ’ and ’ | . | $author2 | . | ’.</p>’ |
It’s important to mention that a concatenation operator merges strings or variables together without introducing spaces. If a space is intended, it needs to be explicitly included within the quotation marks within the string, as demonstrated in the example.
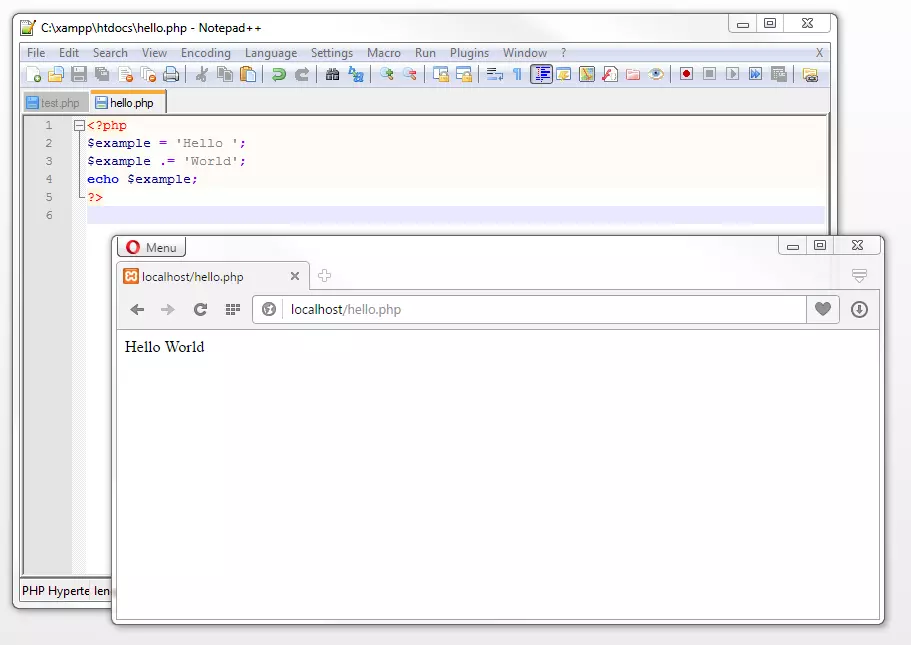
Programmers employ the concatenation operator not only to combine strings and variables for textual output, but also to extend variables. The following example illustrates how this is accomplished:
<?php
$example = 'Hello ';
$ example .= 'World';
echo $ example;
?>To extend the value of a variable, define it again, but put the concatenation operator dot (.) before the equal sign. This is the common shorthand notation for $example = $example . ‘world’.
PHP will append the new value to the previously defined one. If you want a space between the two values, write it at the end of the first string, as in the example.
Embed PHP in HTML
In principle, the PHP interpreter is only interested in code that is between an opening and a closing PHP tag:
<?php [This section is parsed by the PHP interpreter] ?>
The interpreter ignores all remaining sections of the document and forwards them to the web server without altering them. As a result, PHP code can be seamlessly incorporated into HTML documents as needed, for example, when crafting templates for content management systems. It’s crucial to save HTML documents containing PHP code with the PHP file extension. Otherwise, the document will be presented directly to the web browser without undergoing preprocessing by the PHP interpreter. This scenario would lead to the code being visible as text on the website.
You can think of the PHP interpreter as the lazy colleague of the web server, who only works when it’s explicitly asked to do so, e.g., by an opening PHP tag.
To combine HTML and PHP, write your HTML page in the classic document structure and save it under the file extension .php:
<!DOCTYPE html>
<html lang="de">
    <head>
        <meta charset="utf-8">
        <title>My first PHP page</title>
    </head>
        <body>
    <h1>Hello World</h1>
    <p>What is the current time and date?</p>
    </body>
</html>Now add a PHP script to your HTML document. Make sure that all the code is inside the PHP tags.
<!DOCTYPE html>
<html lang="de">
    <head>
        <meta charset="utf-8">
        <title>My first PHP page</title>
    </head>
    <body>
    <h1>Hello World</h1>
    <p>What is the current time and date?</p>
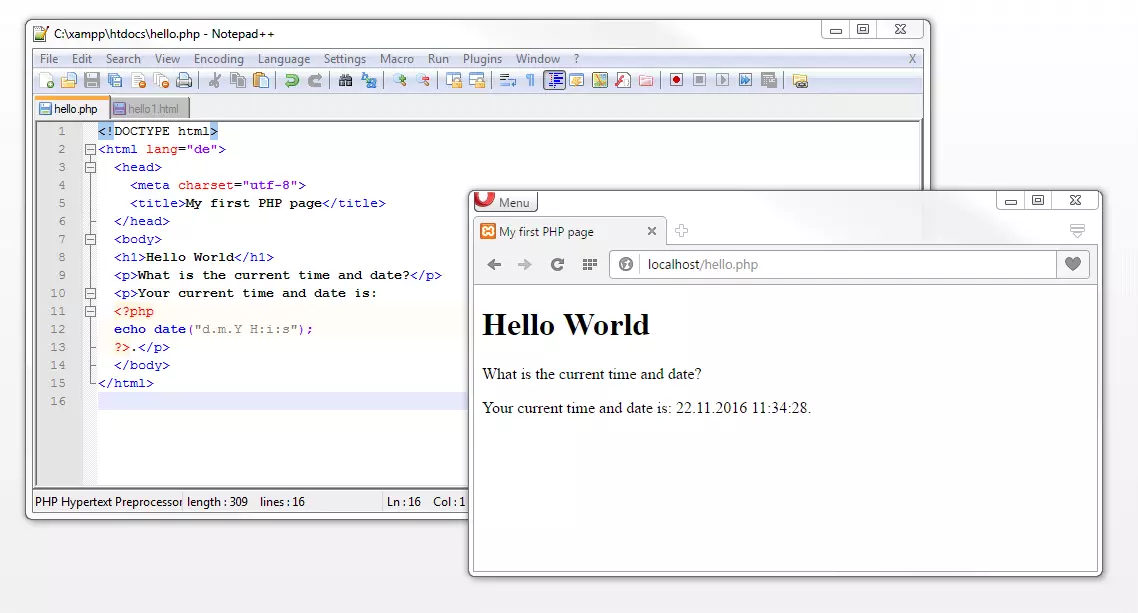
    <p>Your current time and date is:
    <?php
    echo date("d.m.Y H:i:s");
    ?>.</p>
    </body>
</html>In this instance, we’ve merged the language construct echo with the PHP function date() to output the present date and time as server-side text. The function’s parameter designates the preferred format, indicated as a string:
d.m.Y H:i:s = day.month.year hour:minute:second.
When a web browser requests such a file, the PHP interpreter initially executes the script, embedding the current time as text into the HTML document. Subsequently, the web server transmits this document, which is then exhibited in the browser as a web page.
PHP comment function
Similar to HTML code, you can leave comments in your PHP code as well. Comments within the source code are disregarded by the PHP interpreter as long as they adhere to the syntax rules. PHP offers three distinct methods for commenting.
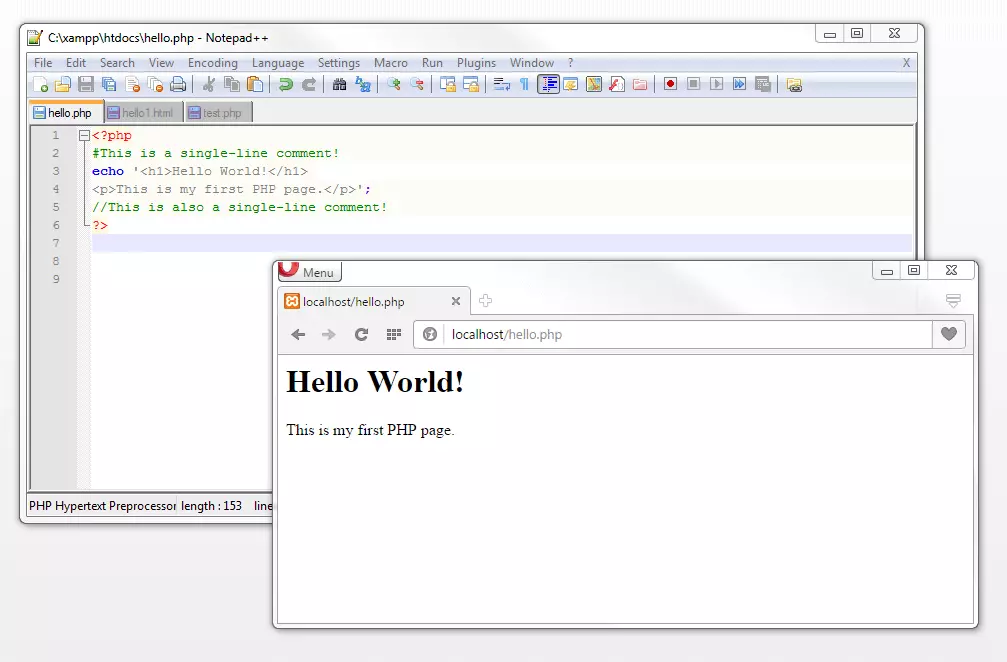
To designate a whole line as a comment and thereby exclude it from interpretation, you can either utilize the hashtag (#) or two consecutive slashes (//). Both options are used in the following code example:
<?php
#This is a single-line comment!
echo '<h1>Hello World!</h1>
<p>This is my first PHP page.</p>';
//This is also a single-line comment!
?>The Notepad++ text editor highlights comments in green. Unlike HTML comments, text sections labeled as comments within the script environment don’t reach the web browser. This distinction arises because they PHP interpreter already disregards them during script execution.
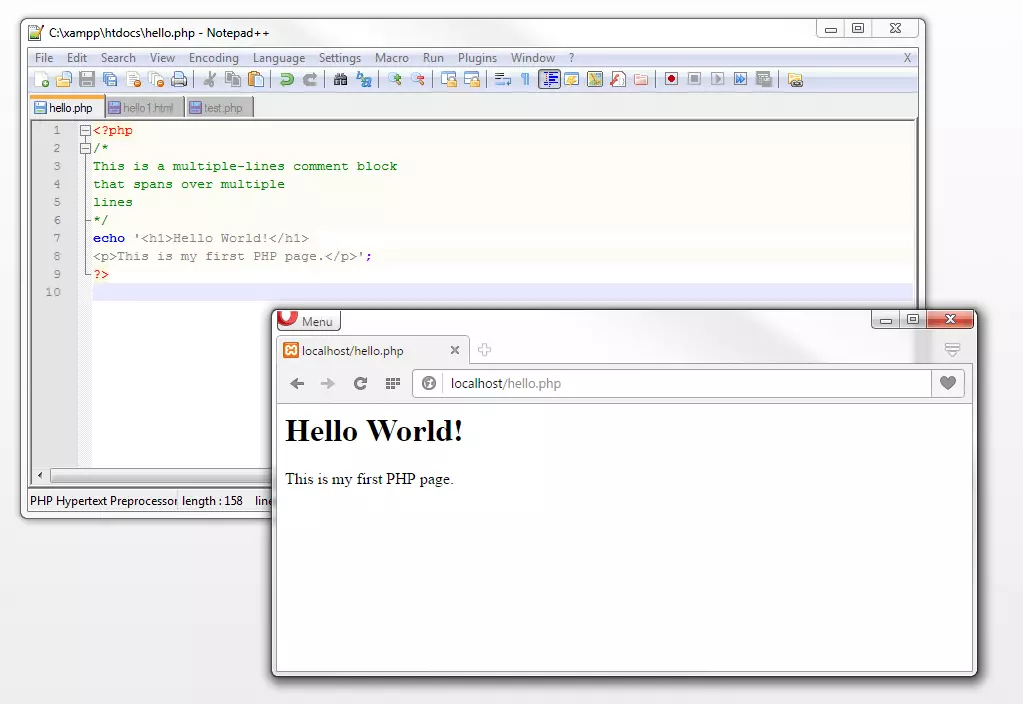
In addition, you can insert comments that extend over several lines. To do this, mark the beginning of a comment section with a slash followed by an asterisk (/*) and the end with an asterisk followed by a slash (*/).
<?php
/*
This is a multiple-line comment block
that spans over multiple
lines
*/
echo '<h1>Hello World!</h1>
<p>This is my first PHP page.</p>';
?>Such comments aren’t parsed and do not appear on the website.
Programmers use comments to structure the source code of their scripts, leave notes for later editing, or add internal information to the build, such as the author or date. Comments are optional and should be used sparingly to ensure good readability of the source code.
Calculating with variables
In our PHP tutorial, you’ve already encountered variables, primarily holding string values. Now, let’s delve into variables representing integers or floats. When variables store numeric values, PHP allows calculations to be performed with them. Let’s begin with by adding two integers:
<?php
$number1 = 237;
$number2 = 148;
$result = $number1 + $number2;
echo "result: " . $result;
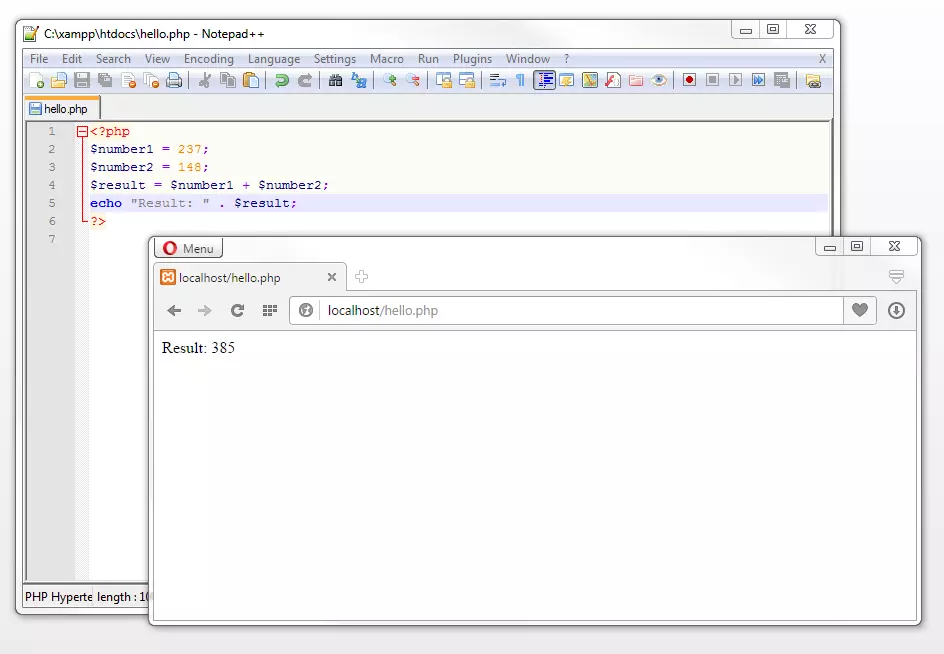
?>First, we assign the integers 237 and 148 to the variables $number1 and $number2 and then define the variable $result. This is used to store the sum of the variables $number1 and $number2. For this operation, we use the arithmetic operator +(plus). Finally, we output the sum as text using theecho language construct. Note that you do not need to use quotes when assigning numerical values to variables.
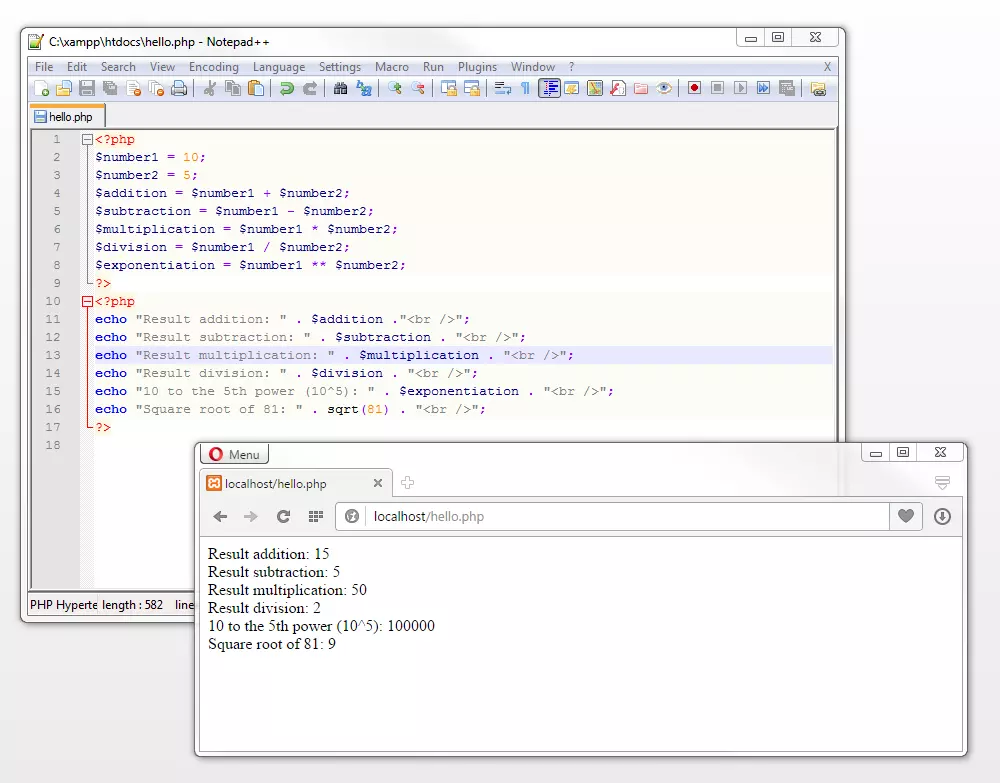
The following code example shows a selection of mathematical calculations that can be performed server-side with PHP. The PHP operators used correspond for the most part to standard mathematical symbols.
| Arithmetic operator | Operation | Result |
|---|---|---|
| $number1 + $number2 | Addition | Sum of $number1 and $number2 |
| $number1 - $number2 | Subtraction | Difference of $number1 and $number2 |
| $number1 *$number2 | Multiplication | Product of $number1 and $number2 |
| $number1 / $number2 | Division | Quotient of $number1 and $number2 |
| $number1 **$number2 | Power | $number2-th power of $number1 |
<?php
$number1 = 10;
$number2 = 5;
$addition = $number1 + $number2; //addition
$subtraction = $number1 - $number2; //subtraction
$multiplication = $number1 * $number2; //multiplication
$division = $number1 / $number2; //division
$power = $number1 ** $number2; //power
?><?php
echo "Result of addition: " . $addition ."<br />";
echo "Result of subtraction: " . $subtraction . "<br />";
echo "Result of multiplication: " . $multiplication . "<br />";
echo "Result of division: " . $division . "<br />";
echo "10 to the 5th power (10^5): " . $power . "<br />";
echo "root of 81: " . sqrt(81) . "<br />";
?>
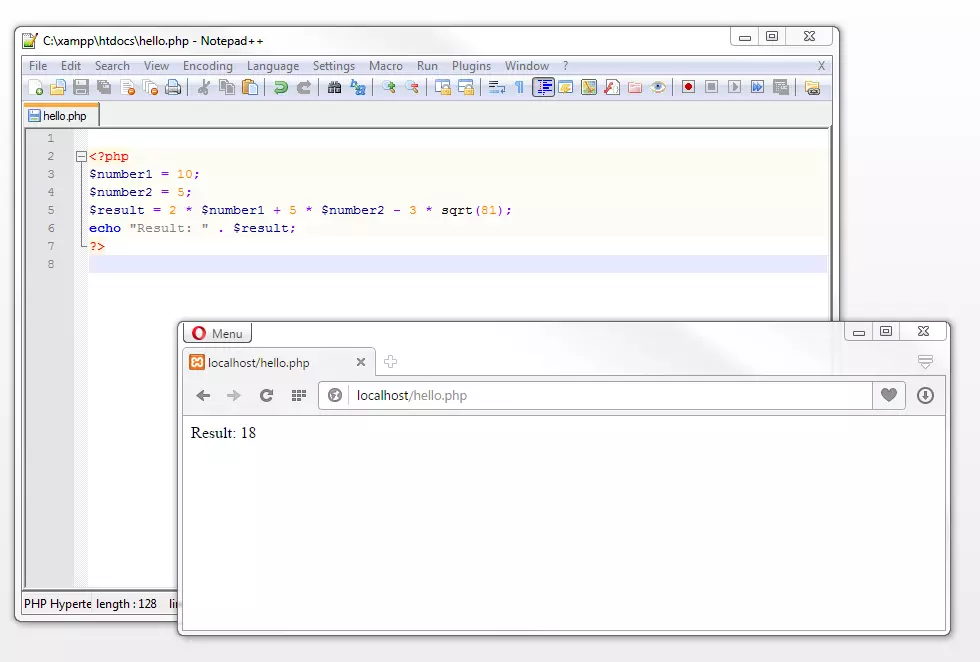
For complex calculations, various arithmetic operations can be combined in one script:
<?php
$number1 = 10;
$number2 = 5;
$result = 2 *$number1 + 5* $number2 - 3 * sqrt(81);
echo "Result: " . $result;
?>The PHP interpreter determines the values of the variables and calculates:
2 *10 + 5* 5 - 3 * √81 = 20 + 25 - 27 = 18
The function sqrt() calculates the square root of the bracketed parameter. The classic operator rank order of mathematics applies: dot before dash. The instruction echo outputs the result as a string for the web browser.
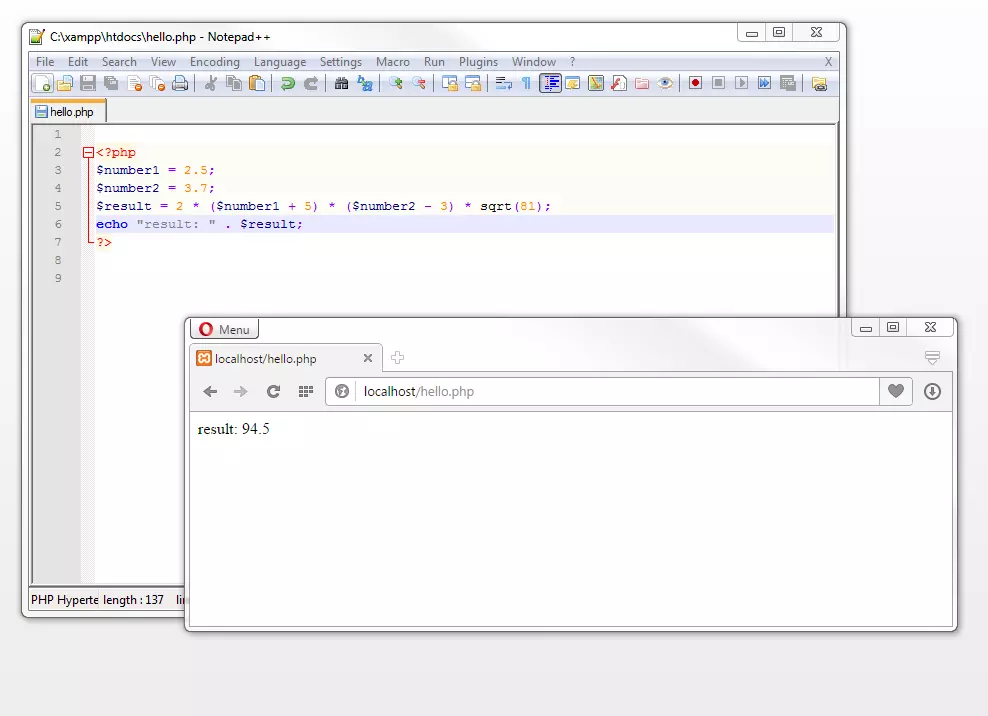
PHP also evaluates bracketed terms first. This time we’re going to work with floating point numbers:
<?php
$number1 = 2.5;
$number2 = 3.7;
$result = 2 *($number1 + 5)* ($number2 - 3) * sqrt(81);
echo "Result: " . $result;
?>
Like all common programming languages, PHP allows for operators to increment or decrement numeric values by the value 1. A distinction is made between the pre-increment operator, the pre-decrement operator, the post-increment operator and post-decrement operator.
| Operation | Operator | Result |
|---|---|---|
| Pre-increment | ++$number | The operator ++ increments the value of the variable $number. The value is incremented by 1. The result is returned as the new value of $number. |
| Pre-decrement | –$number | The operator – decrements the value of the variable $number. This decrements the value by 1. The result is returned as the new value of $number. |
| Post-increment | $number++ | The current value of $number is first returned and then incremented by 1. |
| Post-decrement | $number– | The current value of $number is first returned and then decreased by the value 1. |
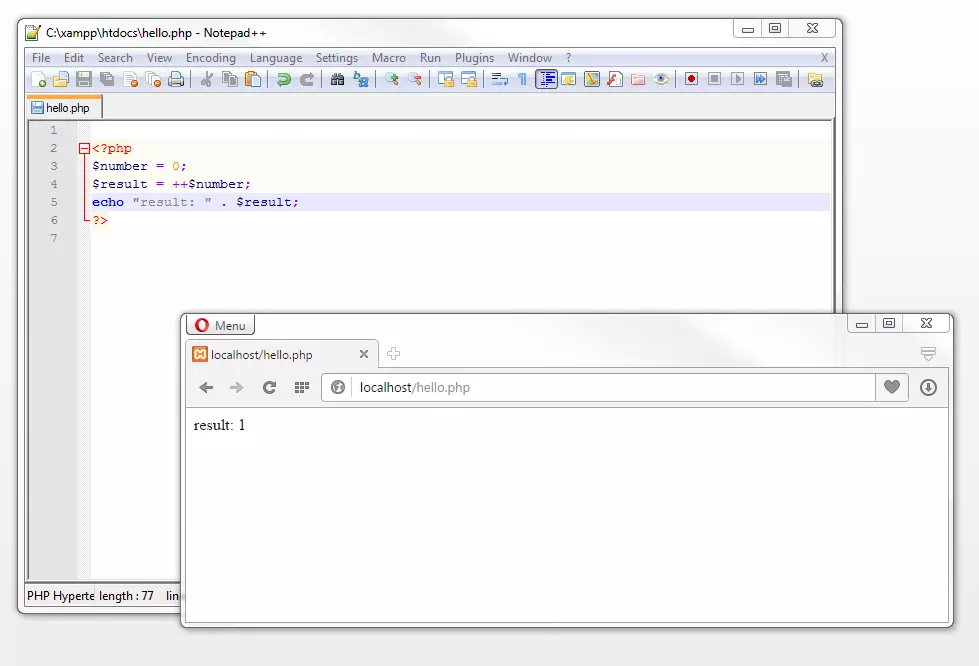
First, we’ll illustrate how to perform arithmetic operations with increment and decrement operators by providing an example with pre-increment. The following script increments the value of the variable $number by 1, stores the new value in the variable $result and then outputs its value as a string:
<?php
$number = 0;
$result = ++$number;
echo "Result: " . $result;
?>If you increase the value 0 by 1, you get the result 1.
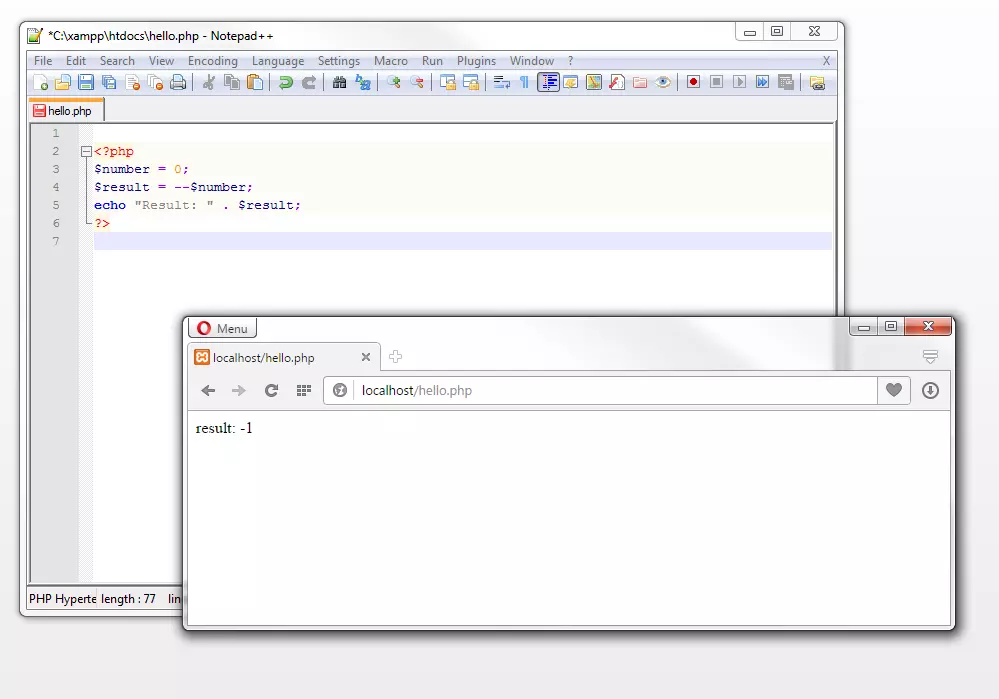
To compute the pre-decrement of the variable $number, we make use of the same scripts, but swap the pre-increment operator (++) for the pre-decrement operator (–):
<?php
$number = 0;
$result = --$number;
echo "Result: " . $result;
?>Here, we decrement the value 0 of the variable $number and get the result -1.
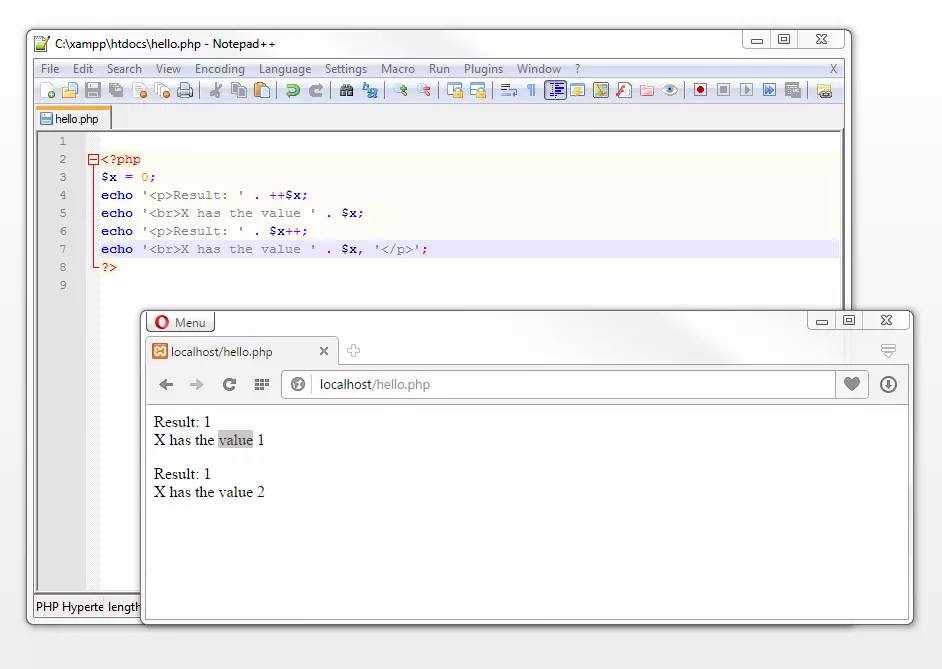
An increase before and after the output (pre- vs. post-…) of a value can be demonstrated with the following script:
<?php
$x = 0;
echo '<p>result: ' . ++$x;
echo '<br>x has the value ' . $x;
echo '<p>result: ' . $x++;
echo '<br>x has the value ' . $x, '</p>';
?>In both cases, we get the same result. With pre-increment, the value of x is increased before the output in line 3, while with post-increment, it’s incremented after the output in line 5.
How to use the $_GET and $_POST superglobals
You are now familiar with PHP fundamentals. You can work with variables, concatenate, and perfor, calculations. Next, we’ll illustrate the pivotal role of variables in scripting.
An important function of scripting languages is their ability to evaluate user input and transfer the values to another script. PHP relies on the superglobals $_GET and $_POST—predefinedsystem variablesavailable in all scopes—for data transfer. As associative arrays (data fields),$_GET and $_POST store a set of variables in the form of strings in a variable.
PHP arrays can be likened to a cabinet with multiple drawers. Each of these drawers provides a space for storing data. To maintain clarity about the contents of each drawer, you tag them with a variable name. Depending on the array type, this identifier can be an index or a key. In indexed arrays, you assign a numerical index to each drawer, whereas in associative arrays, you label the drawers using a string-based key.
The superglobals $_GET and $_POST encompass a collection of variables represented as keys, enabling access to the corresponding values. We’ll delve into this further when we explore the $_GET and $_POST superglobals in depth.
Data transfer via $_GET
The superglobal $_GET represents an array of variables that are passed to a PHP script using a URL.
If you spend time on blogs or inonline shopsandinternet forums, you might have noticed some odd URLs. Usually, they’re structured according to the following scheme:
http://hostname/ordner/filename.php?variablenname=variablevalue
For a blog, the scheme might look like this:
http://www.example-blog.com/index.php?id=1
Breaking down such a URL is relatively straightforward. On a web server that has the domain example-blog.com is a file named index.php. This file is used to craft dynamic web pages and typically contains HTML and PHP code, along with references to external template files and style sheets—essentially, all components necessary for webpage display.
The addition of id=1in a URL is a common way to tell if a webpage is dynamic. You’ll find this located after the question mark (?) in a URL. This component is known as an HTTP query string and contains a variable (id) and a value (1), which are linked by an equal sign (=). URL parameters of this nature are employed to generate dynamic web pages, retrieve database content and trigger appropriate templates.
Dynamic websites enable the separation of content and presentation. Although the index.php contains the information about a website’s structure, it still has to be filled with content. These are usually stored in a database and can be accessed using parameters in the HTTP query string. In the example, the URL of the index.php passes the parameter id=1. This specifies which content should be read from the database and loaded into index.php. In the context of a blog, it could be the ID of an article; for a forum, a particular post. For an online store, it could be a specific product.
If a URL contains more than one parameter, these are connected with an ampersand (&).
www.example-blog.com/index.php?page=article&id=1
Below we’ll show you how to use $_GET. For the example, it’s not necessary to use a database. In the following script we use the superglobal $_GET to read the values of the variables firstnameandlastname from an HTTP query string and write them to the PHP variables $variable1 and $variable2:
<?php
$variable1 = $_GET['firstname'];
$variable2 = $_GET['lastname'];
echo "Hello " . $variable1 . " " . $variable2 . "!";
?>The script is called by the following URL:
localhost/hello.php?firstname=John&lastname=Doe.
The parameters firstname=Johnandlastname=Doe have been passed. The output of the values is done just as before by using the language construct echo.
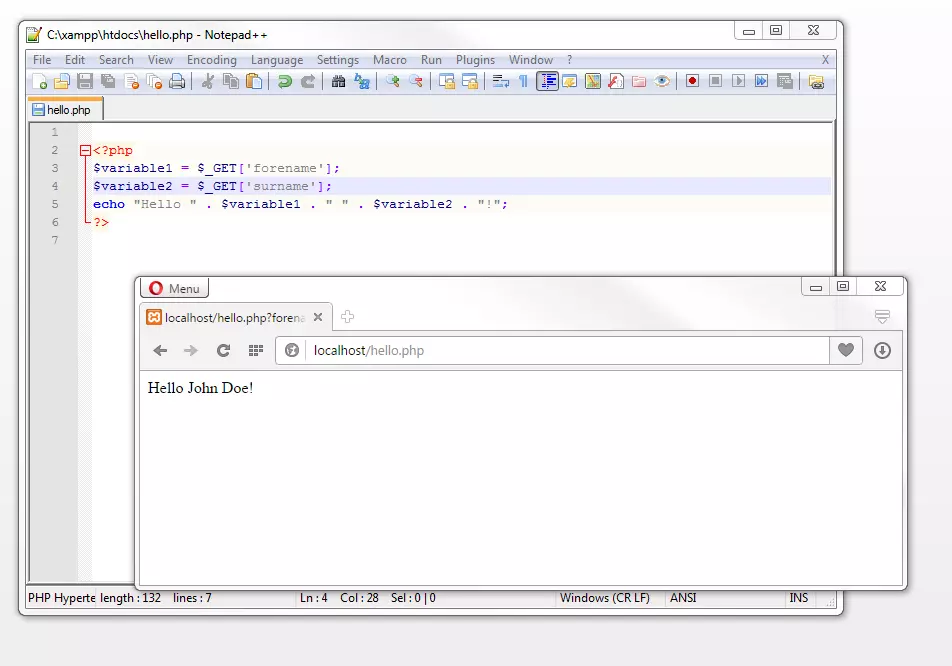
A data transfer via $_GET inevitably leads to the transferred data being visible in the address line. This means parameters that have been passed can be traced. The advantage is that variables can be stored in hyperlinks. In addition, users have the option of saving URLs including the HTTP query string as bookmarks in their browser.
However, the fact that GET parameters are listed in plain text in the URL makes this method incompatible with the transfer of sensitive data, such as data generated by online forms. In addition, the amount of data that can be passed using $_GET is limited by the maximum length of URLs.
You can get around these restrictions with the HTTP method POST. Data that is passed with this method can be found in the $_POST superglobal.
Data transfer via $_POST
While in the GET method, data is passed as a URL parameter, with $_POST, data transfer takes place in the body of an HTTP request. This makes it possible to even pass large amounts of data from one script to another.
A central application field of the HTTP POST method is the transfer of HTML form data. We will demonstrate this using the example of a newsletter subscription.
To do this, create a new PHP file with the name page1.php and copy the following code block:
<form method="post" action="page2.php" >
Please send your newsletter to: <br />
Your name: <input type="text" name="first name" /><br />
Your surname: <input type="text" name="lastname" /><br />
Your email address: <input type="text" name="email" /><br />
<input type="submit" value="Send form" />
</form>The HTML element <form> is used to create forms. The start tag contains two attributes: methodandaction. With the method attribute you define the transmission method, in this case HTTP-POST. In the action attribute, you store the URL of a script receiving all data entered via subsequent input fields. The example shows a HTML form with three input elements (input type=“text “) and a submit button (input type=“submit “). The file page2.php is defined as the recipient of the data.
To illustrate the data transfer using $_POST, we’ll use a simple script to evaluate the form data, which stores the submitted values as PHP variables and outputs them in text form. To do this, create a file page2.php and insert the following program code:
<?php
$name = $_POST["name"];
$surname = $_POST["lastname"];
$email = $_POST["email"];
echo "Hello " . name . " " . $lastname . ", <br />
You have registered with the following e-mail address:" . $email . ".";
?>Save the two PHP files in the htdocs folder of your test server and call page1.php from the following URL in your web browser: http://localhost/page1.php. Your browser will now show you the interactive web interface of your HTML form.
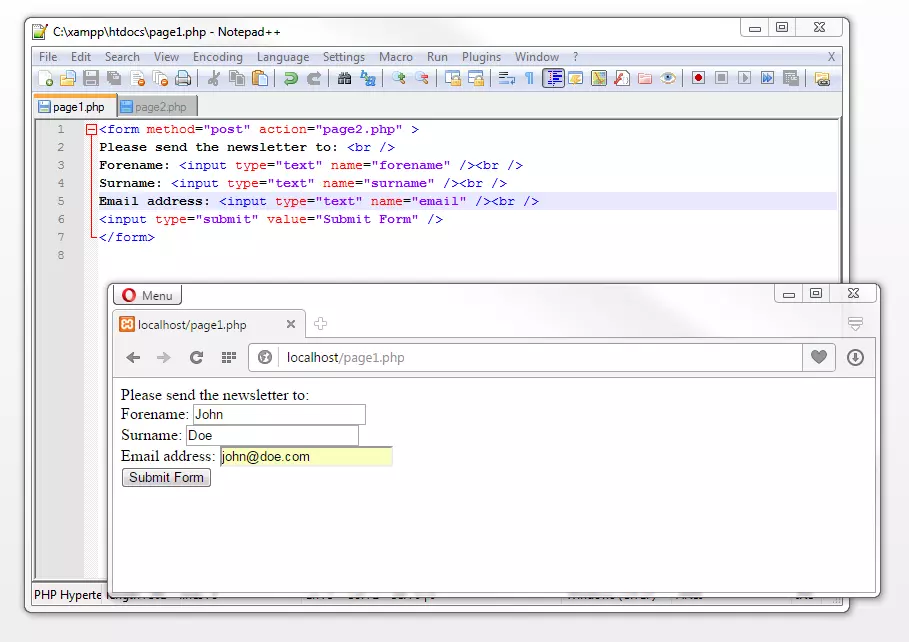
Enter any credentials and press the submit button to transfer variables from one script to another. Once you confirm the page1.php inputs, you’ll be immediately redirected to page2.php. The browser window will show the result of the script execution based on the submitted data.
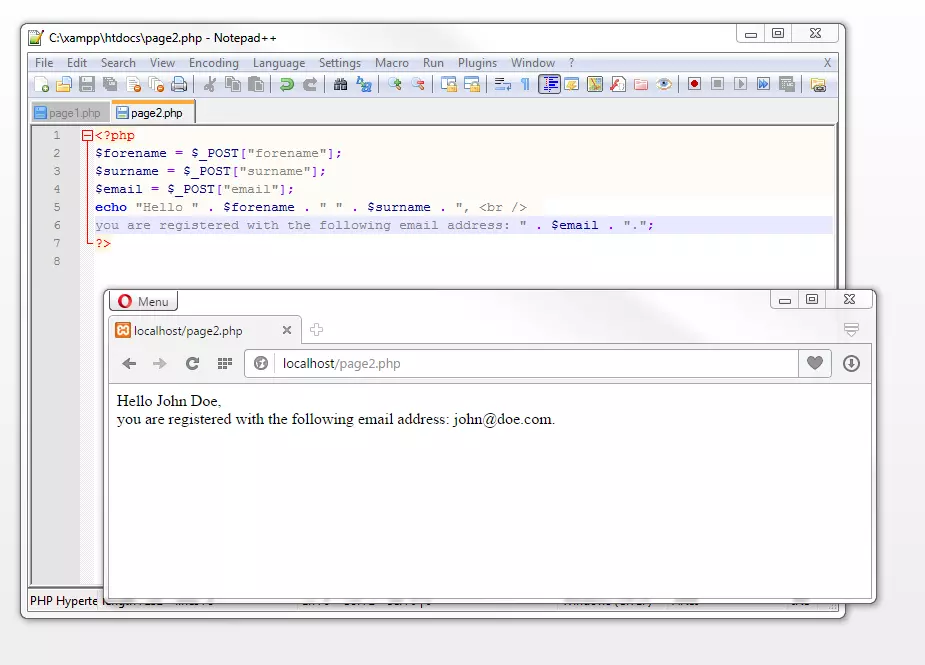
User input captured via the input fields page1.php will be retrieved by page2.php via:
$_POST["input field name"]
The line $firstname = $_POST[“firstname”] retrieves the input in the input field firstname and stores it in the variable $firstname. The variable $firstname can, in turn, be output as a string using echo.
How to use PHP comparison operators and the IF construct
So far we’ve defined variables, passed them from one script to another, and output them as strings. In the next step, you’ll learn to tie the execution of code fragments to certain conditions.
The language construct if lets you write scripts in such a way that statements only take effect when a condition you define is met, for example, entering the correct password.
Conditions are defined in PHP according to the following basic framework:
<?php
if(expression)
    {
    statement;
    }
?>This reads as follows: If the condition as outlined in expression is met, the statement will be executed. A condition is always fulfilled if the if construct returns the result TRUE (true). Otherwise, it’s considered FALSE (false). In this case, the statement will be skipped over.
Usually, the if construct checks whether the value of a variable corresponds to what was defined in the condition. This control structure is usually realized on the basis of comparison operators.
Comparison operators
Comparison operators are used in formulating conditions to put two arguments into a logical relationship that can be evaluated as true (TRUE) or false (FALSE). When comparison operators are used in PHP control structures, they’re applied to two variables in the expression of an if construct:
if ($a == $b)
    {
    statement;
}In language terms, the control structure is as follows: If variable $a is equal to variable $b, then the statements defined in the statement are executed.
The PHP comparison operators are based on the C programming language and their notation differs considerably from classical mathematical symbols. An overview can be found in the table below.
| Comparison operator | Description | Condition |
|---|---|---|
| == | equals | The condition is met if $aand $b have the same value. |
| === | is identical | The condition is met if $aand $b have the same value and belong to the same data type. This can be illustrated with an example where an integer (1) is compared with a string (“1”): 1 == “1” //TRUE 1 === “1” //FALSE For conditions that require two variables to be equal, it’s best to always use the relational operator === (is identical). |
| != | is unequal | The condition is met if $aand $b have unequal values. |
| !== | not identical | The condition is met if $aand $b have unequal values or belong to different data types. |
| < | is smaller than | The condition is met if value $a is smaller than value $b. |
| > | is larger than | The condition is met if the value of $a is greater than the value of $b. |
| <= | is less than or equal to | The condition is met if the value of $a is smaller than the value of $b or $aand $b have the same value. |
| >= | is greater than or equal to | The condition is met if the value of $a is greater than the value of $b or $aand $b have the same value. |
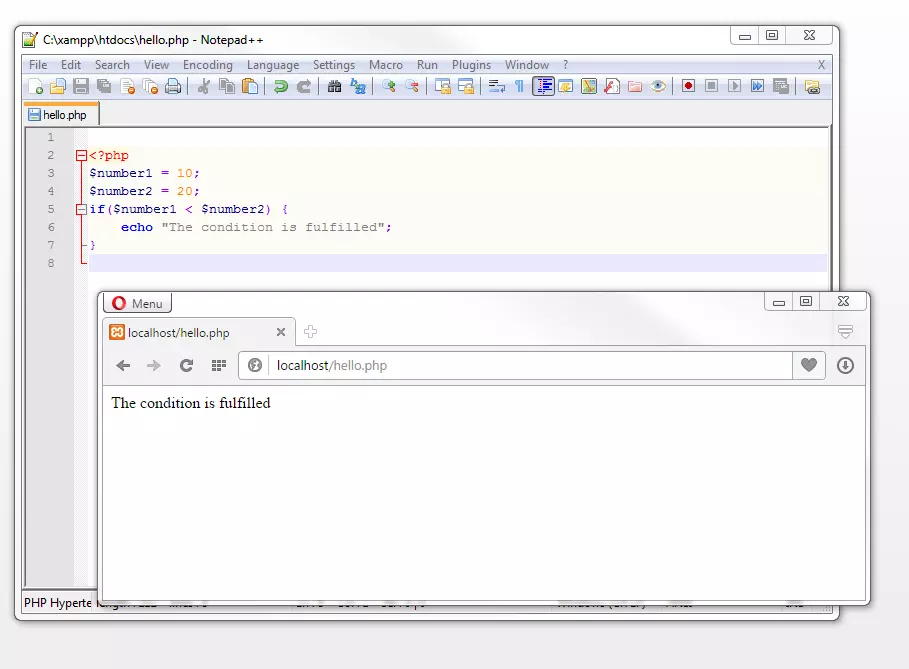
The following script should clarify this control structure. Two integers are compared. The comparison operator < (is smaller) is used:
<?php
$number1 = 10;
$number2 = 20;
if($number1 < $number2) {
    echo "The condition is fulfilled";
}We define the variables $number1 and $number2 and assign them the values 10and20. Afterwards, we set a condition: If $number1 is less than $number2, the string listed in the echo statement should be output.
The result of the script execution contains the answer: 10 is smaller than 20. The if construct returns the result TRUE. The condition is fulfilled.
To define statements that are executed if a condition is not met, add the language construct else to the if statement to form an if-else statement in PHP:
<?php
if(condition a)
    {
    statement b;
    }
else
    {
    statement c
    }
?>This script checks whether condition a returns TRUE or FALSE. If condition a is met (TRUE) statement b is executed. If condition a is not met (FALSE), statement b is skipped and statement c is executed instead.
Let’s extend our script by the else construct and exchange the comparison operator < (is smaller) for == (is equal):
<?php
$number1 = 10;
$number2 = 20;
if($number1 == $number2)
    {
    echo "The condition is fulfilled";
    }
else
    {
    echo "The condition is not fulfilled";
    }
?>This time the if construct returns FALSE. The value of the variable $number1 is not equal to the value of $number2. The condition is not fulfilled. Thus, the statement listed under if is not executed, but the one defined under else is.
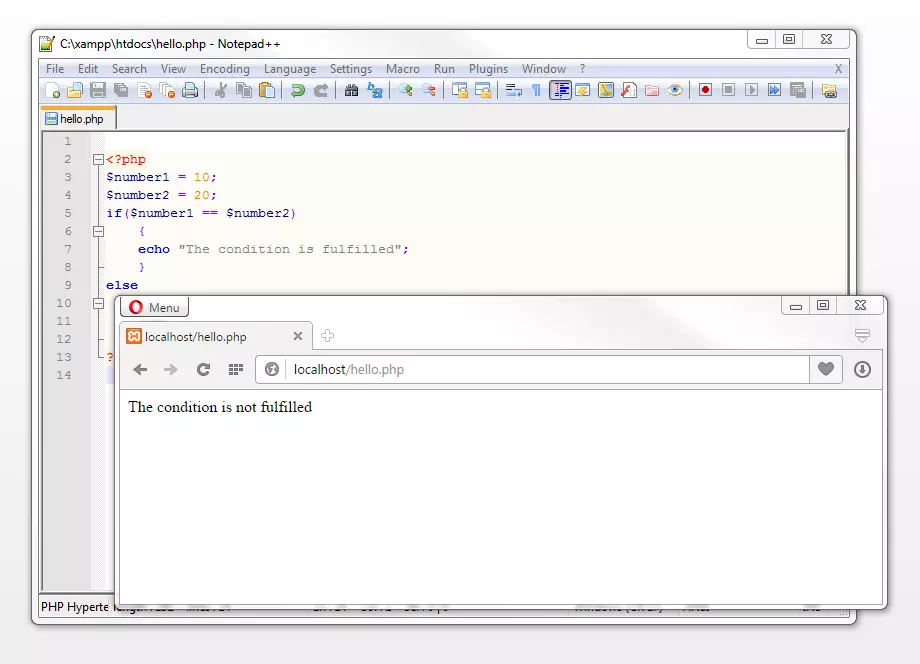
To bind the execution of a code fragment to two values being equal, a double equal sign (==) is used in PHP. A single equal sign (=) is used to assign values to variables.
You can negate conditions by putting an exclamation mark (!) before an expression.
<?php
$number1 = 10;
$number2 = 20;
if ($number1 == $number2)
    {
    echo "The numbers are the same.";
    }
if (!($number1 == $number2))
    {
    echo "The numbers are not equal.";
    }
?>This example highlights the condition $number1 == $number2 and its negation. !($number1 == $number2) is equivalent to ($number1 != $number2).
A practical application of ifandelse is the password query based on an HTML form. We can simulate this using our PHP files page1.phpandpage2.php.
Open page1.php and paste the following code:
<form action="page2.php" method="post">
Please enter your password: <input type="password" name="password" />
<input type="submit" value="send" />
</form>The structure corresponds to a previously created form. This time, however, one input field is sufficient: the password query. As before, user input is passed to the page2.php script.
We can adapt this using the following code so that the password entry is compared with a stored password:
<?php
$password = $_POST["password"];
if($password=="qwertz123")
    {
    echo "The password was correct";
    }
else
    {
    echo "The password was incorrect";
    }
?>The code can be explained as follows: Initially, we assign a value to the $password variable on line 2, which we retrieve using the HTTP POST method. We then define the following control structure: The if construct in line 3 should check whether the value of the variable $password matches the string qwertz123. If this is the case, the string The password was correct is output. If if returns the result FALSE, else is used in line 7 and the string The password was incorrect is output.
Now we call the script page1.php via the URL http://localhost/page1.php.
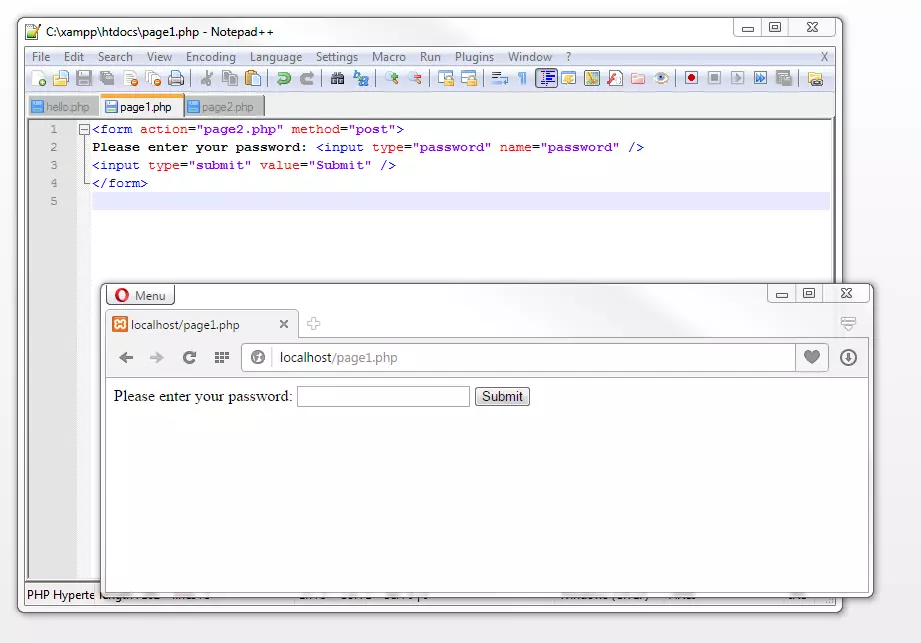
The browser presents the web view of our HTML password request form. We enter the password quertz123 defined in script page2.php, then click on the Submit button.

The web browser automatically redirects us to page2.php while the if control structure compares our input with the stored password. It comes to the result “qwertz123 == qwertz123 is TRUE” and then outputs the string The password was correct.
Test it yourself to see what happens when you type a different password into the input field.
Logical operators
Conditions that you define using comparison operators in the expression of the if construct can be combined with other conditions in the same expression if required. PHP relies on the logical operators ANDandOR.
| Close Bond | Weak Bond | Description |
|---|---|---|
| && | AND | Both conditions associated with the operator must be TRUE. |
| || | OR | Only one of the two conditions associated with the operator must be TRUE. |
To combine conditions, you can use closely bound and weakly bound logical operators in PHP. In practical usage, employing either of the two spellings alone won’t yield any noticeable distinction. If you combine both spellings, you’ll find that OR and || bind more closely than AND and OR. Also, AND and && bind more tightly than OR and ||. This is comparable to the operator ranking known from mathematical operators (e.g., dot before dash: *binds more closely than+).
The password query offers a practical example. Typically, login credentials include a secret password and a username. The login is only successful if both entries match the data stored in the system.
Now, we’ll open our password query form again in Page1.php and add an input field for the username:
<form action="page2.php" method="post">
Username: <input type="text" name="username" /><br />
Password: <input type="password" name="password" /><br />
<input type="submit" value="Submit" />
</shape>In the next step, we need to adjust the control structure of the if construct. We use the logical operator AND to link the condition for the password query with a condition for the username query.
<?php
$username = $_POST["username"];
$password = $_POST["password"];
if($username=="John Doe" AND $password=="qwertz123")
    {
    echo "Welcome to the internal area" . $username . "!";
    }
else
    {
    echo "Access failed";
    }
?>In our script page2.php the values for usernameandpassword are obtained and saved in the variables $usernameand $password. The expression within the if construct now contains two conditions linked by the logical operator AND. Both conditions have to be met (username==“John Doe”and$password==“qwertz123”) forifto return the resultTRUE.
While retrieving the username from the input field username, we can directly use it in the textual output using the echo statement. Welcome to the internal area is followed by the value in $username. Should either of the two conditions not be fulfilled, the text output will be: Access failed.
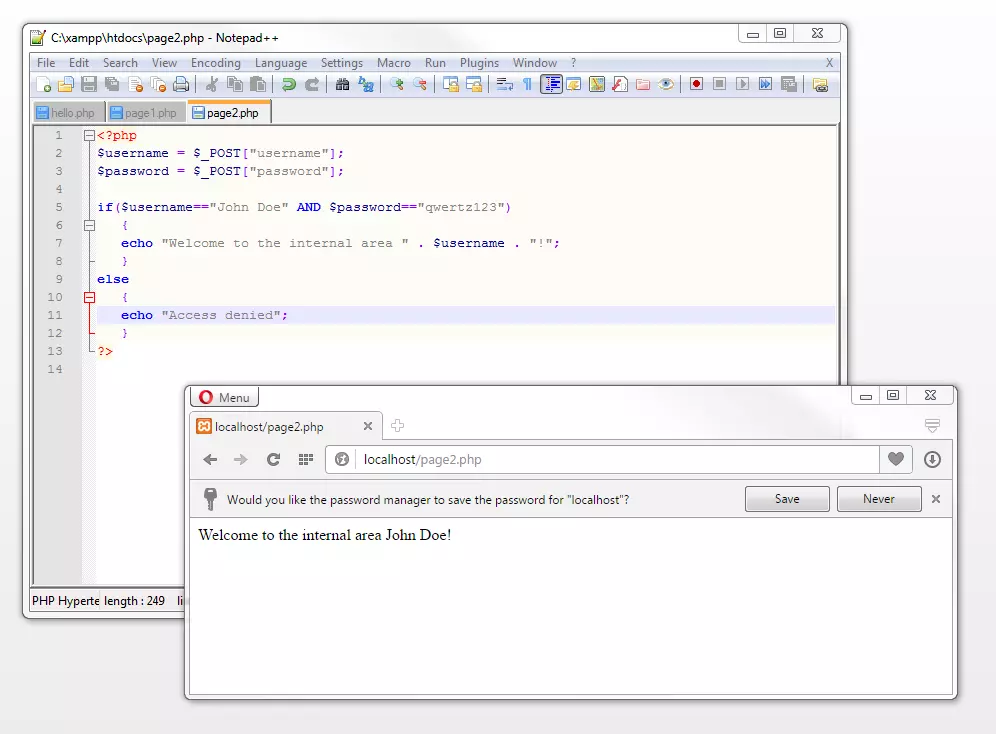
Logical operators can be combined in any way. Keep in mind that AND has a higher operator precedence than OR. As with mathematical equations, PHP allows you to use parentheses to indicate precedence.
How to use loops (while, for)
Sometimes a script must run through a certain section of code several times before executing the rest of the program code. Programming languages use the concept of loops for this. There are three types of loops in PHP:
- while loops
- do-while loops
- for loops
while loops
The while loop is the simplest type of loop in PHP. Here is the basic structure:
while (condition)
    {
    loop step and other instructions
}The while loop tells PHP to execute substatements as long as the while condition is met. To do this, the PHP interpreter checks the condition at the beginning of each loop pass. The execution of the subordinate code is only stopped when the while condition is no longer met.
This principle can be illustrated with a simple counting script:
<?php
$number = 1;
while ($number <= 10) {
    echo $number++ . "<br />";
    }
?>
The concept of incrementing was introduced in the Calculating with Variables section of this tutorial. In the subsequent script, we build upon this concept, but with a twist. This time, we utilize a post-increment operator. This raises the value of the integer variable $number by 1 after each iteration of the loop, immediately following the echo text output. We set the condition for the while loop as follows: $number is greater than or equal to 10. Consequently, the echo statement will be executed repeatedly until the $number surpasses a value of 10.
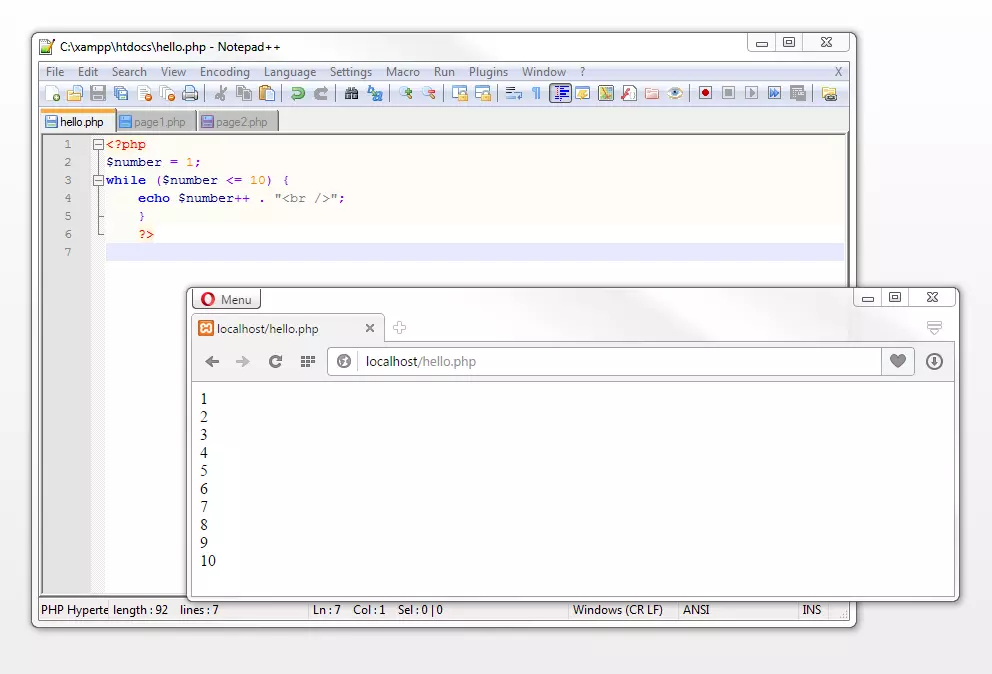
The result of the script execution is a string that prints the value of the variable $number for each loop pass before it is incremented. As a result, the script counts from 1 to 10 and stops executing the code as soon as the while condition is no longer met.
do-while loops
The structure of the do-while loop is similar to that of the while loop. The only difference is that the condition is not checked at the beginning of each loop pass, but only at the end. The basic scheme of a do-while loop is as follows:
do {
     loop step and other instructions
     }
while (condition)Programmed as a do-while loop, the preceding script would look like this:
<?php
$number = 1;
do {
    echo $number++ . "<br />";
    }
while ($number <= 10);
?>In this case, the result remains the same. What’s special about the do-while loop is that it is run through at least once, even if the condition is not met in any loop pass.
for loops
Generally, the for loop in a PHP script has the same function as the while loop. Unlike the while loop, however, the start value, condition, and statement are written on one line instead of spread over three or more lines. The basic structure of the for loop is:
for (start value; condition; loop step)
instructionsThe example above could be written more compactly as a for loop:
<?php
for($number = 1; $number <= 10; $number++) {
    echo $number . "<br /> ";
}
?>First, the value 1 is defined for $number. Then PHP checks whether the condition $number <= 1 is met. If this is the case, the loop is continued and the statements below the loop are executed (here the statement is echo). Once this has been done, the loop steps will be executed. In this context, the choice between pre- or post-increment becomes irrelevant, as this step always takes place before output. Once the loop step concludes, the subsequent iteration of the loop initiates.
In a for loop, the seed, condition, and loop step are considered optional components. In theory, even empty loops are feasible. However, such loops would be redundant.
It is basically up to you whether you write your PHP scripts with a for or a while loop. However, there’s an argument for choosing for loops: When for loops are used, you have a better view of the framework data of the loop. This avoids the risk of accidentally writing a forever loop that runs until the interpreter’s memory is full. Referring to the previous example, this can happen when you forget to increment the value of the $number variable.
However, if the loop is to be run through at least once, regardless of the condition, the do-while loop is the loop to go with.
breakandcontinue statements
The execution of a while, do-while or for loop can be influenced by the breakandcontinue statements. Use break to interrupt the flow of a loop at any point and continue to skip a loop pass. Both statements are bound to a condition using if. The following example shows our counting script with a break:
<?php
for ($number = 1; $number <= 10; $number++) {
    if ($number == 5) {
      echo "If it is 5, we abort the script!";
      break;
    }
echo $number . "<br /> ";
}
?>In the for loop, we’ve defined that the value of the variable $number should be increased by the value 1 in each loop round, starting at 1, until the variable has reached the value 10. We can stop this loop prematurely using break as soon as $number has reached the value 5. The language construct echo only outputs the numbers 1 to 4.
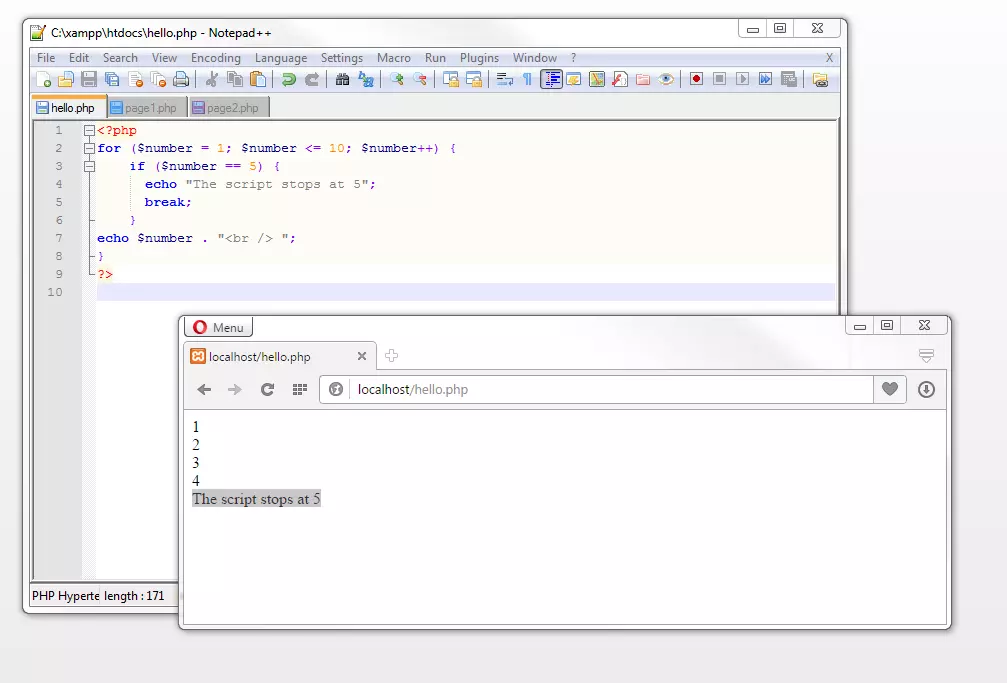
To skip the output of the fifth round, but not stop the entire loop flow, we replace the break statement with continue:
<?php
for ($number=1; $number <= 10; $number++) {
    if ($number == 5) {
      echo "Let's skip the 5!<br />";
      continue;
    }
echo $number . "<br /> ";
}
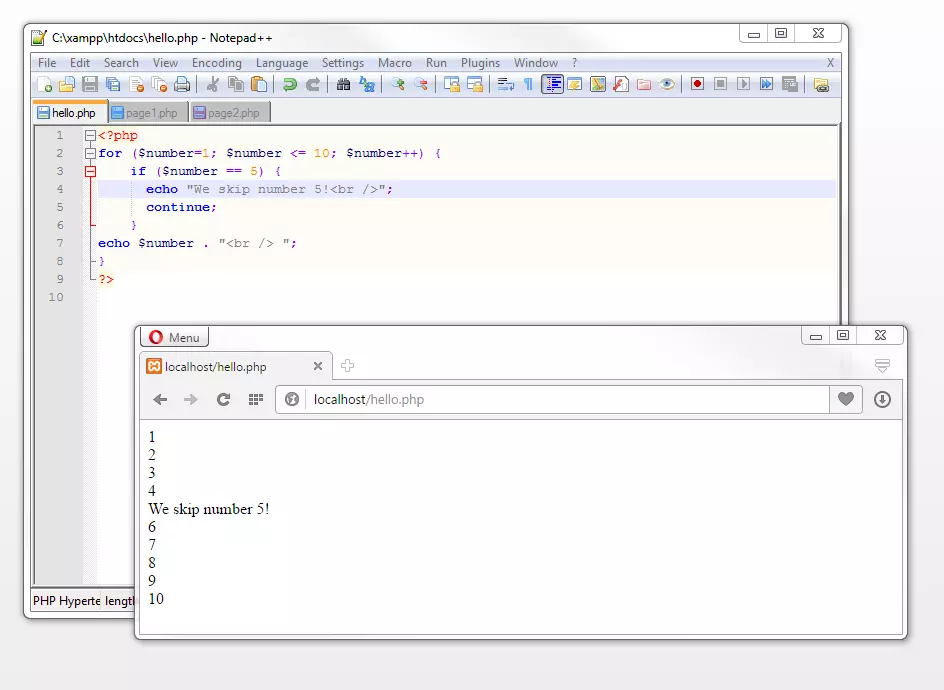
?>Instead of the digit 5, PHP outputs the text string We skip number 5! defined under if.
How to carry out file operations
Dynamic web content is structured around the principle of separating content and presentation. To achieve this, scripting languages like PHP offer a diverse array of functionalities that facilitate the seamless integration of content from external data sources into central template files. In practice, these data sources are usually databases that are managed using management systems such as MySQL. You can find out how this works in our MySQL tutorial.
It’s also possible to include data from files. Below we’ll show you how to read files as a string into a PHP script and save text output from your script in files.
Reading files
To read the contents of a file, PHP has various functions. Of these, file()andfile_get_contents() are particularly suitable for the task at hand. While the file_get_contents() function reads the entire contents of a file into a string, the file() function saves the contents as an array. Each element of the array corresponds to a line of the file. Using file() makes it easier to output each line individually.
We’ll demonstrate the PHP file operations on the text file example.txt, which we place in the htdocs folder of our test server. The file contains four lines of dummy text:
Lorem ipsum dolor sit amet, consectetuer adipiscing elit. Aenean commodo ligula eget dolor. Aenean massa. Cum sociis natoque penatibus et magnis dis parturient montes, nascetur ridiculus mus. Donec quam felis, ultricies nec, pellentesque eu, pretium quis, sem.
First we need to read the entire file as a string. To do this, we have to assign the name of the corresponding file as a parameter to the file_get_contents() function:
file_get_contents('example.txt')
Now we have the opportunity to work with the string that has been read. For example, we can assign this to a variable and output it as text in the web browser:
<?php
$example = file_get_contents('example.txt');
echo $example;
?>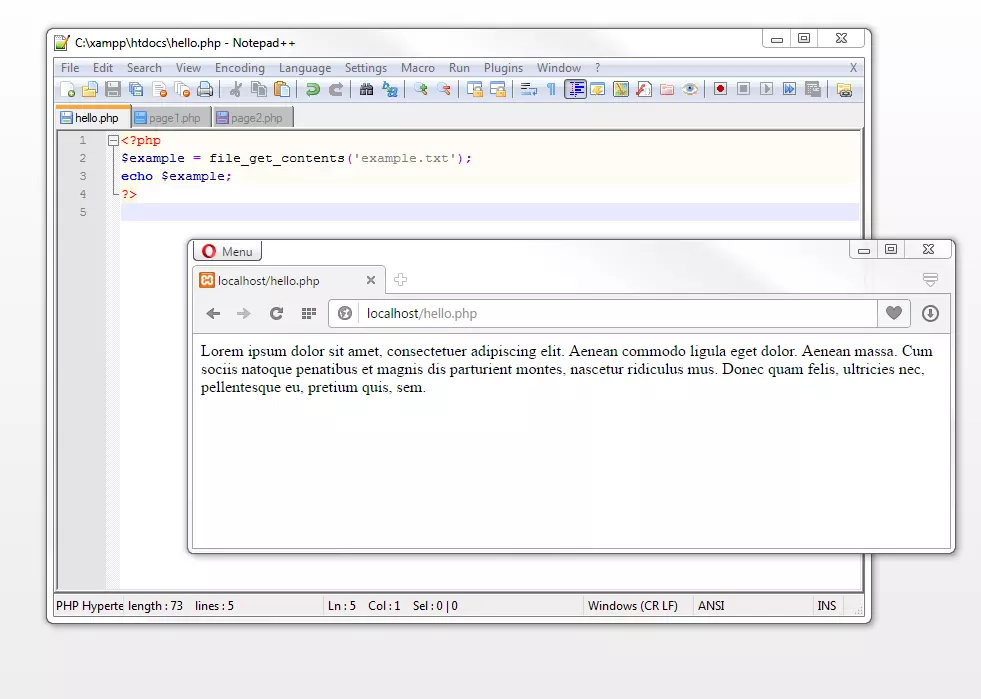
In the browser view, we can see that the text string is output without paragraphs. The line breaks of the original file aren’t visible. That’s because the web browser interprets the script’s text output as HTML code. Breaks that were defined in text editors are lost.
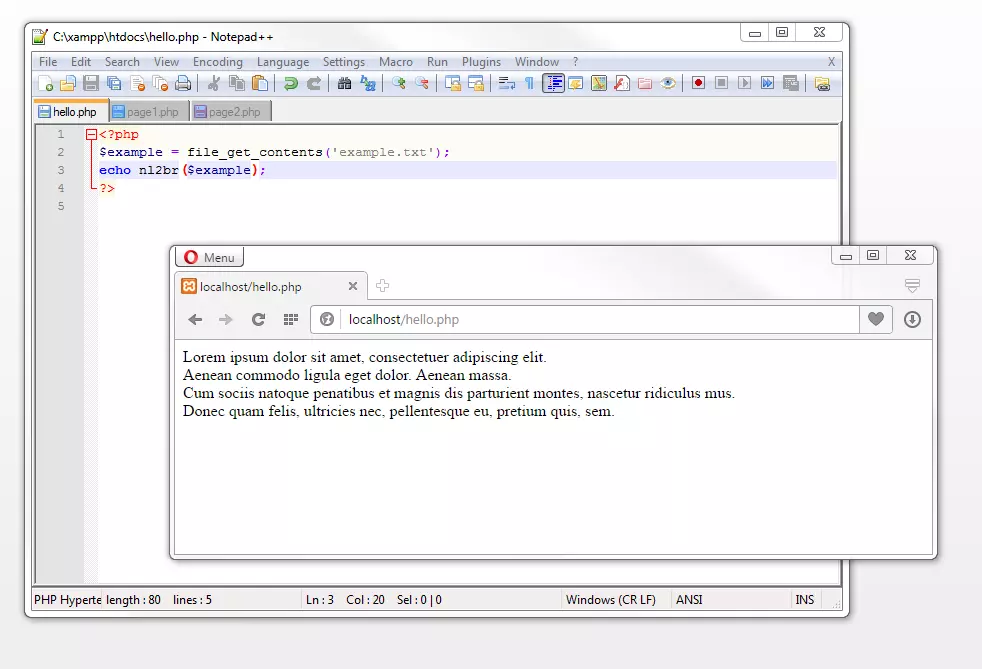
To have the original structure retained, you’ve got a few options. You can add the HTML coding for the line break (br) in the source file manually using search and replace, put a <pre> around the file content, set the CSS property white-space: pre -wrap, or use the nl2br() function to signal PHP to automatically convert line breaks (new lines) to HTML line breaks (breaks). Here’s the code:
<?php
$example = file_get_contents('example.txt');
echo nl2br($example);
?>If the echo language construct is used in combination with nl2br(), PHP inserts an HTML line break before each new line.
To output the lines of a file individually, you can use the file() function. This reads a file, numbers all lines starting with the number 0 and saves their contents as elements of an array. Applying this to our example produces the following result:
[0] = Lorem ipsum dolor sit amet, consectetuer adipiscing elit
[1] = Aenean commodo ligula eget dolor. Aenean massa.
[2] = Cum sociis natoque penatibus et magnis dis parturient montes, nascetur ridiculus mus.
[3] = Donec quam felis, ultricies nec, pellentesque eu, pretium quis, sem
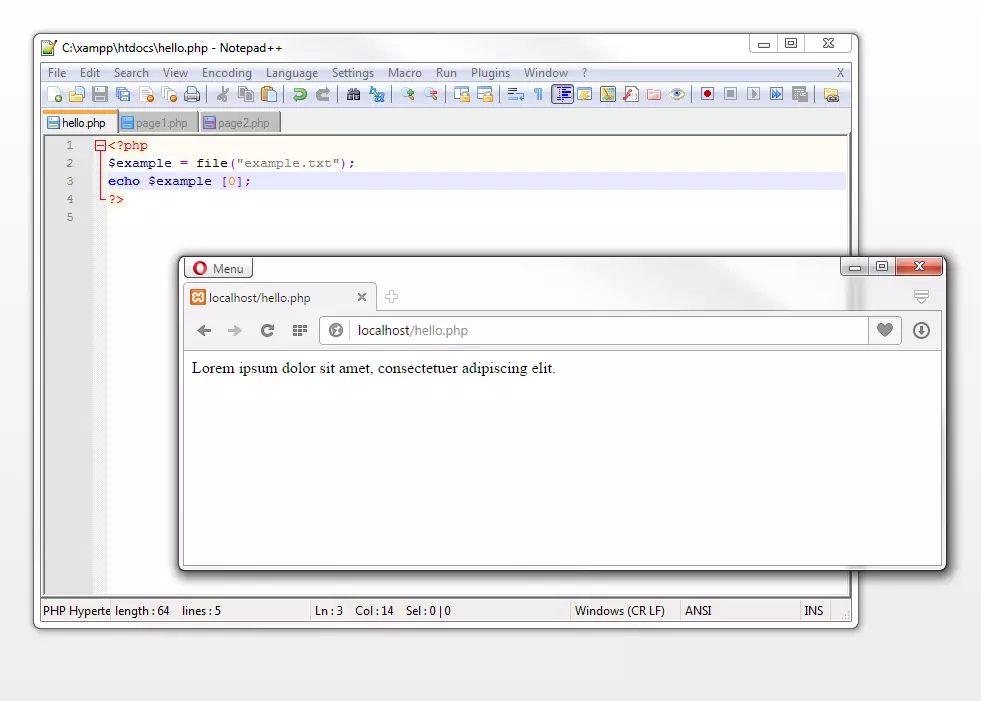
To output the respective content using echo, just specify the desired line number. For example, the following script only provides us with the first line of the file example.txt as output for the browser:
<?php
$example = file("example.txt");
echo $example [0];
?>
Write files
PHP goes beyond mere file reading by also letting you read, create and modify files effortlessly.
Using the file_put_contents() function is a prime example. It requires just two parameters: the target file’s name and the data, which can be a string or an array. In the script below, a new file called test.txt is created, containing the string This is a test!. The inclusion of \r\n ensures a line break in the file.
<?php
file_put_contents("test.txt", "This is a test! \r\n");
echo "test.txt has been created!";
?>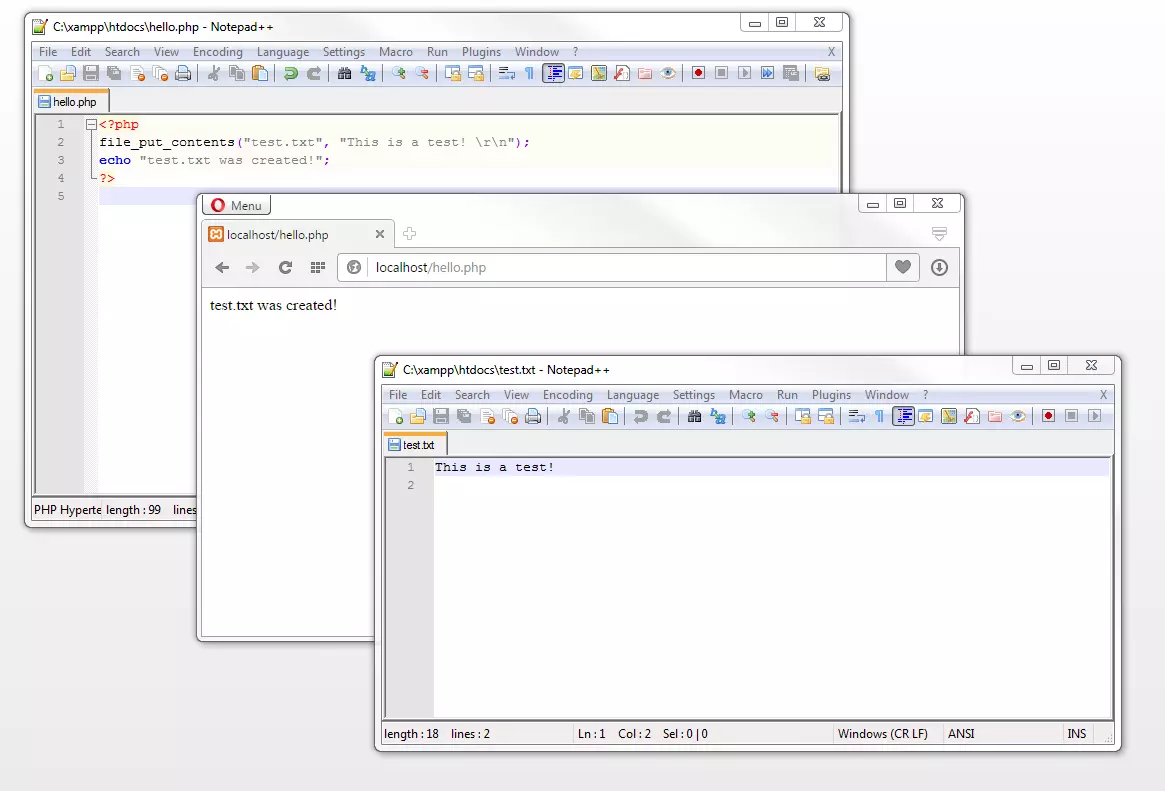
Since file_put_contents doesn’t give us any output for the browser, we add an echo statement that tells us what action is being performed.
If there’s already a file with the same name in the target folder, it will be overwritten. You can prevent this by setting the FILE_APPEND parameter:
<?php
file_put_contents("test.txt","The test was successful! \r\n", FILE_APPEND);
echo "test.txt has been updated!";
?>By using file_put_contents() with the parameter FILE_APPEND, new content will be appended to existing content.
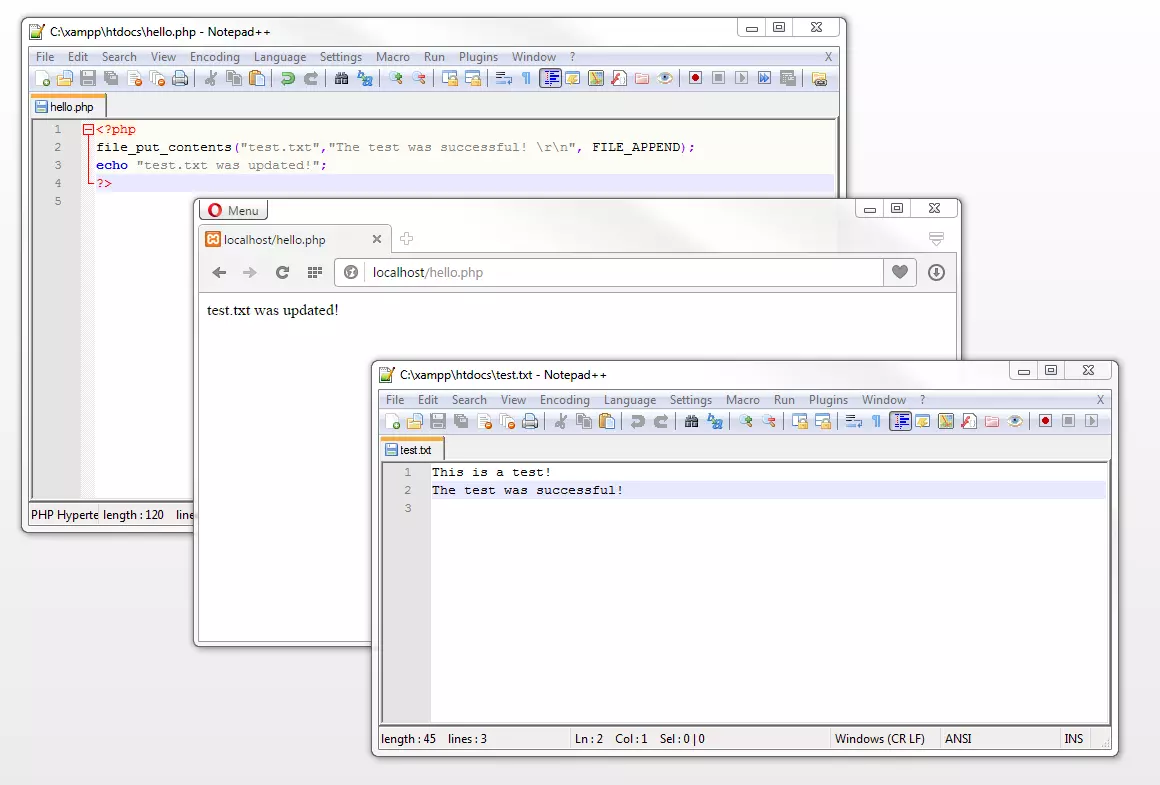
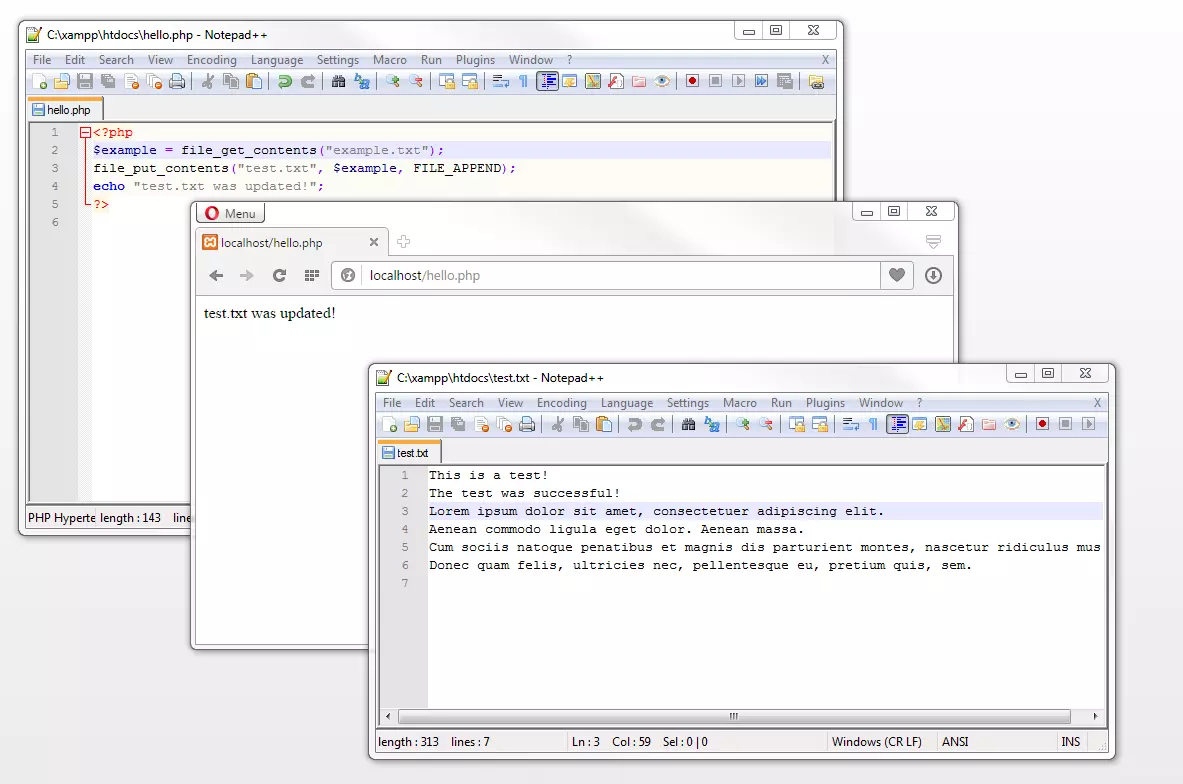
What PHP writes to the target file doesn’t necessarily need to be defined in the script. Alternatively, you can transfer content from one file to another. The following script reads the content of example.txt and inserts it into the test.txt file:
<?php
$example = file_get_contents("example.txt");
file_put_contents("test.txt", $example, FILE_APPEND);
echo "test.txt has been updated!";
?>