How to find duplicate files in Windows 10
If duplicate files pile up, this leads to a cluttered hard drive and wasted storage space. A variety of free tools can help you to find and remove duplicate files in Windows 10. We will tell you all about the best tools you can use and explain how they work.
Why you should remove duplicate files
If you create backups regularly or have been using your operating system for a long time, you will inevitably accumulate duplicate photos, documents, and videos. This happens quicker than you might think, for example when you move folders to another location by copying and pasting them by means of a Windows Shortcut. When you have hundreds of files, removing duplicate files quickly becomes a Sisyphean task, especially if you have to find duplicate file names and remove them manually. You then have to devote a whole day to digital cleaning in order to free up storage space. Luckily, there is a more practical solution. There is a variety of different tools designed to deal with this annoying storage space problem and help you to find duplicate files.
If you not only want to remove duplicate files, but also to bring structure to the contents of your data carrier, there are different file managers for Windows, Linux, and Mac for clear system management.
Finding duplicate files in Windows 10: How it works
You can use one of the following tools to find duplicate files. We will show you how they work.
Tool 1: Anti-Twin
Anti-Twin is a free program that finds and removes duplicate files. Regardless of whether it’s photos, music, or documents – Anti-Twin searches your system for duplicates and then lists the results clearly.
How to use it:
Step 1: Download the Anti-Twin freeware from a trustworthy site.
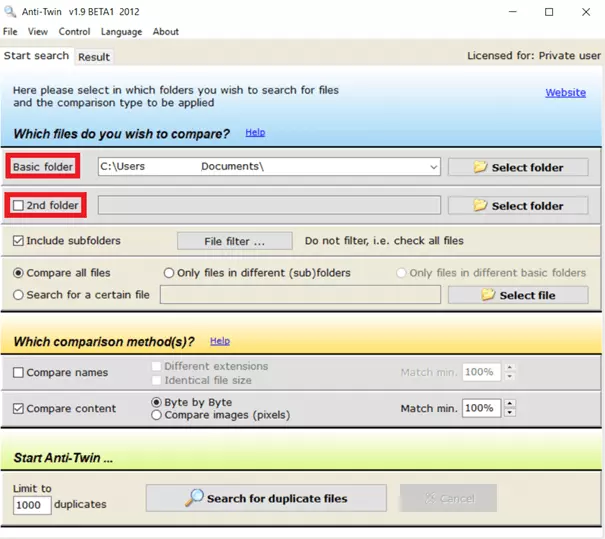
Step 2: Start Anti-Twin and specify the folder to be searched under “Basic folder”. You can add another folder under “2nd folder”.
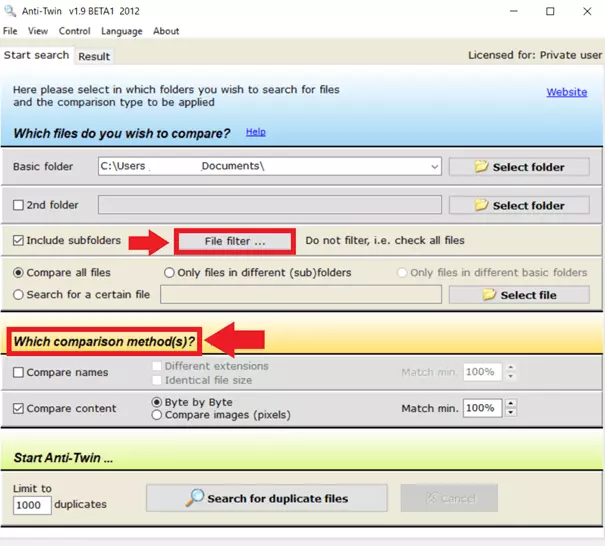
Step 3: Check “Include subfolders” if you also want to scan all subfolders. Alternatively, you can define a “File filter”. You can also decide if you want to compare all files, only files in different folders, or a certain file. Then under “Which comparison method(s)?” you can set the parameters for your search. You can compare file extensions and sizes and either scan content “Byte by Byte” or by pixels. You can also define the required minimum match.
Step 4: Start the search. Once the search has finished, Anti-Twin will list the files that it has found for removal.
Tool 2: AllDup
AllDup is a freeware that you can use with Windows 10 to easily find and remove duplicate files. The free tool searches either your entire hard drive or only selected folders. If you want to remove specific duplicate files (e.g., in folders for photographs or images), it is advised that you check specific folders individually. You can perform a search according to the following parameters: file name, size, attribute, contents, as well as creation and modification date.
How to use it:
Step 1: Download the free tool AllDup from a trustworthy site. You can either install the tool with Windows or you can opt for the portable version.
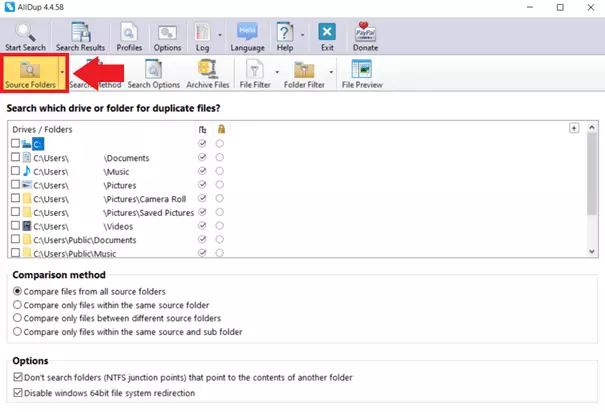
Step 2: Start AllDup by double-clicking on it and then go to “Source Folders” in the user interface. Select a standard drive such as C: or D: (with or without subfolders). You can then select additional, user-specific folders from those listed below.
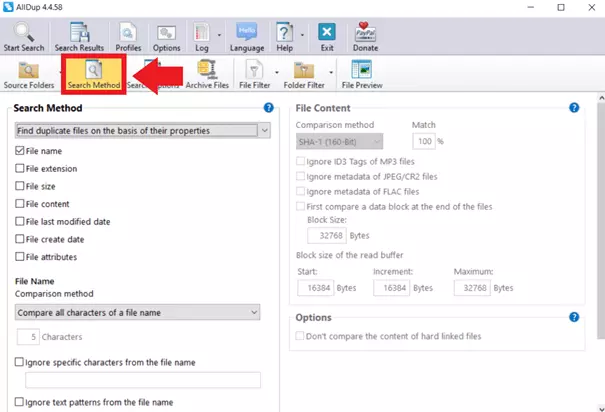
Step 3: Now go to “Search Method” and set the search parameters such as file name, size, or content. Under “Search Options” you can indicate if you want AllDup to use as little computing power as possible if you have to continue working at the same time. Under “File Filter”, you can define whether AllDup should only include specific file formats in the search or exclude specific file types. Finally, click on “Start Search”.
Step 4: At the end of the search process, AllDup lists how much storage space will be freed up once the duplicate files have been removed. By clicking on “+”, you can also check to see whether the files found are duplicates that you want to remove or not. When removing the file, you can choose to either remove it permanently or move it to the Windows Recycle Bin, which allows you to restore removed files for a certain amount of time.
Tool 3: CCleaner
CCleaner is one of the best-known tools for removing duplicate files. The freeware scans your entire system or, if you prefer, only selected folders. Duplicate files are listed clearly at the end of the scan.
How to use it:
Step 1: Download the free tool CCleaner from a trustworthy site. You can choose between a free and a Premium version.
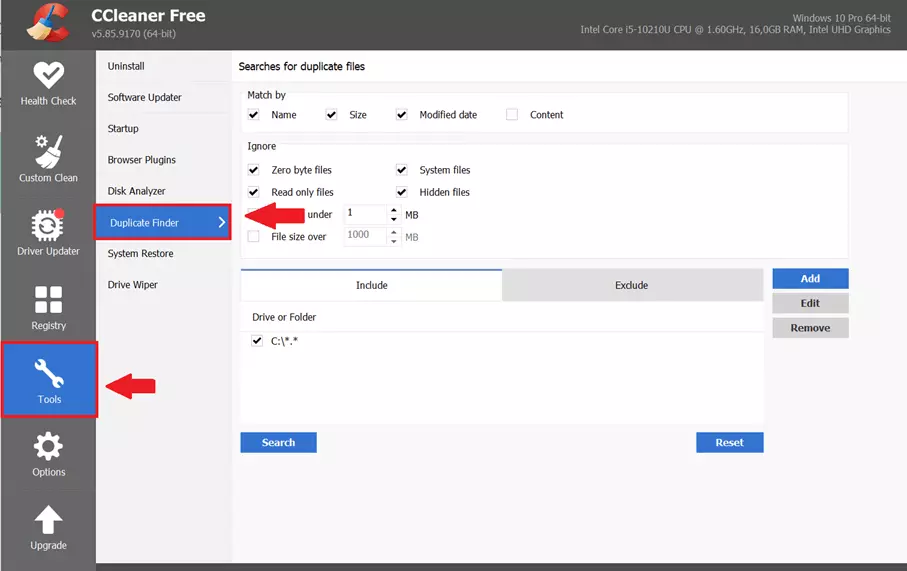
Step 2: Start CCleaner, go to “Tools” and then to “Duplicate Finder”. Here you can set the criteria (name, size, modified date, and content) for the search. Under “Ignore” you can define whether the search should start from a specific file size and whether it should also include hidden Windows files and folders, for example.
Step 3: Specify which drives and folders you would like to search. You can select multiple drives or just specific folders to add to the search. You can also restrict the search to specific file types within the selected folders. Click on “Search” to start the search.
Step 4: At the end of the search, CCleaner lists all the duplicate files found. You can save the list for further processing later or mark and remove the duplicate files immediately.


