How to clean up the WinSxS folder on Windows Server 2012
Many Windows Server 2012 users may not know what the WinSxS folder is used for, even though it can take up so much storage space. It’s important to know that the contents of the WinSxS folder shouldn’t simply be deleted, as this can significantly impair the system’s functionality. In this article, we show you how you can reduce the size of WinSxS without harming your system.
- Automatic backup & easy recovery
- Intuitive scheduling and management
- AI-based threat protection
How to clean up the WinSxS folder step by step
To clean up the WinSxS folder, you can use the command line tool dism.exe. The following steps show you how to proceed:
Step 1
To be able to run dism.exe, you need administrator rights. Press the [Windows] key and enter “cmd” to search for the Windows command prompt. Now click on “Run as administrator”, which is located on the right.
Step 2
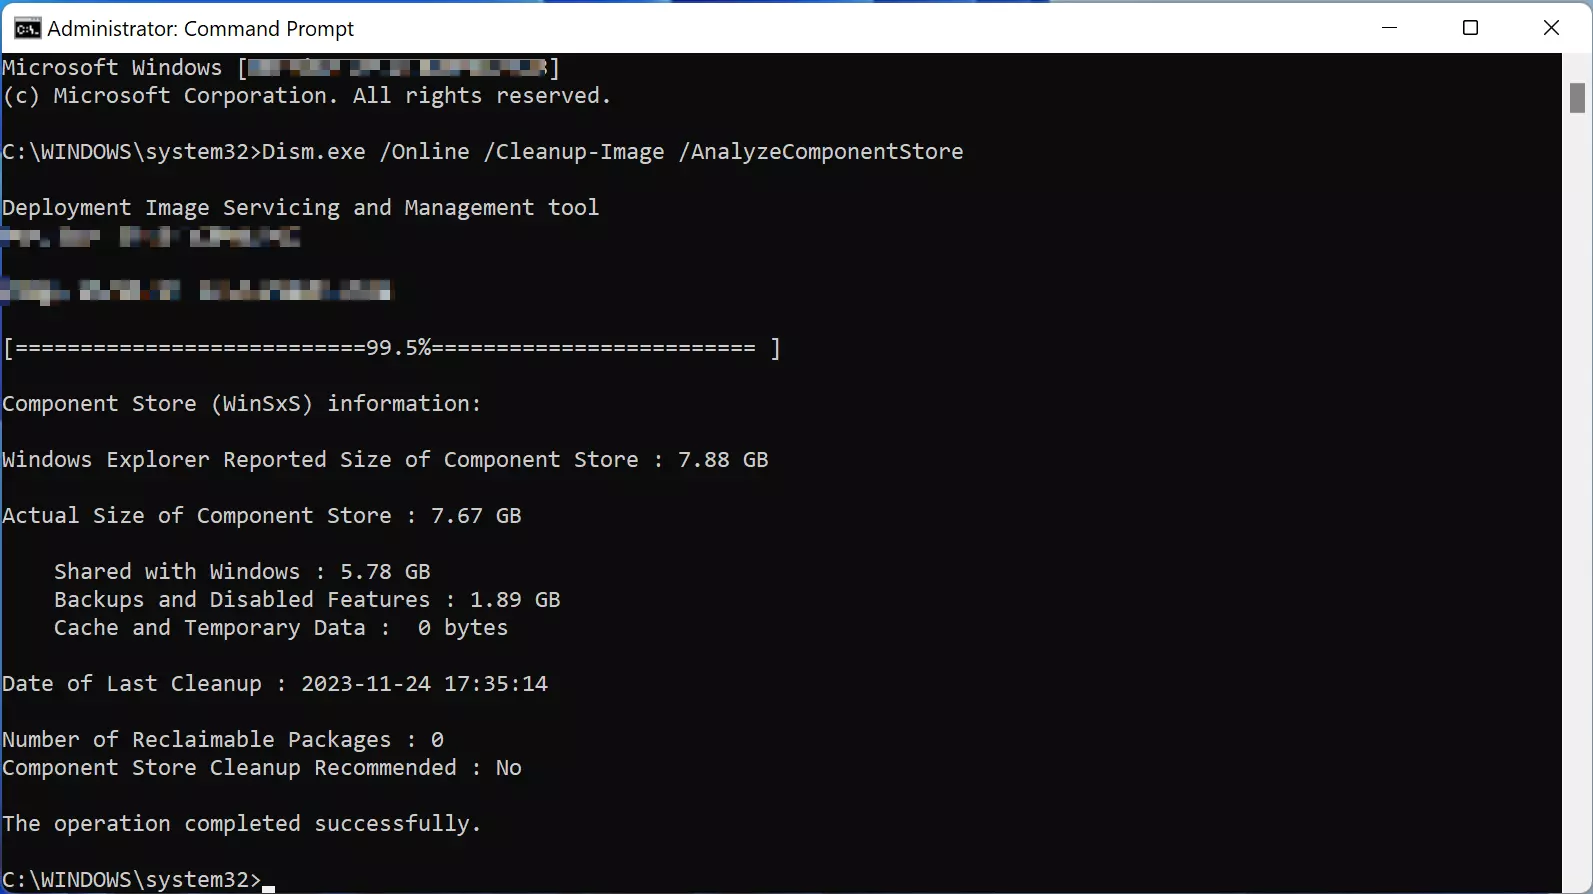
Use the command Dism.exe /Online /Cleanup-Image /AnalyzeComponentStore to start the WinSxS folder analysis to find out how much storage space is actually being used. Then enter the command Dism.exe /Online /Cleanup-Image /spsuperseded to start the cleanup process.
To delete saved Windows updates, you can also enter the command Dism.exe /Online /Cleanup-Image /StartComponentCleanup. However, only do this if your system is already running stably, as it will no longer be possible to go back to an older version afterward!

The WinSxS folder also performs important tasks for the system in the desktop version of Windows and can take up a lot of disk space. However, the steps for reducing the size of the WinSxS folder on the desktop version differ slightly compared to the server version. We will show you how to clean up WinSxS on Windows 10.
How to reduce the size of the WinSxS folder
If you do not want to clean up the WinSxS folder, but only reduce its size, you can simply use the normal hard disk cleaning function. Use the cleanmgr tool for this.
Step 1
Press the [Windows] key and search for cleanmgr. Alternatively, you can start the application via the “Run” dialog, which you open via [Windows] + [R].
Step 2
Select the system drive (C:) in the drive selection. If your system only has one drive, this step will be skipped.
Step 3
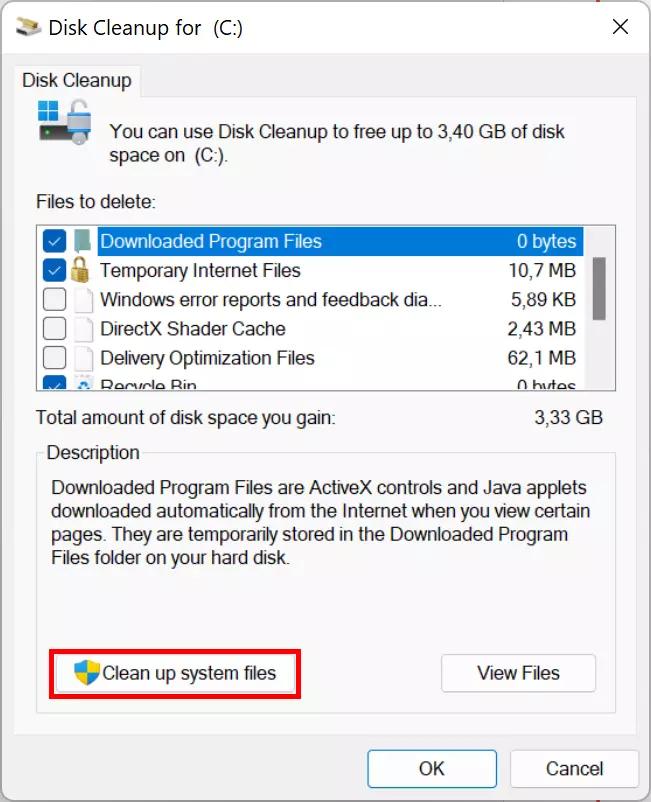
In the next window, click on “Clean up system files” and wait until the process is complete.

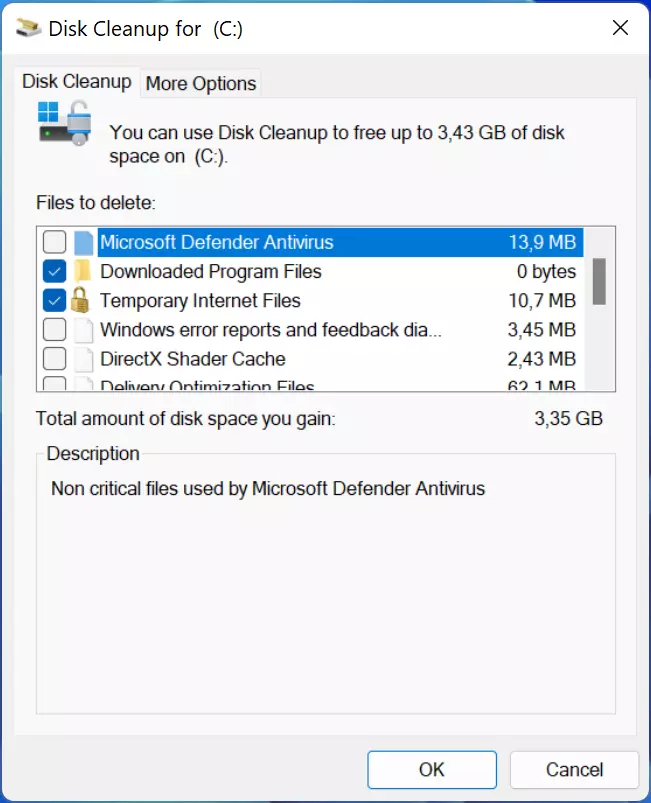
Now select the system files you would like to delete. Click on “OK” to delete the selected files. This process may take a few minutes, depending on how much storage space is freed up.

Details about the WinSxS folder
WinSxS is a system folder in Windows. That’s why it’s located on the system partition. WinSxS stands for “Windows Side by Side,” which is a good description of the folder’s purpose since the different versions of files are stored together, side by side. The folder is also called the component store. It primarily contains system files and can be several gigabytes in size.
Functions of the WinSxS folder
The WinSxS folder stores the necessary files for system recovery. Specifically, it allows for the following applications:
- Simultaneously saving different versions of Dynamic Link Libraries (DLLs) and other system files. Older applications may not be compatible with changes in DLLs. Therefore, different versions are stored in the WinSxS folder at the same time.
- Enabling and disabling functions while Windows is running, Hyper-V and the corresponding sandbox system, can be enabled without having to be installed separately. The necessary files can also be found in this location.
- Adding roles in server operating systems: Functions in Windows server operating systems are also known as roles. For example, the server can play the role of a DHCP server on the network. The WinSxS folder is also used for these extensions.
- Restoring the system in the event of boot problems: If the operating system stops booting, it can be booted in recovery mode. This allows you to recover older versions of system programs.
- Uninstalling problematic updates: When Windows runs an update, it saves the previous version rather than deleting it so that it can be restored in case problems arise later.
Alternatives for saving disk space
If reducing the size of the WinSxS folder isn’t enough, there are other ways to free up disk space:
- Disable system hibernation: Windows creates a snapshot of your system for hibernation mode. This file is called hiberfil.sys and often uses considerable amounts of disk space.
- Move user profiles to another drive: If you want to avoid reinstalling your system, you can change the location of your user profile sub-folders on the “Location” tab via Properties, which you open from the context menu of a folder. You can also move user profiles to a different drive such as a new hard drive.
- Move program folders: You can usually install space-intensive programs on other drives.
- Remove unnecessary programs and functions using the “Apps & Features” option in the Control Panel.
- Delete unnecessary folders such as Windows.old.
- Disable restore points.
Sometimes cleaning up Windows folders isn’t enough. In these cases, reinstalling or resetting your system is a better alternative. There are also reset options that don’t remove your installed programs or personal files.
Why can’t you simply delete WinSxS?
Windows stores important system information in the WinSxS folder. If you delete or move the folder, certain processes may not be able to run properly. Why is that?
Disk drives in Windows
By default, Windows is installed on the first partition of the hard drive you’re using. These partitions are called disk drives or volumes. Together, they form a complete storage device. The first partition of a hard drive is usually given the drive letter “C.” The C:\Windows\ path contains most of the files and folders relevant to the operating system, including the WinSxS folder.
This content cannot be easily moved to other disk drives because components of the operating system will no longer find it. Therefore, it’s important to provide sufficient disk space for the system partition during installation.
The disk space of a hard drive must be managed in structures that are compatible with the operating system. One or more partitions are created for this purpose. Disk space is partitioned logically. Each partition is formatted with a file system that manages the folder structures and files, including their metadata. The hard drive has a partition table that lists all partitions.
Updates, service packs, and hotfixes
Operating systems and other applications have long ceased to be rigid entities that are installed once and then used for years. Due to their complexity and ever-changing requirements, operating systems require continuous improvements or extensions. You have different options for implementing these improvements, which are hotfixes (quick fixes for a specific error), updates (a scheduled update), and service packs (a collection of updates and hotfixes). These access the information in WinSxS to determine your system’s health. If the folder is missing the required references, the operating system updates will either not be installed at all or will be installed incorrectly.
Updates and upgrades have different functions. An update improves the software and is usually limited to existing features. An upgrade replaces the software with a higher-quality version or a new version when it becomes available. Downgrading involves reverting software back to an older or less complex version, which usually happens when newer versions have bugs.
Software modularity
The modular design of software is the reason for the dependencies between software and libraries or system functions. Some functions, such as opening files or querying the system time, are required by multiple programs. The operating system makes these functions available through programming interfaces so that developers can import them into their software. Many function libraries are located in the WinSxS folder. If you carelessly delete these files, various programs may no longer be able to run.
Summary
Lack of available hard drive space is still a frequent problem these days, especially if you have a laptop or computer with an operating system installed on an SSD. By cleaning up the WinSxS folder, you can get rid of unnecessary files. However, it’s important that you do not manually delete any content from the WinSxS folder. You should always use Windows tools to delete these files. If major updates have been installed recently, you should avoid deleting these files at all. If you do, you won’t be able to remove updates that may contain bugs.

