How to use Windows Photo Viewer in Windows 10
With Windows 10, Microsoft has changed a great deal about the popular operating system compared to Windows 7 and 8. Not only are various classic adjustment options found in a different place, but many programs and services have also been replaced by new solutions. This includes the perennial standard app for opening and presenting images and photos, ‘Windows Photo Viewer’. Replaced with ‘Photos’ in the current edition of Windows, it can only be reactivated using workarounds. In the following sections, you can find out why reactivation of the old viewer might be useful and what steps are necessary to get back the old photo viewer in Windows 10.
- Simple registration
- Premium TLDs at great prices
- 24/7 personal consultant included
- Free privacy protection for eligible domains
Windows 10 Photo Viewer: advantages compared to the ‘Photos’ app
In comparison to Windows Photo Viewer, the new ‘Photos’ app is much more than a simple photo viewing program. Unlike the classic Windows photo tool, the application actually offers lots of additional functions and editing possibilities for your graphics, images and photos. In principle, then, ‘Photos’ is suitable for a wide range of purposes but it is also more cumbersome and more of a drain on computing performance than the Windows Photo Viewer. Opening an image file takes significantly longer as a consequence.
Another disadvantage of the new Windows image viewer is that ‘Photos’ does not provide complete support for color management. The mapping of input color spaces on the monitor, which is fundamental for an accurate representation of images, graphics and photos on the monitor, is, therefore, limited. The old photo viewer doesn’t have this problem.
Windows 10: Reactivating the old photo viewer – step by step
In Windows 10, the Photo Viewer has been officially replaced by the ‘Photos’ app and is not available as a standard option to open image files. With a few small changes in the Registry, though, the program for viewing images can also be activated in Microsoft’s latest operating system. All you require to do so are the editor regedit and administrator privileges.
Incorrect settings in the Windows Registry can have a negative effect on the operating system’s performance. Beyond the steps set out in the following manual, you should only attempt to interfere with it if you have the necessary expertise.
The process to activate the old Photo Viewer in Windows 10 works as follows:
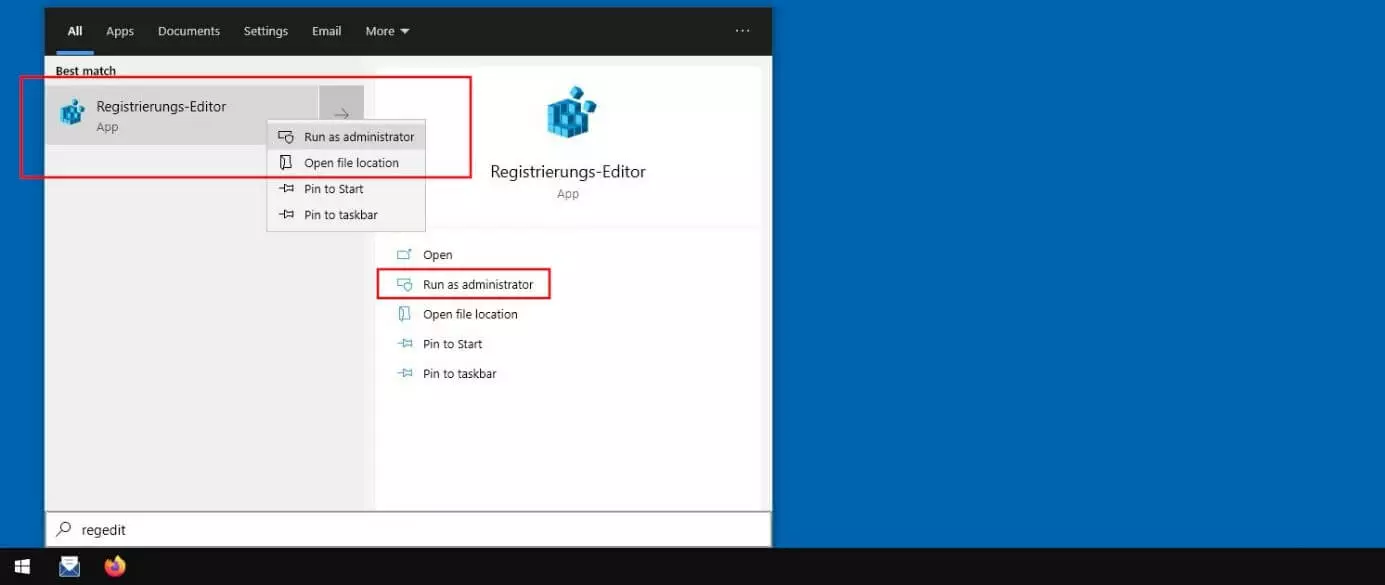
Step 1: Open the Windows search function via the start menu (Windows icon), type the term ‘regedit’ or ‘registry editor’, and select the option ‘Run as administrator’. In some cases, it may be necessary to right-click on the editor icon.
Step 2: Enter the administrator credentials if you are prompted to provide them and confirm your entry with ‘OK’. Regedit will open and you will see the current structure of your Windows installation's registry database. The next step is to navigate to the path ‘HKEY_LOCAL_MACHINE’ → ‘SOFTWARE’ → ‘Microsoft’ → ‘Windows Photo Viewer’ → ‘Capabilities’ → ‘FileAssociations’:
Step 3: Open the final entry, ‘FileAssociations’ by left-clicking on it. In the menu window on the right, you will now see a list of registry keys assigned to this entry. In the case of the image viewing program, these will be the file formats for Windows Photo Viewer, which should be selectable as a reproducible option. For all formats that are to be supported, you now need to create a new entry by right-clicking on the empty space and selecting ‘String Value’ under ‘New’:
Step 5: Now enter the following line into the entry field 'Value’ in each case:
PhotoViewer.FileAssoc.TiffStep 6: Close the Registry and right-click on any image (in this case a .jpg file) that you would like to open with Windows Photo Viewer. In the menu that pops up, choose ‘Open with’ and then ‘Choose another app’. Now search in the list for the entry 'Windows Photo Viewer’ and select it. Tick the option ‘Always use this app to open .jpg files’ so that Windows 10 uses the old photo viewer as the standard application for viewing images:
- 2 GB+ storage
- Sync across all your devices
- Spam filter and ad-free


