0x8024200d: The Best Solutions to the Windows Update Error
In order to maintain a secure and stable Windows system, it’s essential to download and install the latest updates through the Windows Update Center – either automatically or manually. Going without these updates will mean known errors and identified security vulnerabilities will continue to exist on your system, unnecessarily exposing you to system issues and security risks. Although not self-inflicted, errors like 0x8024200d are just as critical because they prevent the update process and the problem can even persist after restarting the computer.
We show you what this update error is all about and which possible solutions are the most promising.
What is the 0x8024200d Error All About?
The Windows error code “0x8024200d” relates to an installation problem with a system update. In this instance, it’s possible that the update process is completely blocked or that only part of the available update is affected by the issue. Besides the code “0x8024200d”, Windows often also displays the message “WU_E_UH_NEEDANOTHERDOWNLOAD”, which suggests that the error won’t be fixed by simply repeating the update process. The update handler can’t work with the existing installation files. This can be due to a wide range of reasons. This includes erroneous data, update components that are defective or haven’t yet started, or a lack of storage space. Moreover, malware and third-party applications like antivirus programs or tuning tools can be responsible for a blocked update.
Error 0x8024200d occurs both on the current version Windows 10 as well as on older editions like Windows 7 or Windows Vista.
The Best Solutions for the Windows Error “0x8024200d”
Since the Windows update error can be due to a range of causes, there are also various solutions available. However, the general problem is that you don’t receive any information whatsoever from Windows about where you should look for the error. So, you have no choice other than to work through the list of possible causes, one after another to fix the 0x8024200d error.
Before you get started, you should at least try to resolve the issue by restarting the computer: The probability is very low, but there’s still a chance that the problematic update will run afterwards – for instance, because the download server simply couldn’t be reached before or because Windows itself wasn’t working properly.
If the Windows update continues to display the error code “0x8024200d” after you reboot the computer, you’ll need to look for the cause of the problem yourself. The solutions presented below have proven to be helpful.
Solution 1: Deactivate Third-Party Security Software (Temporarily)
If the 0x8024200d error is preventing the installation of a new Windows update, you should first take a look at your security software before you implement any changes to system files, services or settings. For example, if you’ve installed additional security programs against malware on your system besides Windows Defender and Windows Firewall, there’s a chance that they’re blocking the operating system’s update process. You can easily check whether this is the case by temporarily deactivating the corresponding applications and then trying the update again.
If you were able to identify an antivirus software, a malware scanner or a similar program as the cause of the problem, you have three different options:
- Contact the manufacturer of the software and report this issue.
- Uninstall the problematic application and replace it with a similar alternative.
- Deactivate the security software whenever you receive error messages like “0x8024200d” when updating Windows (not recommended if Windows Defender and Firewall are also disabled).
Solution 2: Use the Windows Update Troubleshooter
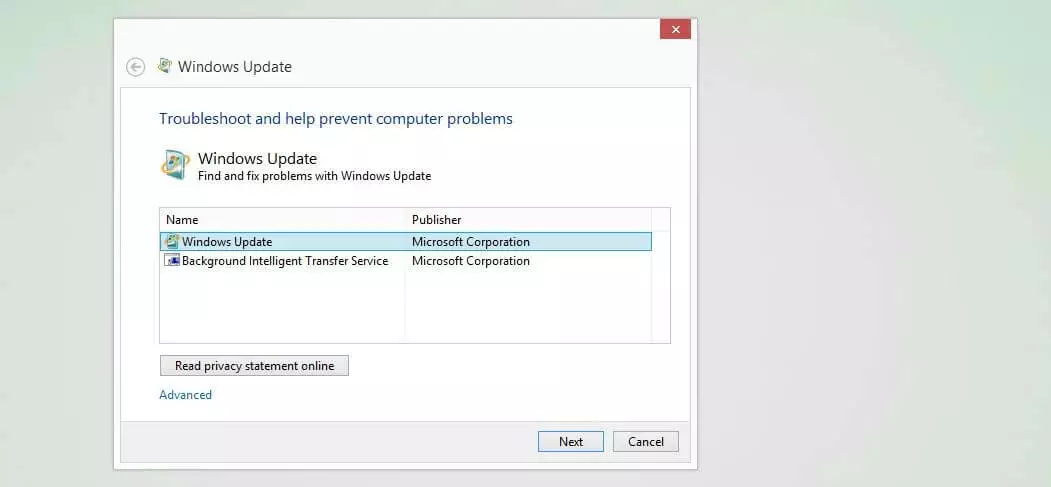
Windows errors that start with the code “0x8024” can often be resolved using the Windows Update Troubleshooter. This is integrated as standard in Windows 10, as well as older versions like Windows 8, however, it can also be downloaded from the Microsoft Support Forum. It’s particularly advisable to download the troubleshooter if you haven’t been able to update Windows for a long time – and are therefore less likely to have the up-to-date version of the troubleshooter. Once it has been downloaded, launch the downloaded .diagcab file simply by double clicking, select “Windows Update” and click on “Next” to start the automatic troubleshooter.
For the integrated troubleshooter in Windows 10, the following steps are necessary:
- Open the Start menu (Windows symbol) and open the Settings (cog symbol).
- Click on “Update and Security”.
- Switch to the “Troubleshooter” tab.
- Click on the “Windows Update” entry and then on “Run troubleshooter”.
Solution 3: Temporarily Delete Windows Installation Files
Another option for fixing the 0x8024200d error is to delete the automatically cached system files for the Windows update. It’s possible that they include defective files or incomplete patches that prevent the update to the operating system.
You need administrator rights to delete system files!
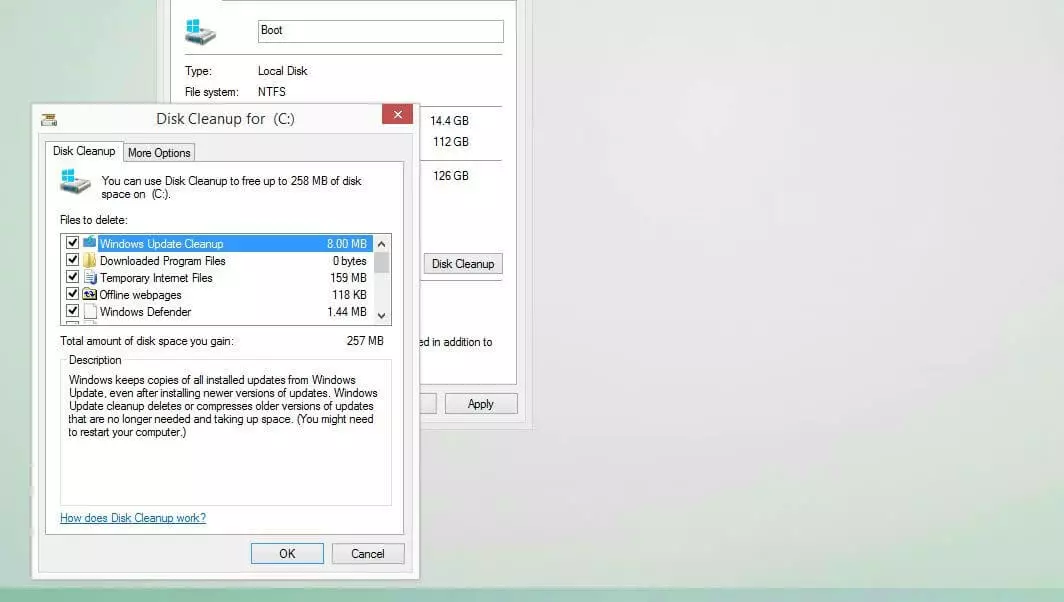
Windows provides the “Disk Cleanup” tool for this purpose; it can be started using the “Run” dialog. You can open it either via the button with the same name in the Start menu or using the key combination [Windows key] + [R]. As soon as you’ve opened the window, enter the following:
cleanmgrConfirm your entry with “OK” and Windows will open the Disk Cleanup tool. Now select the drive Windows is saved on – usually C: – and click on “OK” again. Next, you can press the button “Clear system files”. After a quick check, Windows will display a list of files that may be deleted, where you can select the following entries (provided they are listed):
- Windows Update Cleanup
- Downloaded Program Files
- Temporary Internet Files
- Temporary Files
- System Error Small Memory Dump Files
- Temporary Windows Installation Files
- Temporary Windows Setup Files
Click on “OK” one last time and then on “Delete files” to start the cleanup. After the tool has finished the process, you should then restart the system before trying to run the update again.
Solution 4: Restart the Update and Download Service
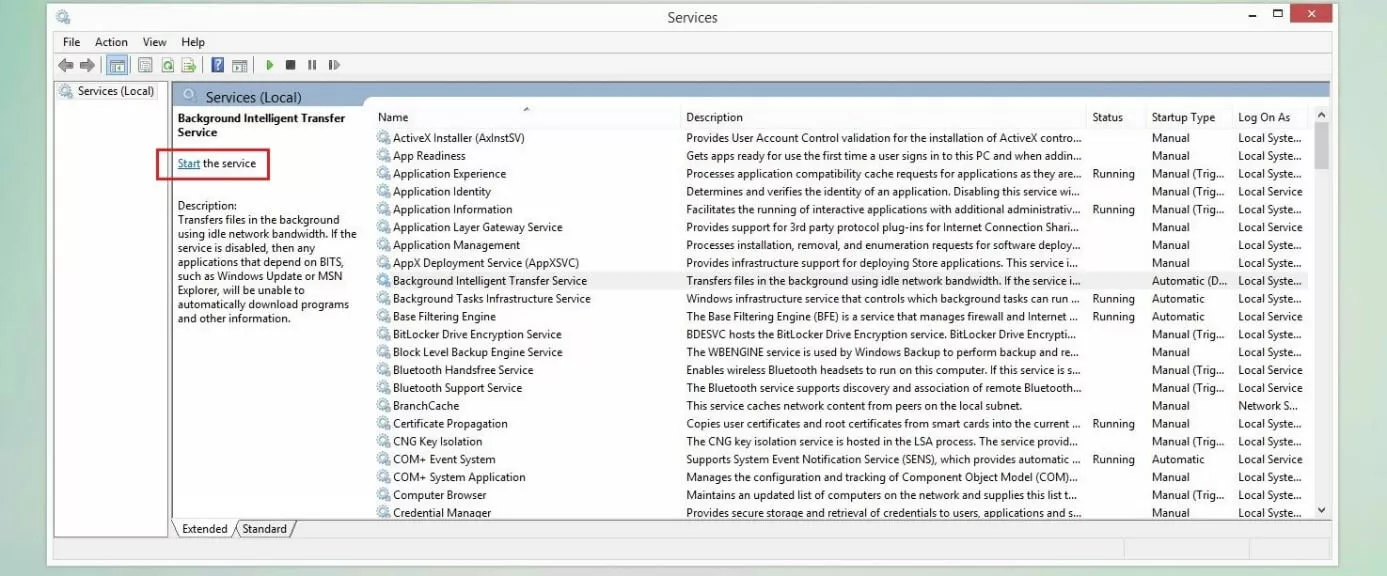
In order for the Windows Update Center to establish contact with Microsoft servers and download and install provided updates, it uses the Windows Update (WU) service as well as the Background Intelligent Transfer Service (BITS), among others. The former supports the entire update process, while the latter serves as a download manager and provides optimal utilization of bandwidth and the resumption of interrupted downloads. If these two services aren’t working properly or can’t even be started, the “0x8024200d” update problem can arise at any time.
The maximum bandwidth provided for new updates can be limited in the advanced settings of the Windows update (under “Transfer Optimization”). Use this option if the automatic Windows update regularly takes up too much of your capacity.
In this case, the solution involves ending these services, deleting the content of the directory Windows\SoftwareDistribution\Download and subsequently restarting both services. Begin by performing the following steps to stop the services:
- Open the “Run” dialog via the Start menu or using the key combination [Windows key] + [R].
- Enter “services.msc”.
- Press “OK” to open the Services Manager.
- Search for the entries “Windows Update” and “Background Intelligent Transfer Service” and press the “End the service” button for each of them.
Keep the Services Manager window open while deleting the content of the Update Download Directory. You can also open this via the “Run” dialog by entering the complete pathway there:
C:\Windows\SoftwareDistribution\DownloadDelete all files and folders contained in this directory without deleting the download folder itself, and then restart the system.
If you’ve chosen another installation location for your Windows system, you’ll need to change the drive letter accordingly.
Solution 5: Check System Files for Errors
If installing new updates produces the error code “0x8024200d”, this can also be due to damaged or missing system files. To check whether this is the case, you can use the System File Checker (SFC) integrated as standard. The tool can be launched via command line, provided you have administrator rights. It examines all protected system files, and also attempts to resolve any discovered issues. If the fix is unsuccessful, you’ll at least receive a detailed report in the CBS.log file found in the directory Windows\Logs\CBS.
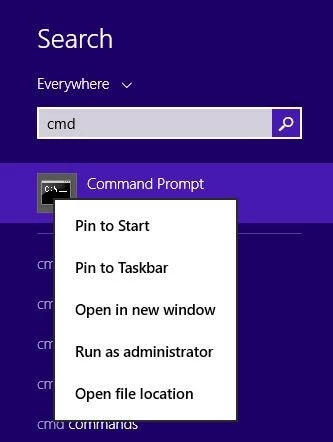
To start the SFC, you need to run the command prompt as an administrator – otherwise the command won’t work even with the corresponding rights. You can start the command prompt as administrator by following these steps:
- Open the Windows search function.
- Enter the term “cmd”.
- Right-click on the displayed entry “Command Prompt”.
- Select the menu item “Run as administrator”.
Now enter the following command into the command line:
sfc /scannowPress the [Enter] key to confirm the command and then wait until the system check has been fully completed. It can take a few minutes. Leave the command prompt window open during this time.
Solution 6: Clear and Expand the System Partition if Necessary
One possible cause for the 0x8024200d error is that the hard drive or partition that Windows is installed in does not have sufficient free space. You should first try to clear up any unnecessary files from the Windows drive if you haven’t already done so as part of Solution 3 (see above).
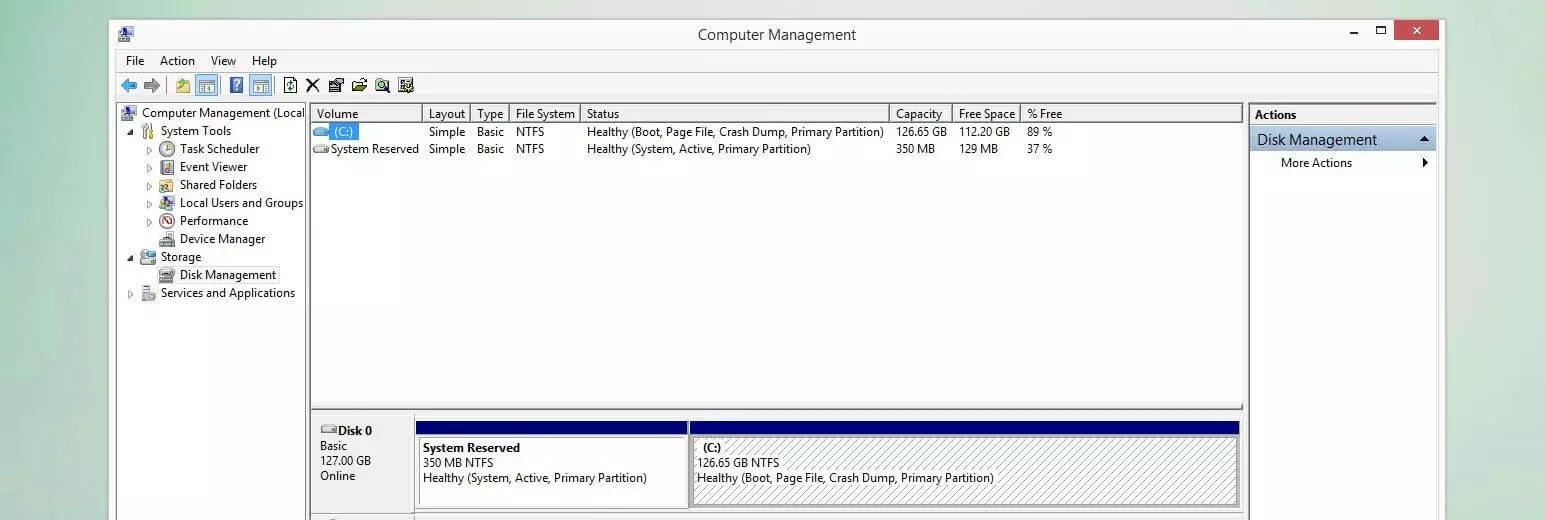
If there still isn’t enough storage space after cleaning up the disk, the alternative solution is to expand the size of the system partition. Windows offers an integrated tool called “Disk Management” for this purpose. It can be opened as follows and used to expand the partition:
- Open the Windows Start menu and click on the entry “Computer Management” under “Windows Management Programs”.
- Under the “Disk” section, look for “Disk Management” and select it to obtain a list of existing partitions.
- Right-click on the system partition and then select the item “Expand volume”.
If the option “Expand volume” is grayed out, the storage space after the partition to be expanded is not available as it is used by the following partition. In this case, you’ll need to move the storage piece by piece by reducing the volume of the following partitions consecutively. Here it is advisable to use a third-party program such as Paragon Hard Disk Manager.
Solution 7: Manually Download and Install the Windows Update
If the 0x8024200d error can’t be resolved with the above solutions, you can try to download and install the problematic update yourself – without the Windows Update Center. All you need to do this is the update ID (starting with the letters “KB”) as well as the online database operated by Microsoft, the Microsoft Update Catalog.
The update ID can be found in the Update Center: Display the update history and note the updates’ KB number which caused the 0x8024200d error, shown in brackets.
You can open the online catalog at any time using the browser of your choice. Simply click on the above link or type the URL “catalog.update.microsoft.com” into the address bar. Next, enter the ID into the catalog’s search bar and click “Search”:
Following a successful search, the web catalog lists the available versions of the searched update. Select the suitable version for your system – Windows (desktop) or Windows Server – and the underlying architecture – ARM64, x64 or x84. Afterwards, click on “Download” in the respective line and then on the link provided in order to start the download. If you’re unsure about what system architecture you have, you can find out using the command prompt. Simply enter the command “systeminfo” and look for the value in the “System Type” line:
After you’ve downloaded the respective update file (.msu), start the installation by double-clicking. Then follow the instructions given by the assistant to update your system properly, thereby also fixing the 0x8024200d issue.
Click here for important legal disclaimers.


