Dual monitors for a laptop | How to connect two monitors
Whether in the office, home office, or for gaming – two screens are better than one. However, setting up dual monitors depends somewhat on available connections and cables. Read on to find out how to connect a second screen to a laptop or PC.
Advantages of dual monitors for a laptop
When splitting your Windows screen no longer suffices, you’ll need an additional monitor. Added screen space is easier on the eyes and simplifies working with several applications simultaneously. Gamers can enjoy high-resolution graphics by installing an additional monitor.
If you only want to view videos or pictures on a larger screen, you don't need to install an extra monitor. With Windows Miracast, for example, you can easily connect your PC to a TV.
Requirements: a suitable connection
The majority of modern laptops and PCs support connecting a second monitor by default. All you need to consider are the ports on your end device and which monitor you’d like to connect. Before you head out to purchase one, be sure to check the type and number of ports on the laptop or PC.
Additional monitors can be connected using the following types of connectors:
HDMI
HDMI (High-Definition Multimedia Interface) is one of the most common connection types of modern monitors and many TV users will already be familiar with it. The connection type is compact and transmits video and audio signals. A modern HDMI connection is suitable for 4K resolutions and a frame rate of 60 Hz. If your monitor and laptop or PC have one or two HDMI ports, you just need a single HDMI cable. If you want to connect two monitors but only have one HDMI port, use an HDMI splitter. Be sure that the splitter has the same refresh rate as the HDMI cable.
USB-C
USB-C is a USB port format that’s often found on new, slim laptop models. The advantage of USB-C is that it can be used for charging while also supporting the transmission of audio and DisplayPort signals with Alternate Mode. DisplayPort refers to monitor interfaces for image and sound signals and high transfer rates. The USB-C downstream and DisplayPort Alternate Mode can be used to link several monitors. If you only have a few USB-C ports, use a USB-C dongle. Ideally, a USB-C dongle has at least two HDMI interfaces for monitors. Alternatively, a dongle can be paired with a HDMI splitter.
DisplayPort
DisplayPort is similar to HDMI and transmits audio and image signals at high frame rates. Thus, the connection is particularly suitable for 4K. Laptops often have a DisplayPort or miniDisplayPort and can be connected to monitors that have a DisplayPort port. For monitors without DisplayPort, a corresponding adapter is required. Thanks to multi-stream transport, multiple monitors can be connected via DisplayPort and coupled to a laptop via a splitter or adapter.
DVI/VGA
DVI and VGA are analog, older connection standards that only transmit image signals. If the monitor and end device have DVI or VGA ports, they can be connected via the corresponding DVI or VGA cable. With the appropriate DVI-HDMI or VGA-HDMI adapter, older monitors can be connected to laptops and PCs to transmit HDMI signals. Modern connection standards are preferable in any case, as they offer better resolution, refresh rates, and color values.
Connect two monitors to a laptop when only one port is available
Even if your laptop only has a single HDMI or USB-C port, you can connect dual monitors. Using a suitable HDMI splitter, a USB-C dongle, or a USB-C dongle with HDMI interface, you can easily connect two or more monitors to your laptop.
Use a second screen as a main or secondary screen
Once you connect one or more monitors to your laptop, you can set up two or more monitors in Windows and specify which monitor you wish to use as the main one. Windows usually detects display devices connected to the laptop or PC automatically and assigns numbers to them. The main monitor is designated number 1. All others are numbered in ascending order.
Proceed as follows to set the ranking of monitors and adjust the screen arrangement in Windows to the physical position of the screens.
Step 1: Right-click on a free desktop area and select “Display” settings.
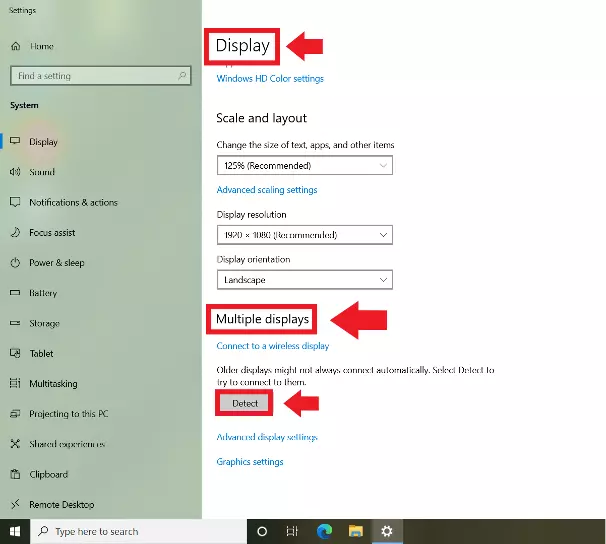
Step 2: Under “Display” and “Multiple displays” you will see display devices detected by Windows, e.g. one or more additional monitors. Click “Detect” if none are visible.
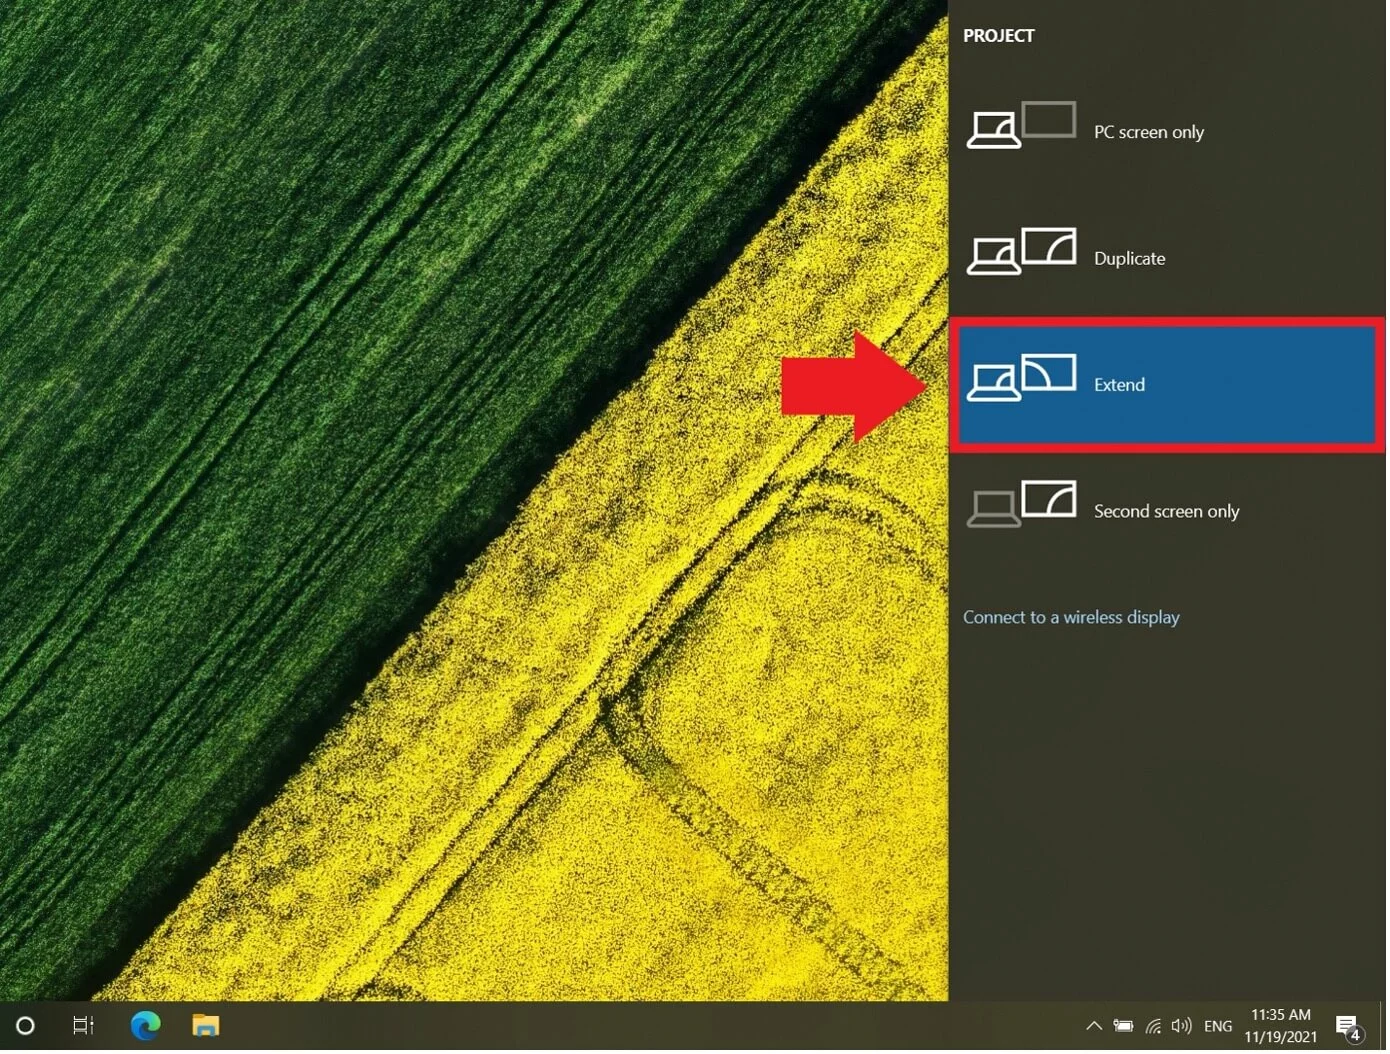
Step 4: The easiest way to change the use mode of the connected monitors is to use the shortcut [Windows] + [P]. Settings such as “Duplicate” let you mirror desktop content. With “PC screen only” or “Second screen only” you determine whether you only use one of the connected screens. Use “Extend” to create a connected desktop from connected monitors. These options can be found in the “Display” menu under “Multiple Screens”.
Possible issues with two or more monitors
When connecting multiple monitors, Windows may not automatically detect older models. In this case, select “Detect” in the “Display” menu.
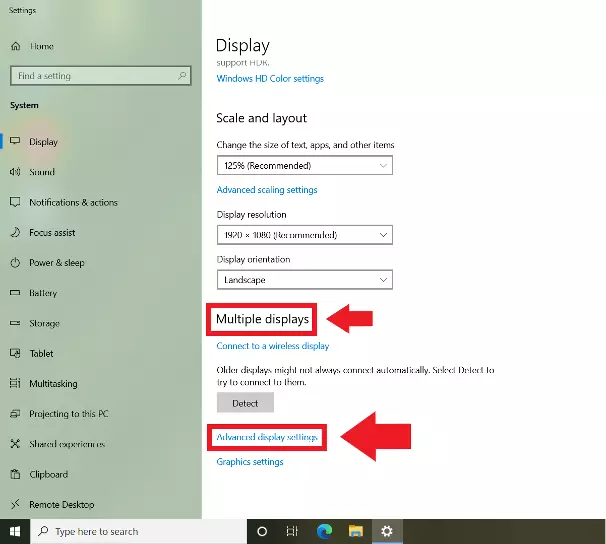
Another problem could be that Windows displays a second monitor as the main monitor. If you want to keep the PC or laptop as your main monitor, go to “Settings” > “System” > “Display Device” and select the “Rearrange Display Devices” option. Then click on “Identify”. You should be able to see the assigned digit on each screen. If you wish to change the order, go to “Advanced display settings”.


