PowerPoint macros: How to automate your everyday work with PowerPoint
For decades, PowerPoint has been one of the most popular solutions for creating digital presentations. According to estimates, the Microsoft software is used to create more than 100 billion slides per year, to accompany school reports, public lectures and business presentations with images and text. Anyone who uses the software (which is available by default to all Microsoft Office Suite users) can make their work considerably easier with a few tricks. One very popular feature is templates, which already contain certain designs and formatting like fonts, font sizes and color variations. Templates can really speed up the process.
If you want to simplify tasks and actions that are repeated again and again or are performed frequently, it makes sense to use PowerPoint macros. These allow you to save sequences and combinations of keyboard inputs and mouse clicks in the presentation software and make them available for quick access. We will explain to you how to create a PowerPoint macro and integrate it into your projects.
What is a PowerPoint macro?
All Microsoft Office Suite programs offer you the option of creating macros (or implementing them) and executing them. This means that you can create macros not only in PowerPoint, but also in Word, Excel and Access. In all these tools, macros function as a kind of sub-program in the respective application and always fulfill the same purpose: They describe a sequence of user commands and actions that are automatically processed in a predefined order when they are called up. This may involve keystrokes (individual keys or combinations of keys) or mouse clicks.
Using macros in PowerPoint saves you from having to perform all the steps that are saved in a given macro. This is particularly helpful when they are repeated often within a project or even across projects.
How does a PowerPoint macro work?
To fulfill their function, macros describe the saved instructions in code form. PowerPoint processes this code automatically when the macro is started so that the corresponding command sequence is executed. When this happens, all macros in PowerPoint and other Microsoft Office programs rely on a proprietary programming language called VBA (Visual Basic for Applications), which Microsoft derived from its own dialect of BASIC and introduced in the mid-1990s as a universal macro programming language for its Office tools. Mastering this scripting language is the essential requirement for being able to create your own PowerPoint macros. With the Visual Basic Editor, Office tools have an integrated practical dedicated development environment for this purpose.
You have three different options for starting or executing a macro:
- Start the PowerPoint macro via the Macro menu.
- Start the PowerPoint macro via a button in the Quick Access menu.
- Start the PowerPoint macro via a button in any tab ribbon.
Other programs in Microsoft Office Suite like Word and Excel offer access to a macro recorder, which you can use to record command sequences. In this case, the underlying VBA code is generated automatically, so that you can create new macros without knowing the scripting language. However, this recording function has not been available in PowerPoint since the 2010 version.
PowerPoint macros: How to create and open macros in PowerPoint
If you want to create macros with current editions of PowerPoint, you can only do so using Visual Basic for Applications. So, before you read the following step-by-step instructions on how to generate your own automated scripts, you should first be proficient in this programming language’s syntax and options. A good basis for this is the following VBA tutorial.
Step 1: Open Visual Basic Editor
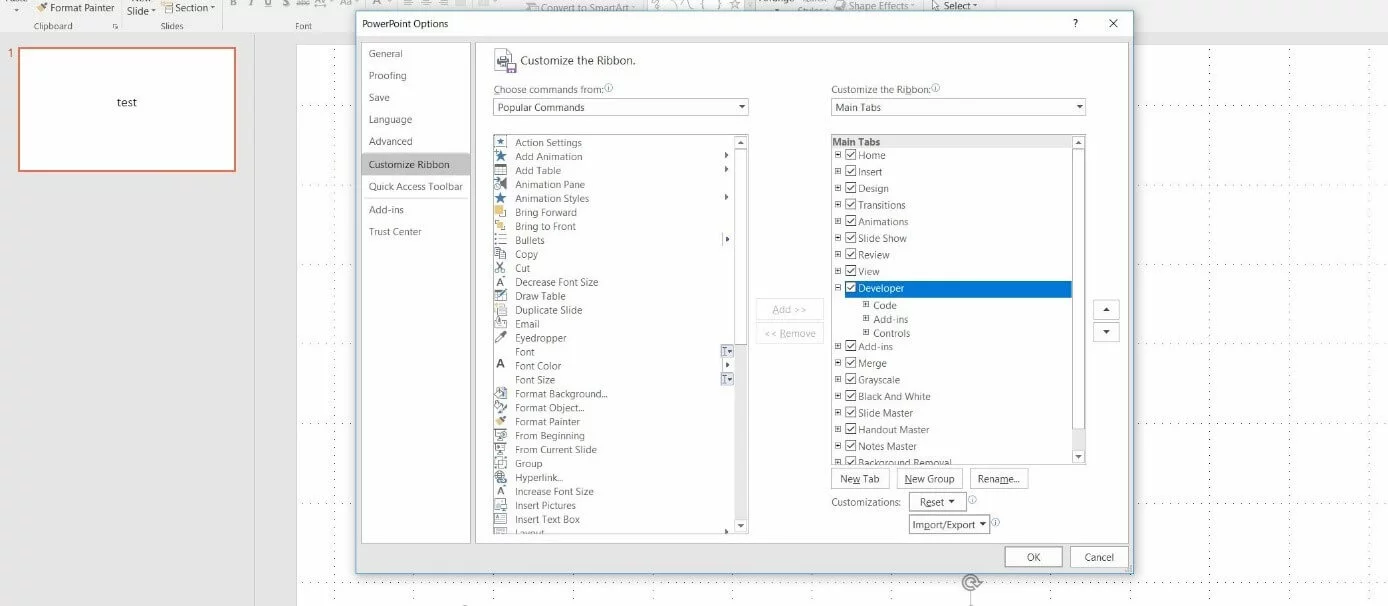
Essentially, you can write the VBA code for a PowerPoint macro with any code editor of your choice. However, the Visual Basic Editor, which is integrated directly in the presentation tool, is recommended as a convenient and easy solution for embedding macros. Since the editor is one of the “developer tools” in the Microsoft Office Suite which are switched off by default, you will need to activate it first. To do this, first click the “File” tab, and then “Options”. Open “Customize Ribbon” in the PowerPoint options. Then you will be able to adjust the top menu bar in the presentation software according to your own preferences.
Select the entry “Main Tabs” in the right menu window, put a check mark next to “Developer” and then click “OK” to add the corresponding tab to your PowerPoint installation:
The “Developer” tab should now also appear in the ribbon. If you select this tab, you will now be able to open the VBA Editor at any time using the “Visual Basic” button embedded in the bar.
Step 2: Create your first PowerPoint macro
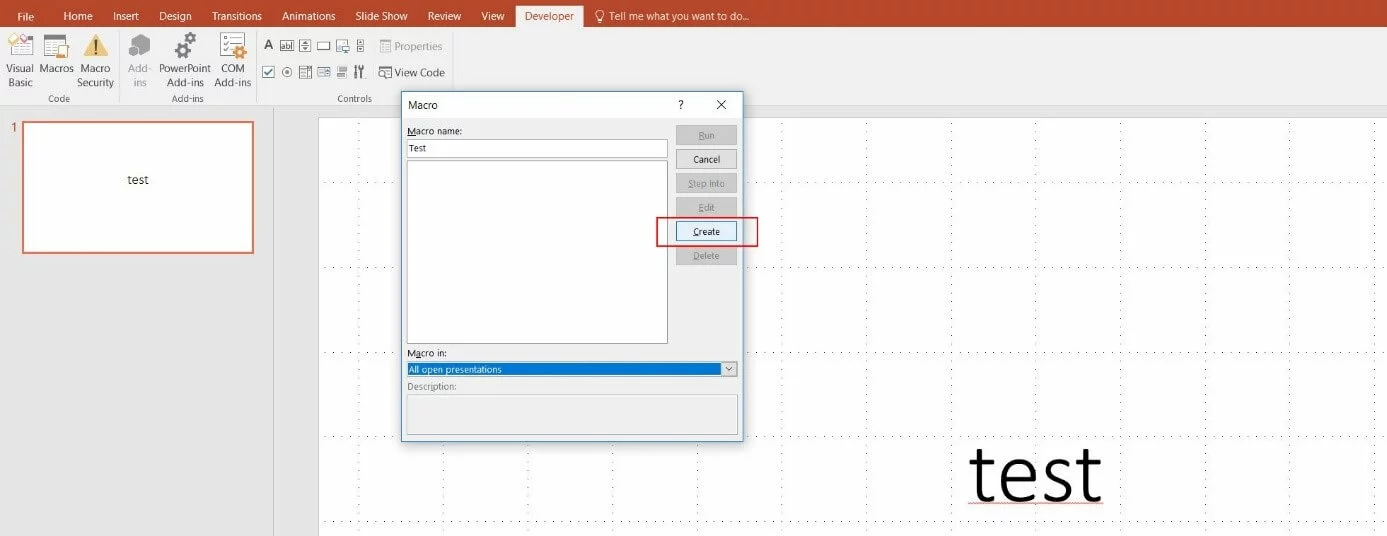
The easiest way to create a new PowerPoint macro with the VBA Editor is by using the “Macros” button, which is right next to the Visual Basic button. After clicking this button, a menu appears where you can enter the desired name for the macro. Then, under “Macro in:,” select the PowerPoint document where you want to use the sequence of commands. If you select “All open presentations” here, you will be able to use the macro across different projects. Finally, click the “Create” button to create the PowerPoint macro:
PowerPoint will then start the Visual Basic Editor automatically, including the standard code window. There you will also see the automatically generated start and end lines of your macro’s VBA code. Since we chose the name “Test” in the previous step, the two lines appear as follows:
Sub Test()
End Sub
You will now add the respective VBA code between the two instructions for the beginning and end of the PowerPoint macro.
Step 3: Save the PowerPoint macro you have created
To finally integrate the macro you have created into your PowerPoint installation, save it either in the folder that is currently open or in a folder specifically created for saving macros. To do this, click the “Save” icon in the menu bar of the VBA editor or, alternatively, use the key combination [Ctrl] + [S] (hold down both keys at the same time).
PowerPoint reacts with a dialog box where the application indicates that you can only save macros in “PowerPoint Macro-Enabled Template” or “PowerPoint Macro-Enabled Presentation” type documents. Click “No” to change the file type of your current document or to indicate the location of a corresponding template:
Now under “Save as type:” select “PowerPoint Macro-Enabled Presentation” or “PowerPoint Macro-Enabled Template”, or alternatively the location of your central PowerPoint macro template (if you created it in advance) before clicking “Save” in the last step:
Step 4: Execute a PowerPoint macro you have created via the macro menu
As soon as you have saved the macro in a certain PowerPoint presentation or template, you can execute it at any time. In this case, the easiest way to do this is via the macro menu in the “Developer” ribbon tab: Call up the corresponding tab and click the “Macros” button, like you did when creating the macro:
In the window you should now see the previously saved and created macro, and you should be able to select it by left-clicking. To start the command sequence, simply click the “Run” button, which will result in the menu closing again and the macro code being executed.
How to link macros in PowerPoint with a button or key combination
Macros are intended to make workflows and processes in PowerPoint as simple as possible, which is why an uncomplicated and quick start is vital. The above-mentioned option for starting an available macro using the macro menu does not really live up to this claim. That’s why Excel offers two ways to run PowerPoint macros in a single step with Macro start via button in the Quick Access Toolbar or in any tab ribbon.
Adding a macro button to the Quick Access Toolbar
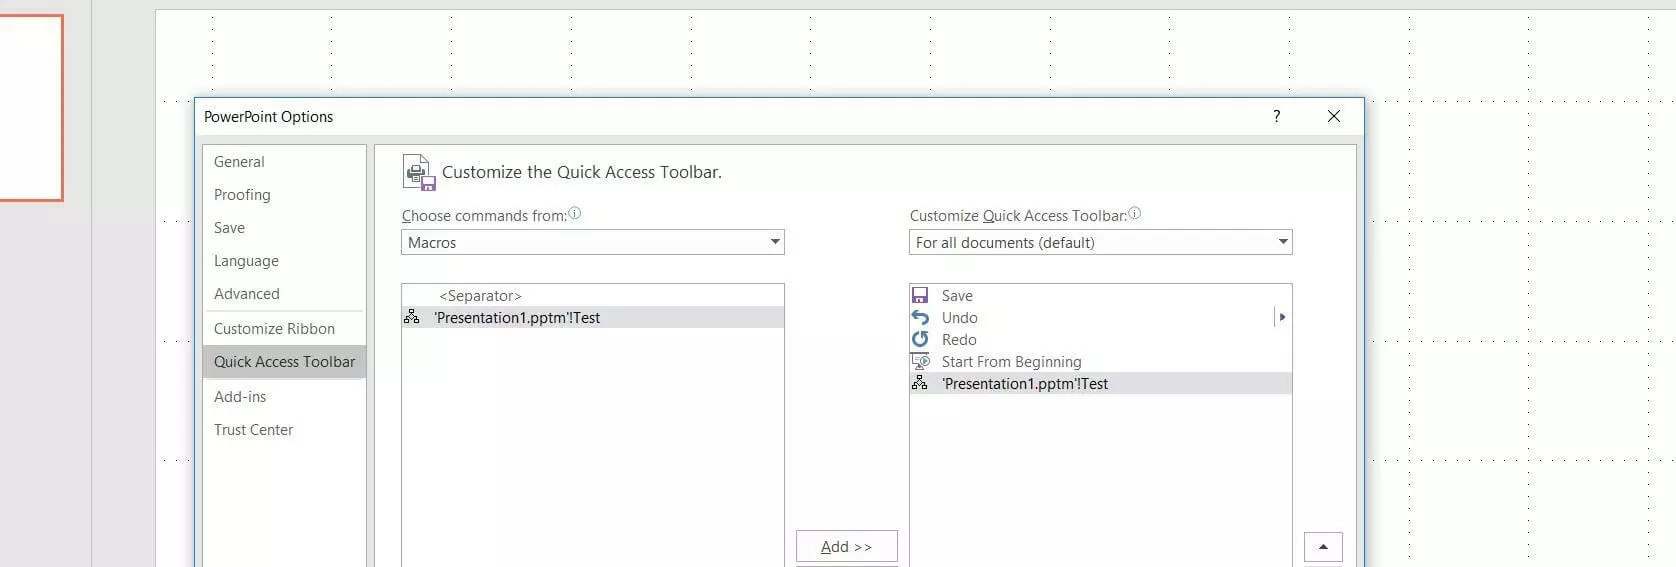
You can add a quick start button for a PowerPoint macro either to the Quick Access Toolbar or any tab ribbon. By default, the toolbar already contains a few buttons for rapidly executing certain program steps – for example for saving the current document. If you want to add a button for your macro to this bar, first call up the Options (via the “File” tab). Once there, switch to the heading “Quick Access Toolbar”:
Under “Choose commands from:” (left window), select “Macros” and then click the macro you created by left or right clicking. If you click the “Add” button, PowerPoint will also list the macro in the right menu window:
Adding a macro button to the tab ribbon
In principle, adding a macro button to a specific tab ribbon works similarly to adding one to the Quick Access Toolbar. However, it requires an additional step: Unlike the Quick Access Toolbar, the button can only be integrated after a user-defined group has been created.
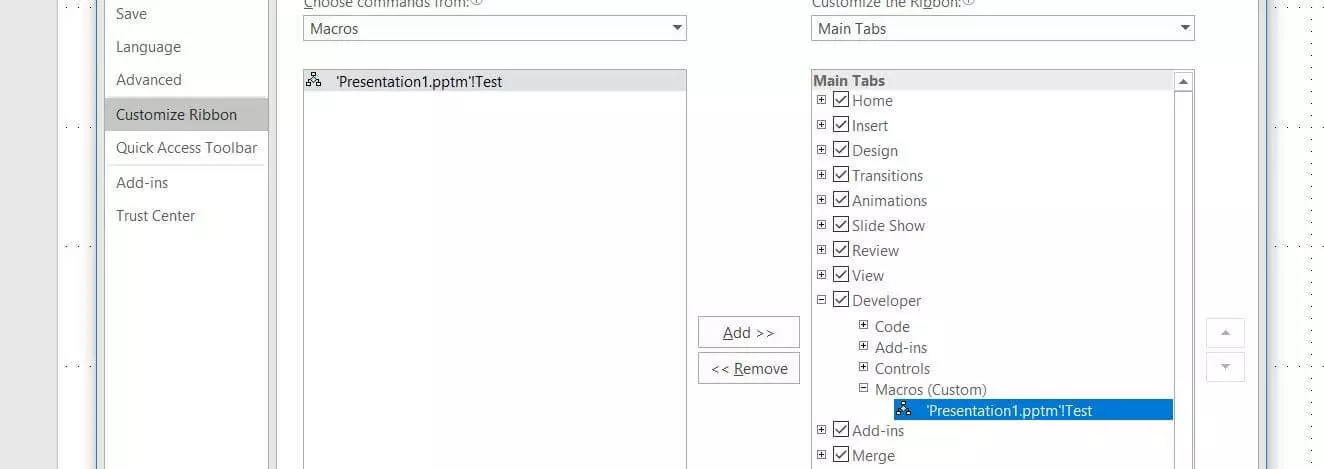
In this case, however, first call up the PowerPoint options (“File” “Options”). After that, navigate to the heading “Customize Ribbon” and double click the tab in the right menu window where you would like to integrate the macro button. Then click “New Group” to add the user-defined group to this card:
Use “Rename” to give the new group another meaningful name before selecting “Macros” in the left menu window under “Choose commands from:”. Click the macro that is to contain a ribbon button and integrate it in the group with “Add”:
As with the Macro button for the Quick Access Toolbar, you can assign an individual icon to your PowerPoint macro by selecting it in the right menu window and clicking “Rename”. If you now click “OK” to close the options, you will find the new button in the ribbon that has been created for the chosen tab:
PowerPoint macros: Examples of useful VBA codes
Visual Basic for Applications allows you to program a variety of different macros in PowerPoint. On the one hand, this can involve executable command sequences that support you in your daily work with the presentation software. On the other hand, these macros allow you to integrate simple functions into the program that you do not necessarily need to create your presentations. For example, the following PowerPoint macro has a purely informative character:
Sub Test()
Dim strText As String
strText = "Operatingsystem: " & _
Application.OperatingSystem _
& Chr(10)
strText = strText & "Directory: " _
& Application.Path & Chr(10)
strText = strText & "Applicationname: " _
& Application.Name & Chr(10)
strText = strText & "Version: " & _
Application.Version
MsgBox strText, vbInformation, _
"Programm-Info!"
End Sub
If PowerPoint executes this VBA code, several items of information will be accessed: In addition to the name of the operating system, you’re currently running PowerPoint on, information about the directory in which the application is saved, and the name and the version number of the PowerPoint installation could be accessed. The Microsoft application will then present the results of the check in a message box with the name “Program Info!”:
We will now also show an example of a PowerPoint macro that simplifies your work with the Microsoft program in a concrete way. The following quite extensive VBA code adds a macro to the presentation software that automatically creates a table of contents for selected slides – with or without hyperlinks:
Option Explicit
Sub Agenda(Optional Hyperlinks As Boolean)
Dim i As Integer
Dim o As Integer
Dim strSel As String
Dim strTitel As String
Dim strAgendaTitel As String
Dim slAgenda As Slide
Dim intPos As Integer
Dim SlideFollow() As Integer
On Error Resume Next
If ActiveWindow.Selection.SlideRange.Count > 0 Then
ReDim SlideFollow(1 To ActiveWindow.Selection.SlideRange.Count)
'Select position for content slides
intPos = InputBox("Which slides should the agenda be inserted before?", "Position of the agenda")
'Cancel if the value is greater than the number of slides
If intPos > ActivePresentation.Slides.Count Then
MsgBox "The selected value is greater than the number of slides in the presentation.“
Exit Sub
End If
'Enter the title of the content slide
strAgendaTitel = InputBox("What heading do you want for the content slide?", "Enter titles")
'Determining the IDs of selected slides
For i = 1 To ActiveWindow.Selection.SlideRange.Count
SlideRange(i) = ActiveWindow.Selection.SlideRange(i).SlideIndex
Next
For o = 1 To UBound(SlideRange)
If ActivePresentation.Slides(SlideRange(o)).Shapes.HasTitle Then
'Build up the ToC Text
strTitel = ActivePresentation.Slides(SlideRange (o)).Shapes.Title.TextFrame.TextRange.Text
strSel = strSel & strTitel & vbCrLf
End If
Next
'Insert blank slides where you want, enter titles and headings
Set slAgenda = ActivePresentation.Slides.Add(intPos, ppLayoutText)
slAgenda.Shapes(1).TextFrame.TextRange = strAgendaTitel
slAgenda.Shapes(2).TextFrame.TextRange = strSel
'Insert Hyperlinks
If Hyperlinks Then
For o = 1 To UBound(FolienFolge)
If ActivePresentation.Slides(SlideRange(o) + 1).Shapes.HasTitle Then
'Build up the ToC Text
strTitel = ActivePresentation.Slides(SlideRange(o) + 1).Shapes.Title.TextFrame.TextRange.Text
With slAgenda.Shapes(2).TextFrame.TextRange.Paragraphs(o).ActionSettings(ppMouseClick)
.Action = ppActionHyperlink
.Hyperlink.Address = ""
.Hyperlink.SubAddress = ActivePresentation.Slides(SlideRange(o) + 1).SlideID & "," & ActivePresentation.Slides(SlideRange(o) + 1).SlideIndex & "," + strTitel
End With
End If
Next
End If
End If
End Sub
Sub DirectoryWithoutHyperlinks()
'Insert directory without hyperlinks
Agenda (False)
End Sub
Sub DirectoryWithHyperlinks()
'Insert Directory with Hyperlinks
Agenda (True)
End Sub
To utilize the options offered by this macro, which is saved in the two variants “DirectoryWithoutHyperlinks” (Directory without hyperlinks) and “DirectoryWithHyperlinks” (Directory with hyperlinks) in the PowerPoint installation, simply select the slides to be listed in the table of contents. All required slides must be selected when starting the PowerPoint macros. To do this, hold down the [Ctrl] key and left-click the respective slides in order. The order that you follow will have a decisive effect on the table of contents: Namely, the macro will present the individual entries in the directory in exactly the reverse order of the selection you made previously.
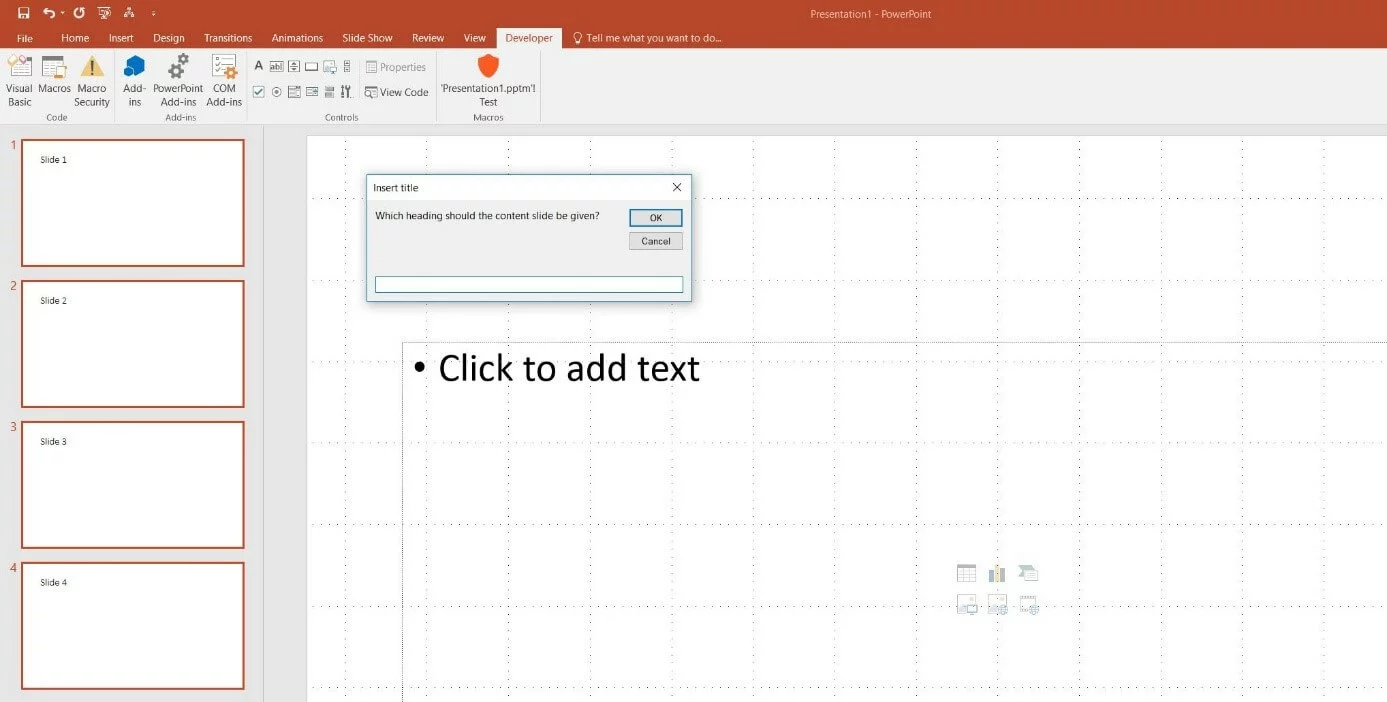
However, after starting the macro, two questions need to be answered:
- BEFORE which slide do you want to add the agenda?
- What heading do you want to give the content slide?
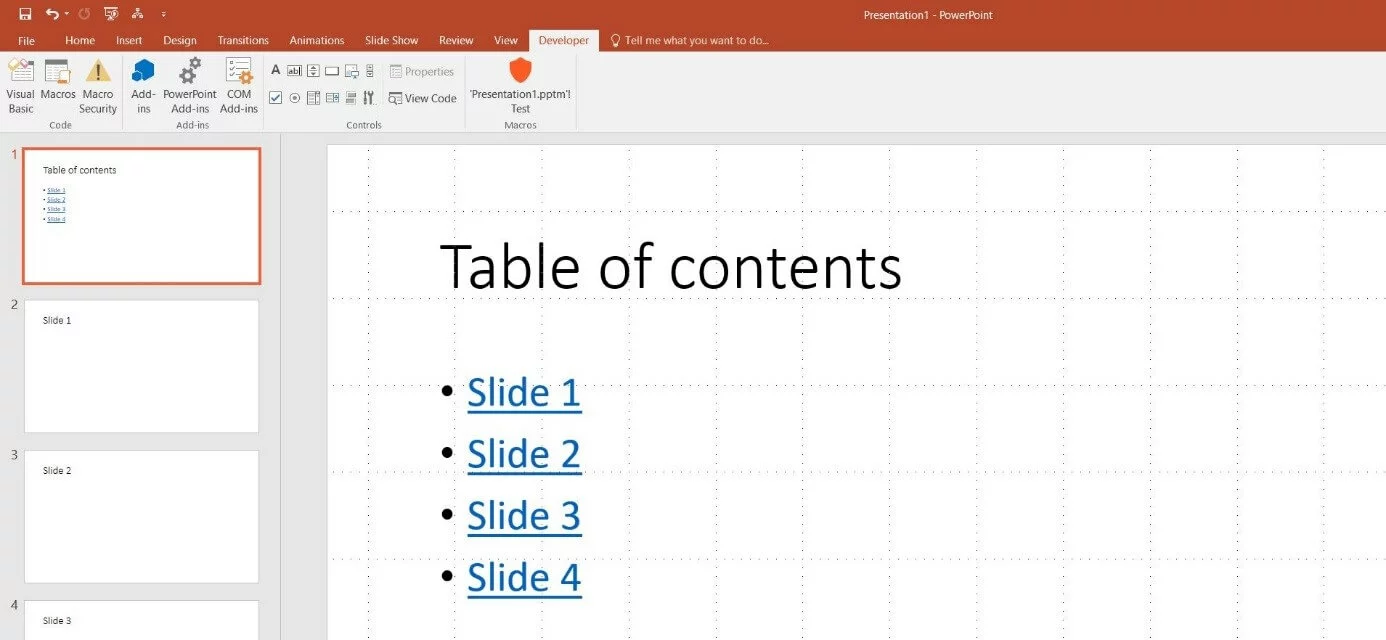
If both details have been provided and confirmed by clicking “OK”, the PowerPoint macro will create a slide with a table of contents in the required place and, if they have been selected, including the hyperlinks to the various slides:
Click here for important legal disclaimers.


