How to forward emails in Outlook automatically
In Microsoft Outlook, you can automatically forward incoming emails to other email accounts. You can also redirect your emails as well. It’s easy to configure both of these features via the inbox rules in your account settings.
How to enable email forwarding in Outlook (Microsoft 365, Outlook 2021, 2019, 2016)
It’s easy to set up automatic email forwarding in Outlook. Below we’ve included step-by-step instructions for both Windows and macOS as well as for Outlook on the web.
How to auto-forward emails in the Windows Outlook app
Step 1: Select the Home tab in the menu bar and click on the Rules button.

Step 2: Select the option Manage Rules and Alerts from the Rules menu.

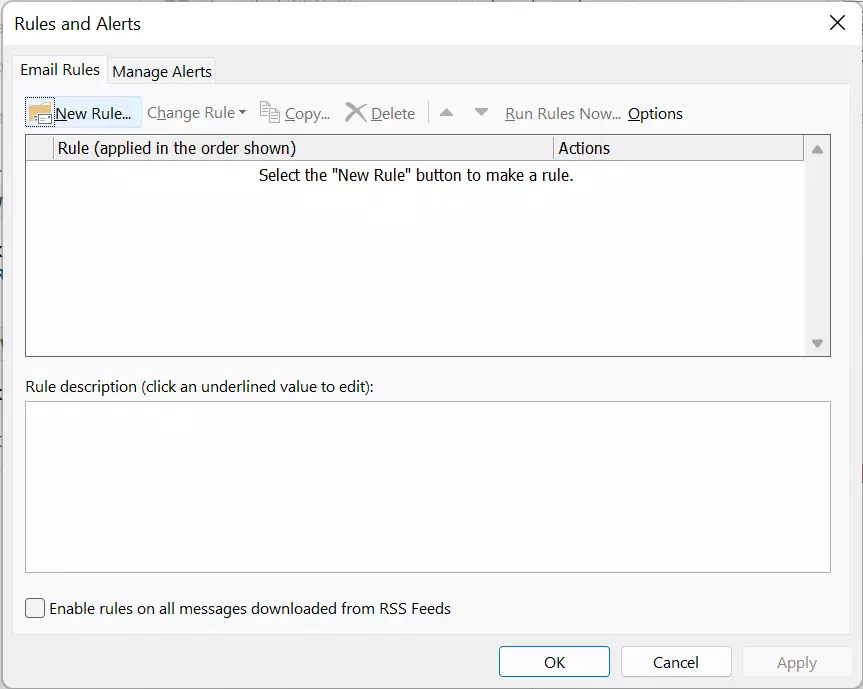
Outlook will open the Rules and Alerts dialog box, which contains the Email Rules and Manage Alerts tabs.
Step 3: Select the Email rules tab and click the New Rule button to open the Rules Wizard.
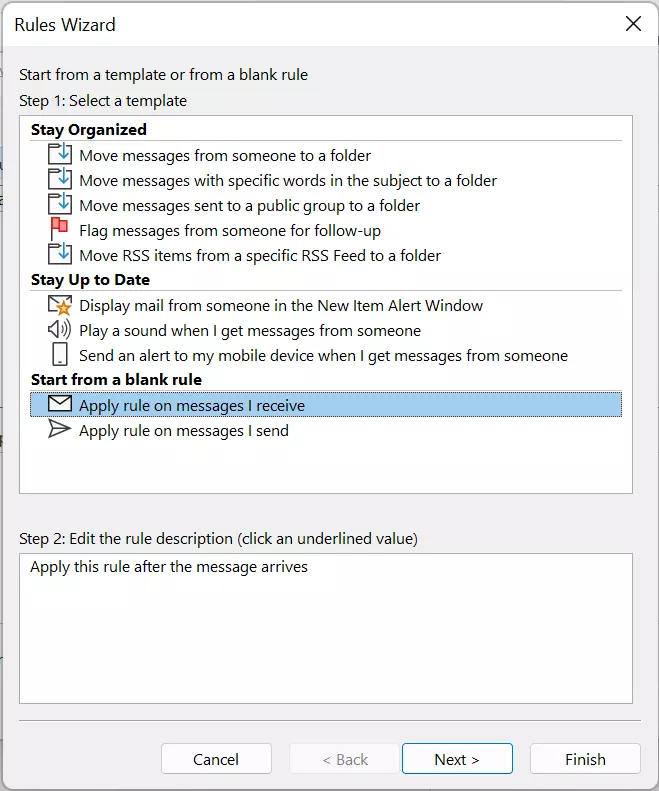
Step 4: The Rules Wizard allows you to access rule templates or create your own rules. To forward emails, select the option Apply rule on messages I receive under the sectionStart from a blank rule.
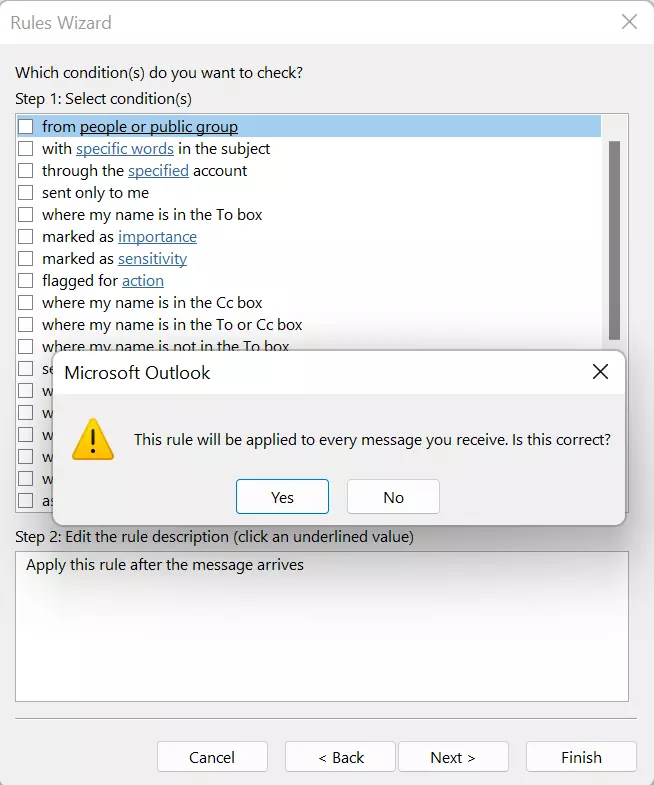
Step 5: First, decide which messages the rule applies to by selecting one or more of the options offered and replacing the underlined words in blue with individual values. If you do not want to select a condition, skip this part by clicking on Next. If you do this, the rule will apply to all incoming messages.
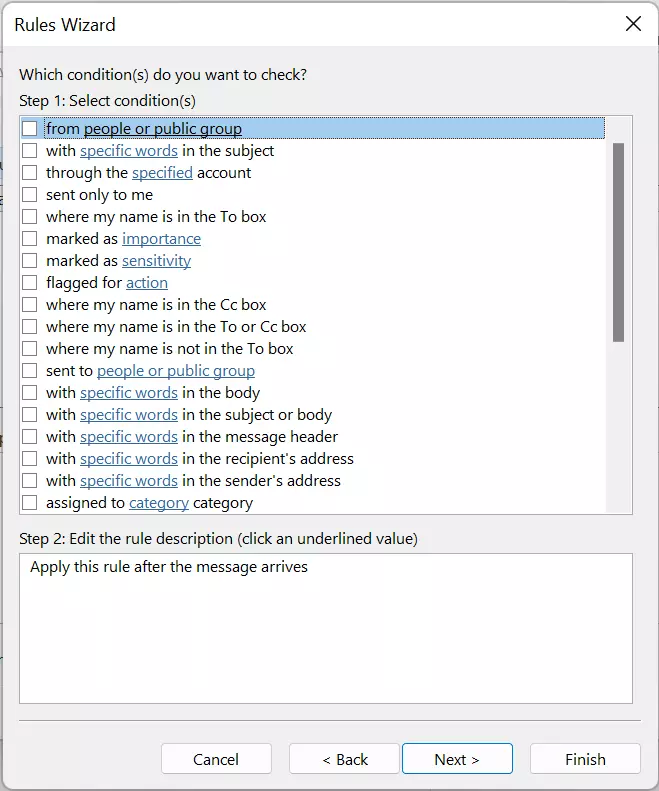
If you want to link your inbox rule to a condition, set a check mark in the respective box and click on the blue underlined word to enter the value (for example, a sender).
Step 6: Then select an action to apply to all messages that meet the previously selected condition. For easy forwarding, select forward it to people or public group. If you want to set up a redirect instead, select redirect it to people or public group.
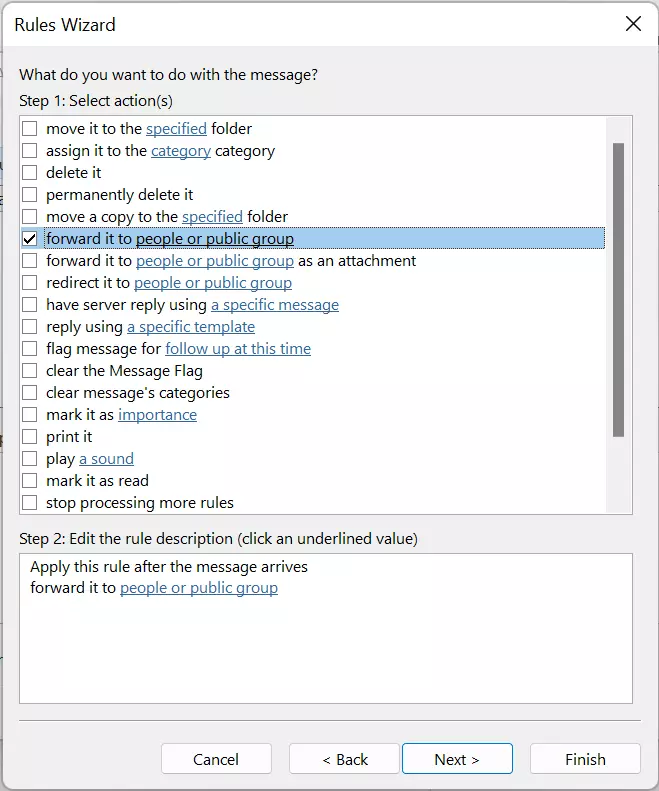
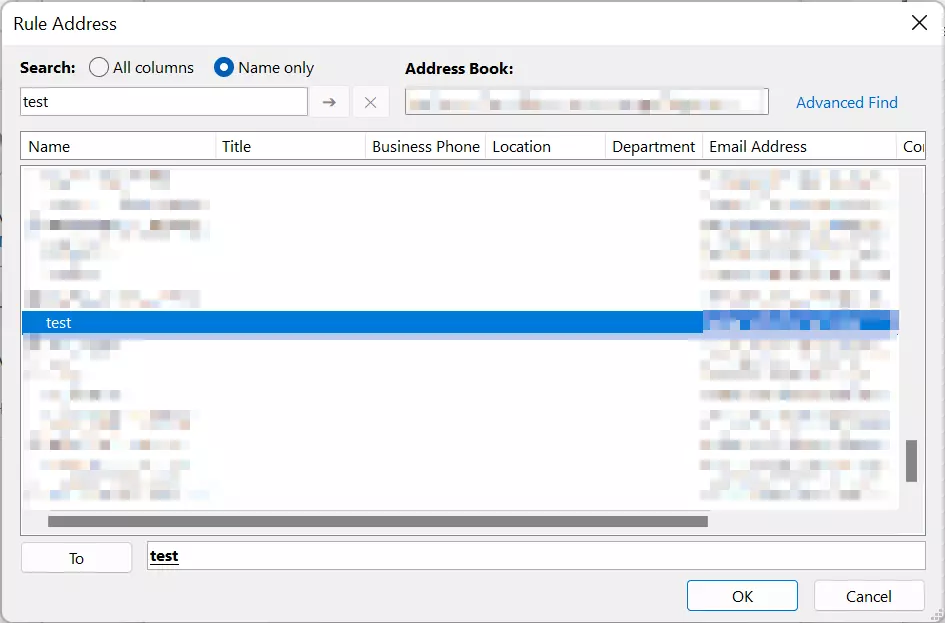
Step 7: Specify a person or group that incoming messages should be forwarded to. Click on the word with a blue background and select a person or group of recipients from your address book.
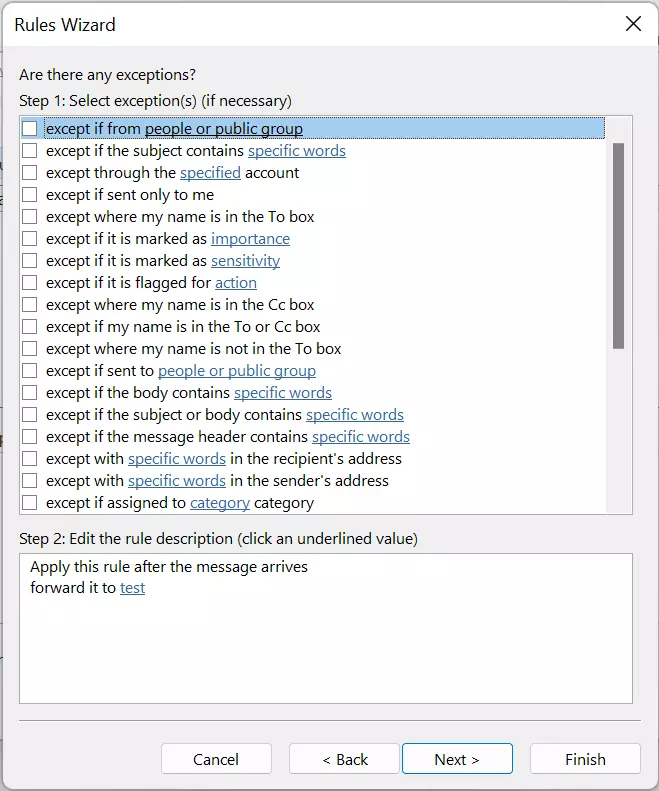
Step 8: If necessary, select exceptions for the inbox rule.
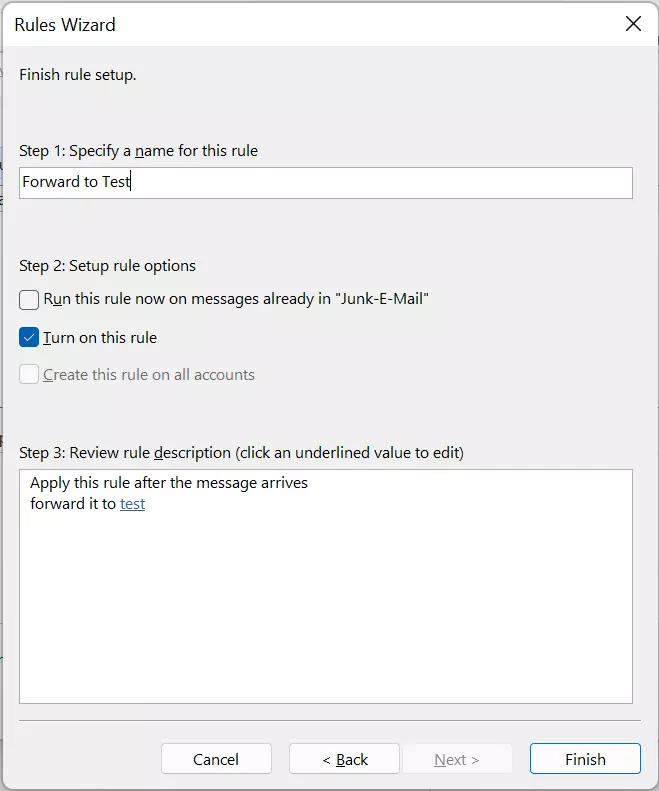
Step 9: Name the rule you just configured and specify if the rule should only be applied to new incoming messages or to all emails already saved in the inbox. Then complete the configuration process by clicking on Finish.
The newly created rule is displayed in the Rules and Alerts dialog box.
- Store, share, and edit data easily
- Backed up and highly secure
- Sync with all devices
How to auto-forward emails in Outlook for Mac
Step 1: To forward emails with Outlook in macOS, first select the Home tab in the menu bar and then click onEdit Rules.
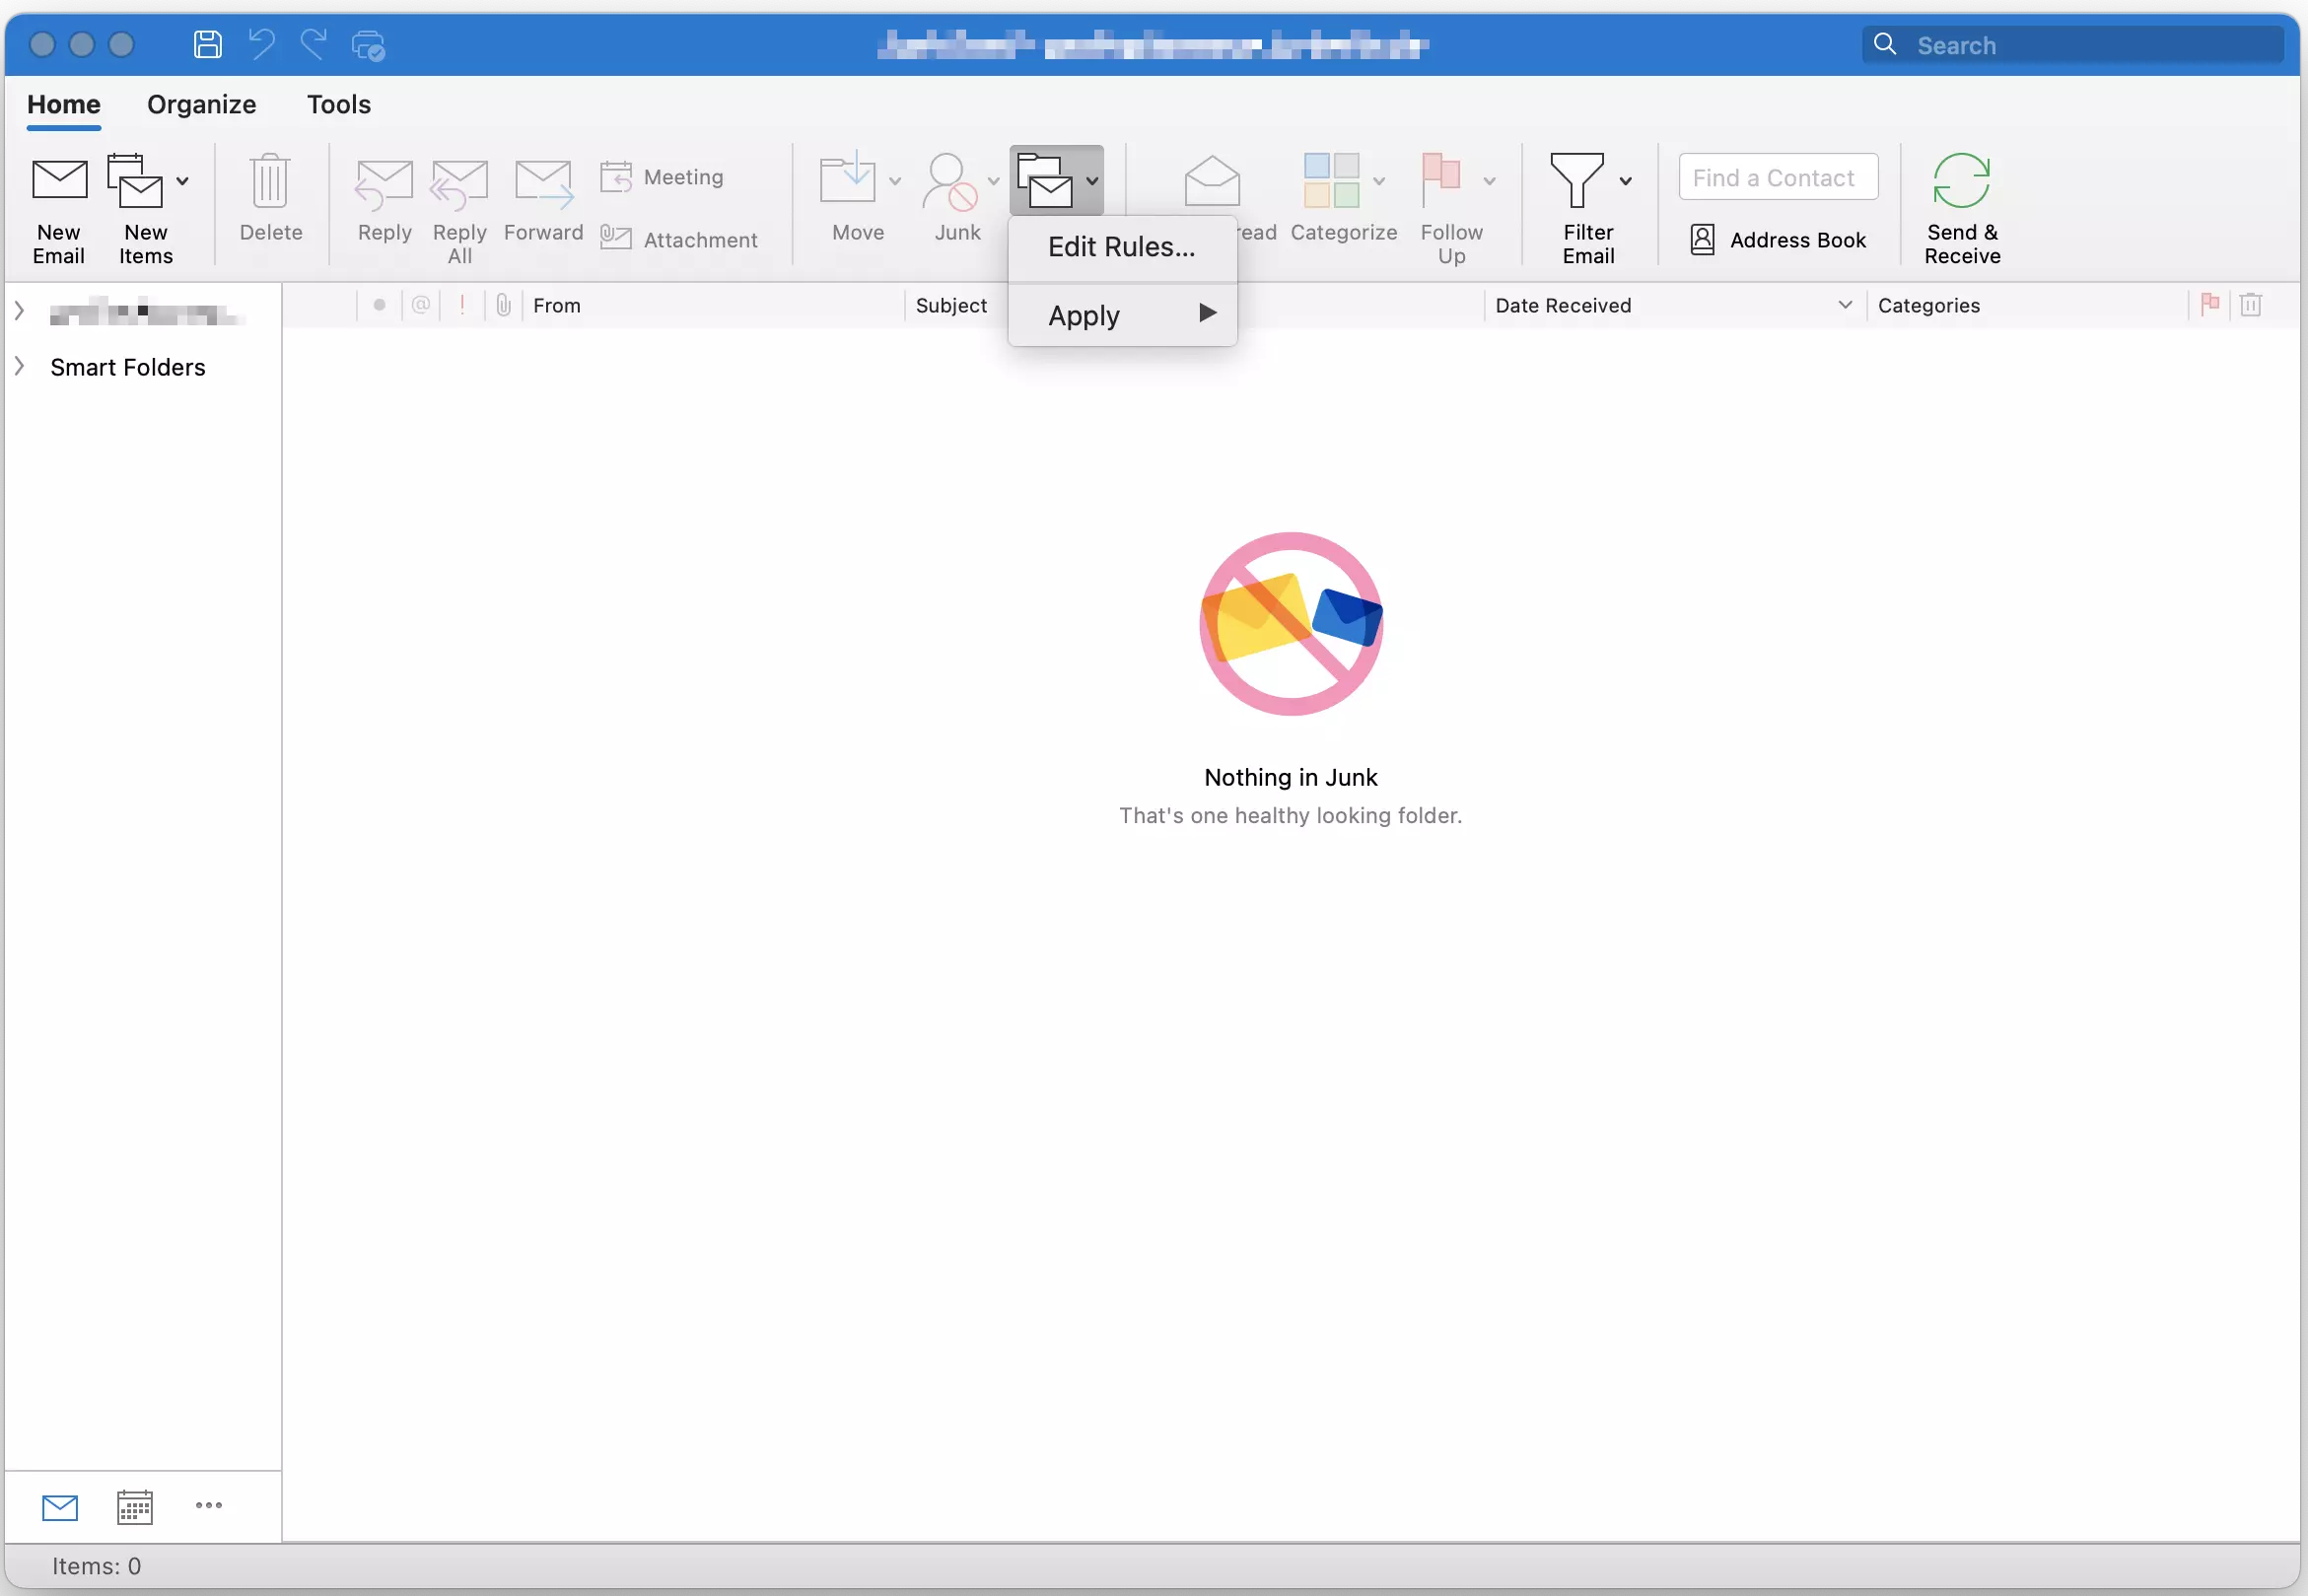
While Outlook for Mac now has its own distinct design, users can still access the older Outlook for Mac layout, which resembles the Windows version.
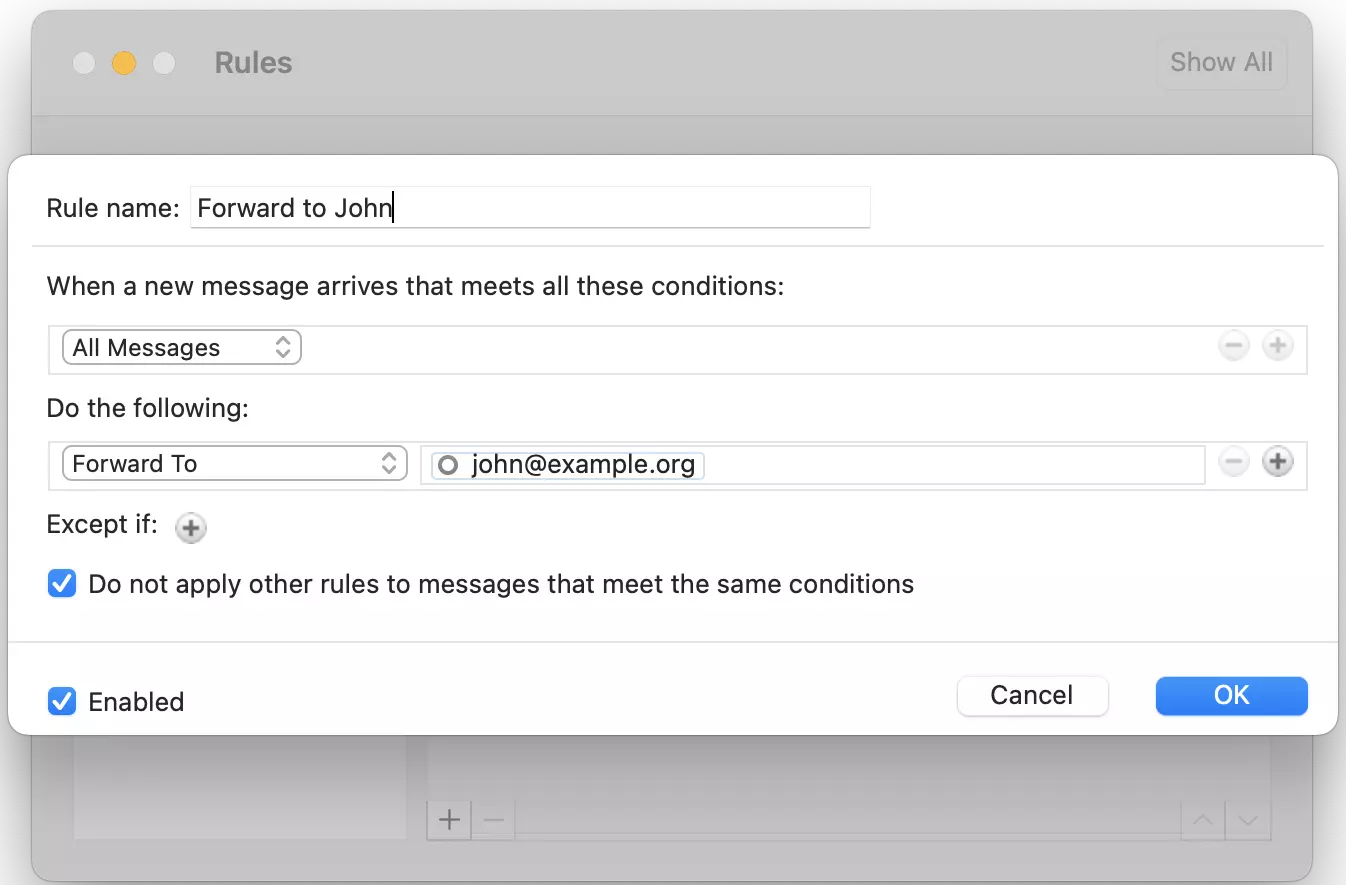
Step 2: Now, it’s time to configure your inbox rules. First create a rule for how the forwarding of emails should be carried out. You can, for example, specify a sender or create multiple rules for email forwarding.
Step 3: Now select Forward to under Do the following: and enter the email address(es) that messages should be forwarded to. In this field, it’s also possible to select multiple choices. For example, in addition to forwarding emails, you can also store them in a special folder. Click OK to finish setting up the rule.
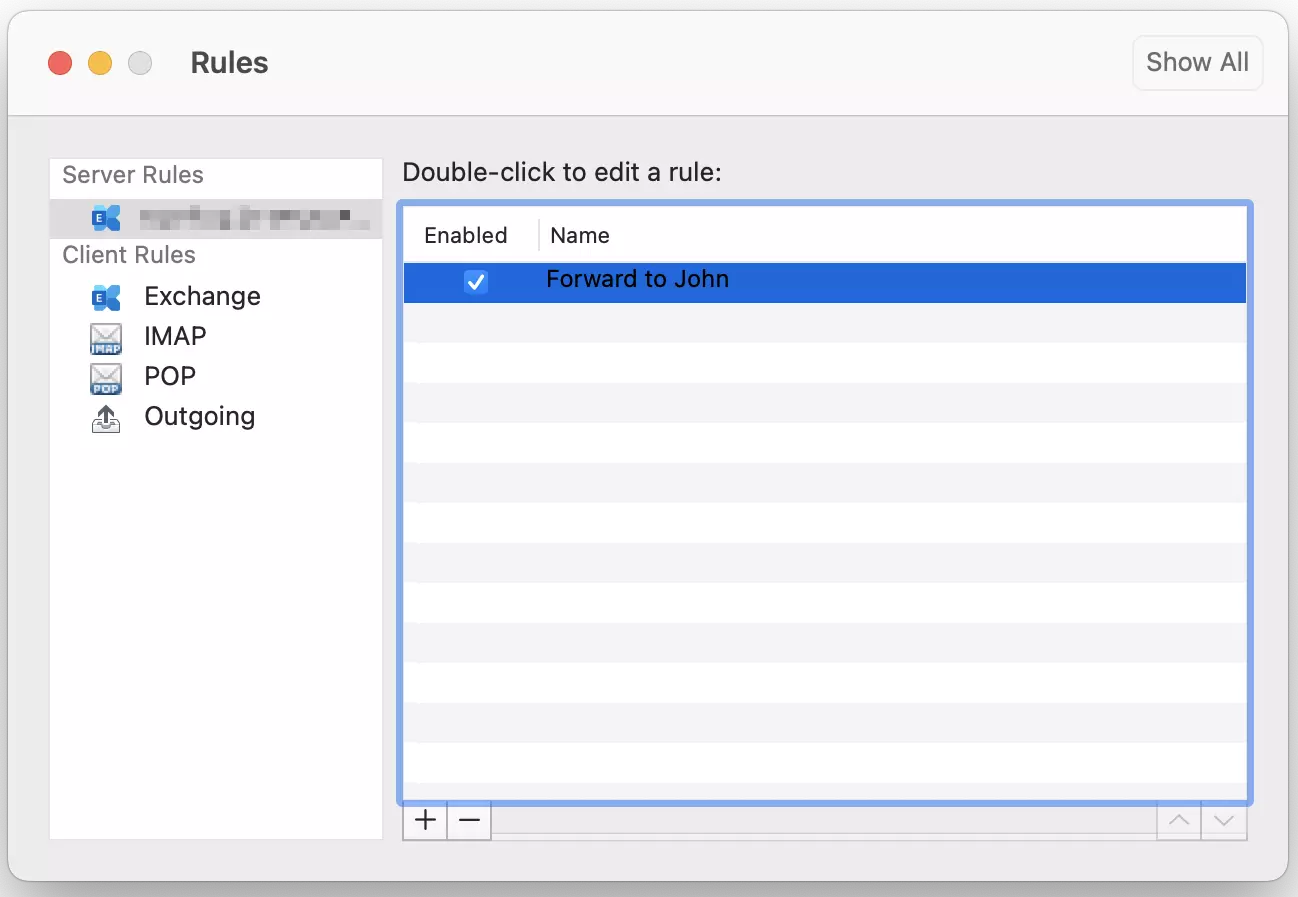
A check mark in the box in front of the rule indicates that the rule is activated. All incoming messages will be forwarded to the contacts that you have selected.
How to set up email forwarding in Outlook on the web
Outlook on the web (formerly Outlook Web Access, OWA for short) is a Microsoft service that allows you to access your Outlook mailboxes from any web browser. The web app is integrated into the online service Microsoft 365 and offers a similar range of functions as the desktop installation of the email program. You can also set up email forwarding and other inbox rules with Outlook on the web in just a few steps.
Step 1: Log in to Microsoft 365 Login page for the Outlook web app.
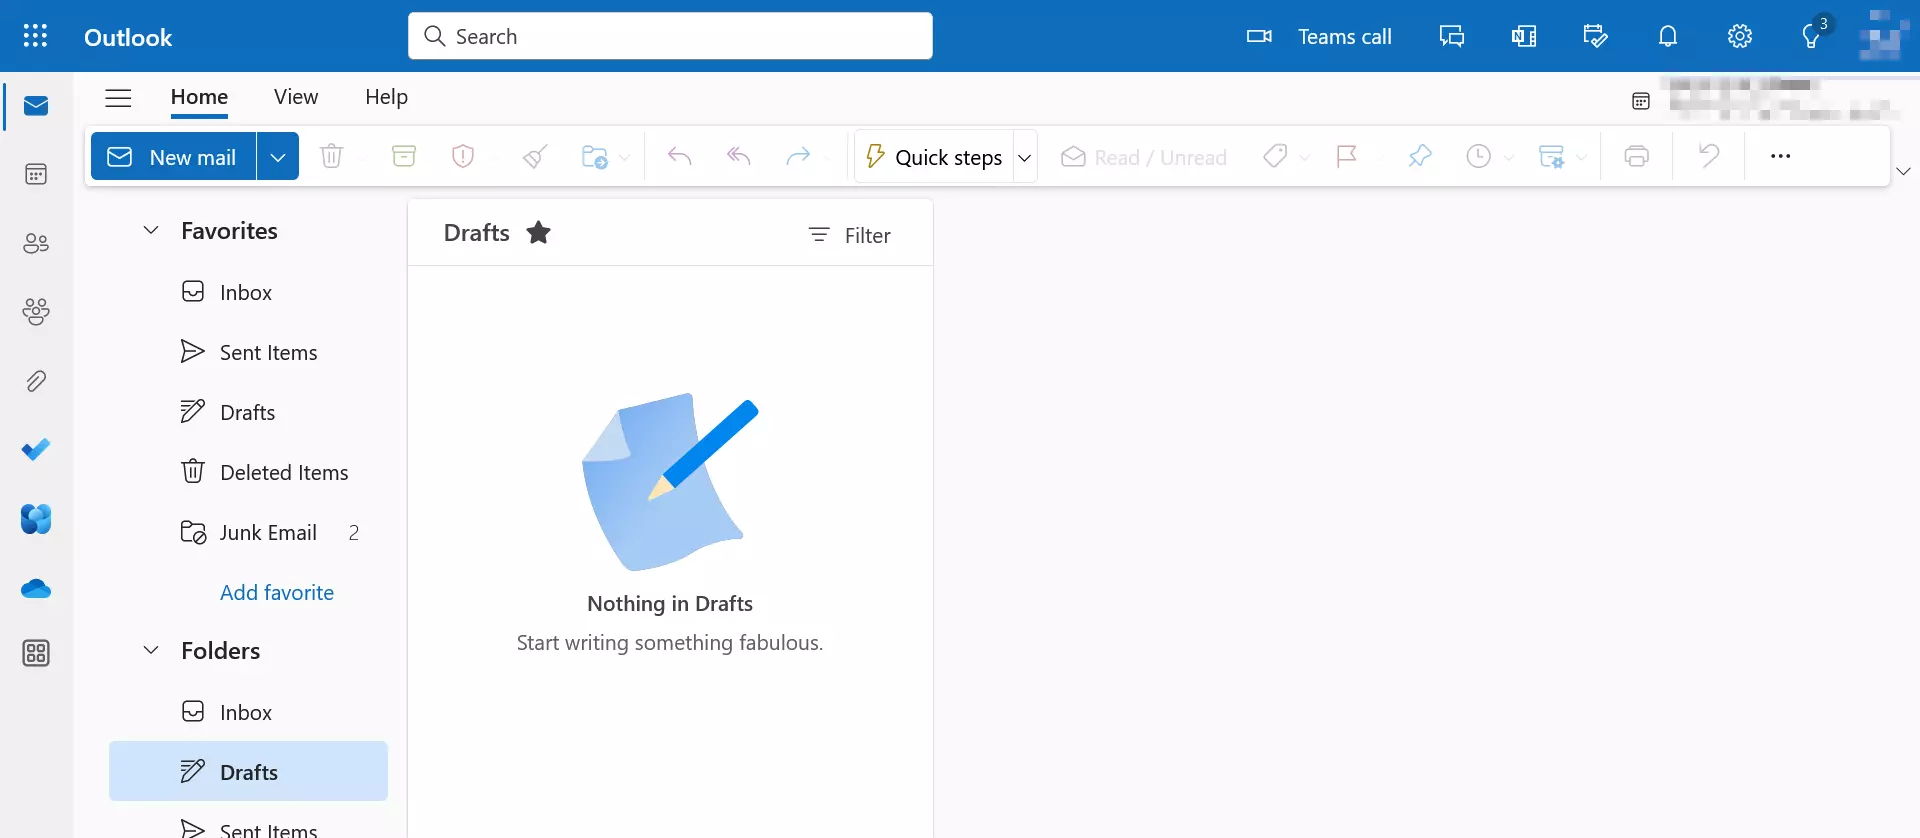
Step 2: Click the cog icon next to your user name and then on Email.

Step 3: Scroll down in the menu to Settings and click on Mail. A navigation menu structure will appear. Select Forwarding. In the field Forward my email to, you can select which email address your outlook emails should be forwarded to.
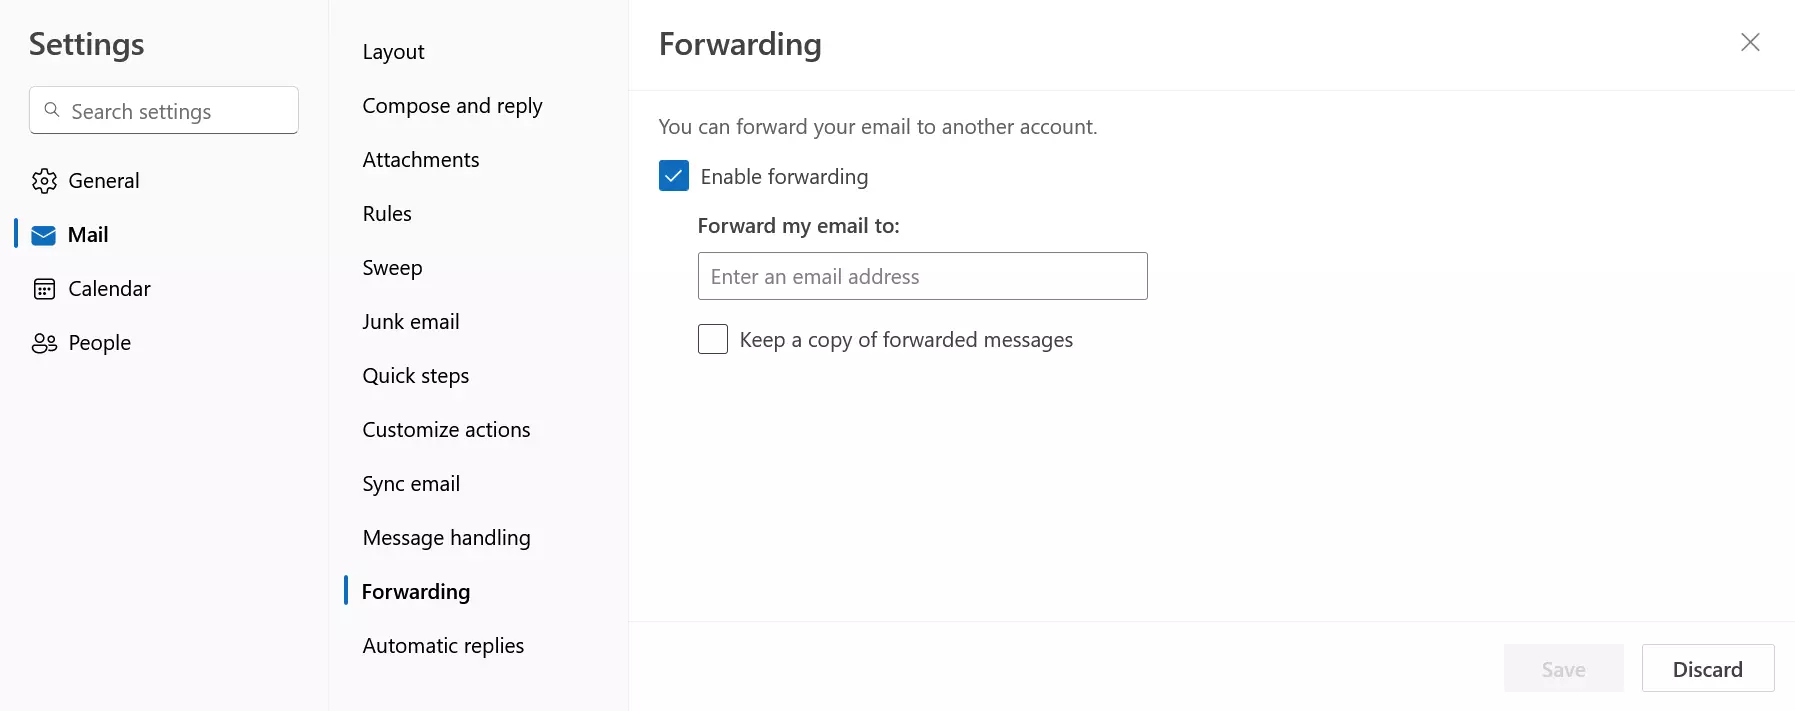
After clicking Save, emails to your Outlook account will be automatically forwarded to the address you entered. If you want to specify when emails should be forwarded in more detail, click on Rules. Here you create rules just as you would in the desktop version.
One alternative to forwarding emails in Outlook is creating an out-of-office message. Learn how to set up an out-of-office message in Outlook and what’s important to keep in mind when writing one in our Digital Guide.
What’s the difference between redirecting an email and forwarding it?
Microsoft Outlook differentiates between email forwarding and email redirection. When forwarding messages, the recipients of the forwarded message are able to see who originally sent it. When you reply to a forwarded message, Outlook automatically selects the account that forwarded the email as the recipient and not the account that originally sent the mail.
With redirections, however, the recipient of the message does not see that the email has been redirected, giving the impression that it’s been sent from the person who originally sent it. When you reply to an email that has been redirected, your response is sent directly to the sender of the message, not to the email account that redirected it to your inbox.
When should you forward incoming emails?
There are many reasons why you may want to forward incoming emails. Here are some of the most common ones:
- Most people have several email accounts with different providers. With automatic inbox rules, you can have all of your emails in one mailbox, giving you a better overview of all the messages you have received.
- In day-to-day work, incoming messages from customers or clients are often relevant for multiple stakeholders. Automatic forwarding ensures that important information is available to all concerned parties without delay.
- Forwarding emails is also useful in the event of an employee’s absence. If messages from customers or business partners are going to be sent during holiday periods, it’s best to make sure that they are being forwarded to a colleague.
- 2 GB+ storage
- Sync across all your devices
- Spam filter and ad-free

