Domain Transfer to IONOS: Moving Emails and Folders to an IONOS Email Account
This article explains how to move the emails and folders from an email account to IONOS as part of a domain transfer from another provider using the IONOS Email Migration Tool powered by audriga.
Depending on the respective provider and type of email account used, other data such as your contacts and calendar entries may also be able to get transferred as part of the email migration.
You don't need to install any special software to move your emails and folders. The IONOS Email Migration Tool powered by audriga connects to your email account using the same protocols as a normal email program and copies your emails from the previous provider to IONOS. In doing so, you can migrate the following data:
Emails and folders using IMAP or POP3
Emails, folders, contacts, calendars, and tasks from Open-Xchange and Microsoft Exchange
If desired, you can select the data you want to get migrated in the tool's settings before starting.
Alternatively, we offer a Setup and Migration Service through which our experts give you one-on-one assistance with the migration of your emails from one or more email accounts to IONOS. Feel free to contact us at any time to find out more or to order the service.
Notes
During the migration, only data stored on the server of the source provider will be transferred. You can see this data by logging in to their webmail, for example. We do not have access to data that is stored exclusively in an email program installed on your end device.
If you transfer a domain to IONOS, only the domain itself will be moved during the domain transfer. Email accounts created with the domain will not be moved.
Important Details
The source and destination email account passwords must not be changed during migration.
Make sure that emails and folders are not deleted in the source or destination email account during migration.
Source and destination email addresses must always be different. If they are identical, you will receive an error message in IONOS Email Migration Tool powered by audriga. If necessary, rename the email address in the source mailbox. Example: To migrate emails from a source/origin email account named info@example.com to a new email account at IONOS named info@example.com, the source/origin email address can simply be renamed to info.old@example.com.
To migrate an email account, follow these steps:
Set up a destination (receiving) mailbox for each source (sending) mailbox. You can use a subdomain or another domain for this purpose if desired. As long as this is in the same contract receiving the domain in the domain transfer process, you will easily be able to change the domain/subdomain to the correct domain later.
Check how much disk space the source mailbox is using. This must not exceed the size of the newly created target mailbox. Please note the existing limitations and notes listed here:
https://www.audriga.com/en/Handbook:Provider_documentation#googleMove the emails and folders using the IONOS Email Migration Tool powered by audriga. Please note the steps described in the section Starting the Email Migration.
Check that all of the emails have been moved.
Perform a delta migration to move emails that have arrived in the source mailbox after the email migration is complete.
Move the domain to the desired target contract.
Rename the target mailbox in your Control Panel. To learn how to rename your mailbox, see the article Changing Your Email Address.
Additional information on moving a domain to IONOS can be found here:
Domain Transfers to IONOS as an Existing Customer
Starting the Email Migration
To open the web app for the IONOS Email Migration Tool powered by audriga, click here: https://emailmigration.ionos.ca/
Read and accept the terms of use and the privacy policy.
Click Proceed.
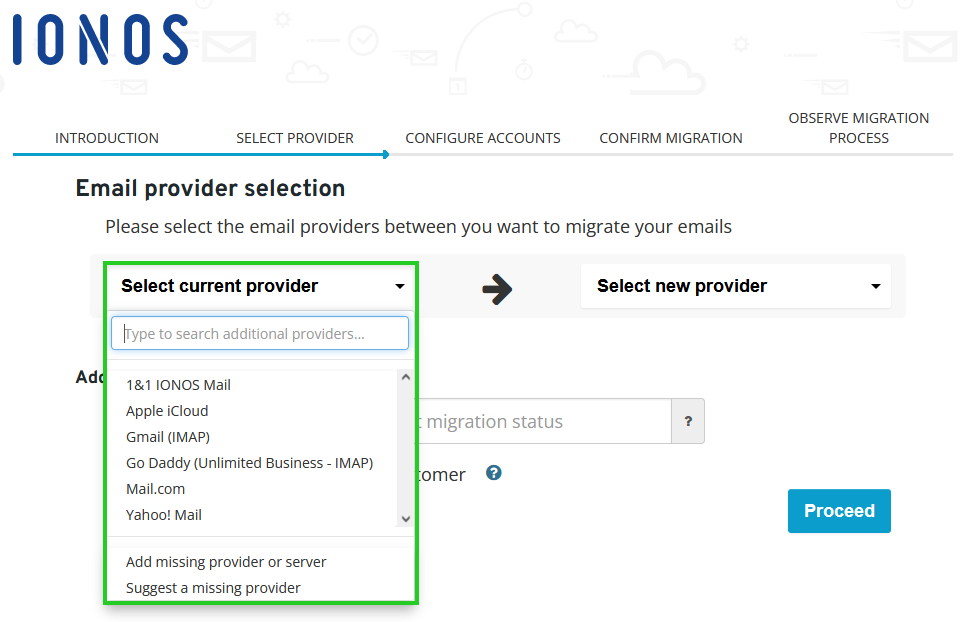
In the Select Current Provider field, select your previous provider. If your previous provider is not displayed in the list, search for the provider.
If the provider is still not found, select the entry Add missing provider or server. Then select the protocol used in the Protocol field and specify the email server of your previous provider. This is listed in the instructions provided by your current provider for configuring email programs (such as Outlook or Thunderbird). Examples: imap.gmail.com, mail.gmx.net
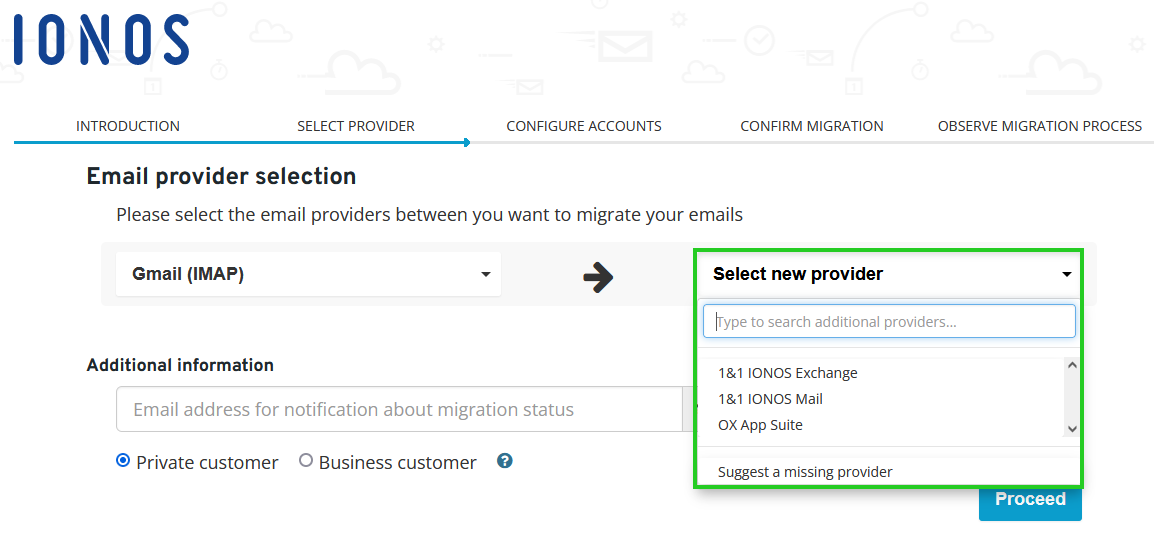
Select the relevant IONOS product in the Select new provider field.
In the Additional information section, enter the email address where you can receive status messages during the migration process.
Specify whether you are a private or a business customer.
Please Note
If you are a business customer, you will be offered a standard contract for order data processing.
Click Proceed.
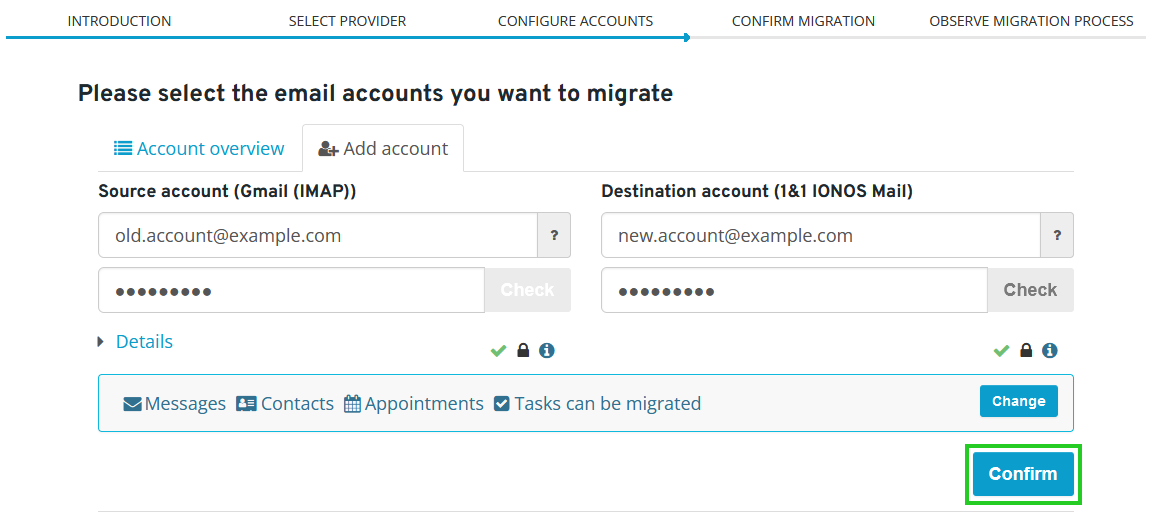
Enter the login details for your source and destination mailboxes.
To check whether the login is possible, click Check.
If the login is possible, click on Confirm, and the estimated moving time will be displayed.
In the Earliest start of migration section, specify the desired start time.
Click Proceed and the summary of the migration will be displayed.
Click Start Migration.
A status page will then be displayed where you can follow the progress of the migration. In certain cases, it can take some time before your move starts and the data is copied. Depending on the amount of data being migrated, the entire process can take up to several hours.
You can close the status page during the migration. It will continue in the background automatically.
After the setup, as well as at the start and end of the move, a notification email will be sent to the email address you provided. These notification emails contain a link with which you can view the status page again if desired.
Starting a Delta Migration
After you have completed the email migration, you can start a Delta (change) Migration once on the status page. This will copy emails that arrived in the source mailbox after the email migration finished.