Setting Up a Private Network for Dedicated Servers (Windows Server 2019 and 2022)
For Dedicated Servers managed in the Cloud Panel
With a private network, you can divide your existing network into several logical networks. The servers communicate using local IPs that are not routed on the Internet.
The use of private networks offers you the following advantages:
You can organize your networks according to organizational aspects.
You can easily add or remove your servers.
You can reduce latency and network load.
You can optimize traffic by prioritizing data packets.
Each server can only communicate with servers on the same private network.
You can seal off servers with confidential data.
The use of a private network can be useful in the following example cases:
Setting up a private network for departments or project teams
Setting up a private network connected to a load balancer
Setting up a private network for a web server and a database server
You can create a private network consisting of dedicated servers by configuring tagged VLANs. VLANs are virtual local networks. These are combined into one standard in IEEE 802.1Q. With VLANs, you can divide an existing physical network into multiple logical networks with different subnets. The data traffic is encapsulated so that data from one or more VLANs can be transmitted independently of each other.
Tagged VLANs do not have a fixed assignment between the virtual network and a port. The assignment is made by marking the data packets. The data packets are provided with tags in which the VLAN ID is stored. This is done according to IEEE 802.1Q by the respective terminal device. In this case, these are the servers assigned to the private network.
Using the VLAN ID, a switch can recognize to which VLAN the data packet belongs. This allows multiple VLANs to be used via a single switch port.
To connect a server that has only one network card to multiple separate networks, you must set up the network card as a trunk port. For this purpose, the NIC team is used as of Microsoft Windows Server 2012.
Caution
This article assumes you have a basic knowledge of server administration with Microsoft Windows Server.
If you do not configure the server correctly, it may no longer be available.
To use the private network for dedicated servers, you must configure all the servers assigned to the network.
To set up a tagged VLAN in Microsoft Windows Server, follow the steps below:
Requirements
You have created at least two dedicated servers.
You have assigned the dedicated servers to a private network.
Determining the VLAN ID
The VLAN ID is required for configuring the network card.
How to determine the VLAN ID:
Open the Cloud Panel.
In the Infrastructure > Servers section, select the desired server.
Scroll to the Private Networks menu item.
Make a note of the VLAN ID.
Example: VLAN: 3509
Checking the Network Card Settings
The current settings must be checked so that the network card can be configured correctly.
Log on to the server as an administrator.
Open the Control Panel.
Click Network and Internet > Network Connections.
Click Change Adapter Settings.
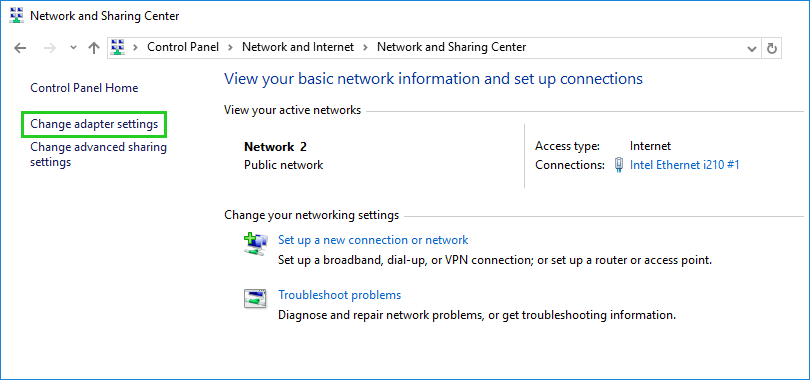
Right-click the network connection and select Properties.
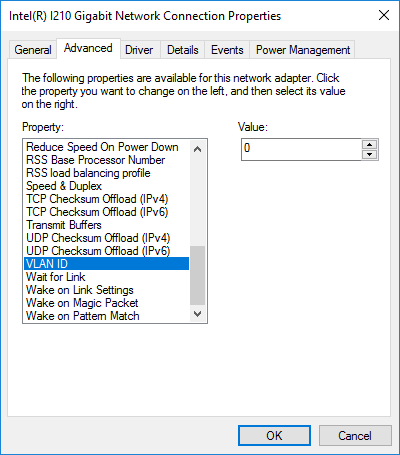
Click Configure.

In the Advanced tab under Property:, click VLAN ID.
Make sure that the value 0 is entered. Otherwise, the network card cannot be configured correctly if you want to create multiple VLANs or private networks.
Configuration of the Network Card
In this example, we assume that a host needs access to a VLAN or a private network. The assigned IP address for the host is 192.168.2.2/24 for VLAN 3509. For other VLANs, the setup is the same.
Log on to the server as an administrator.
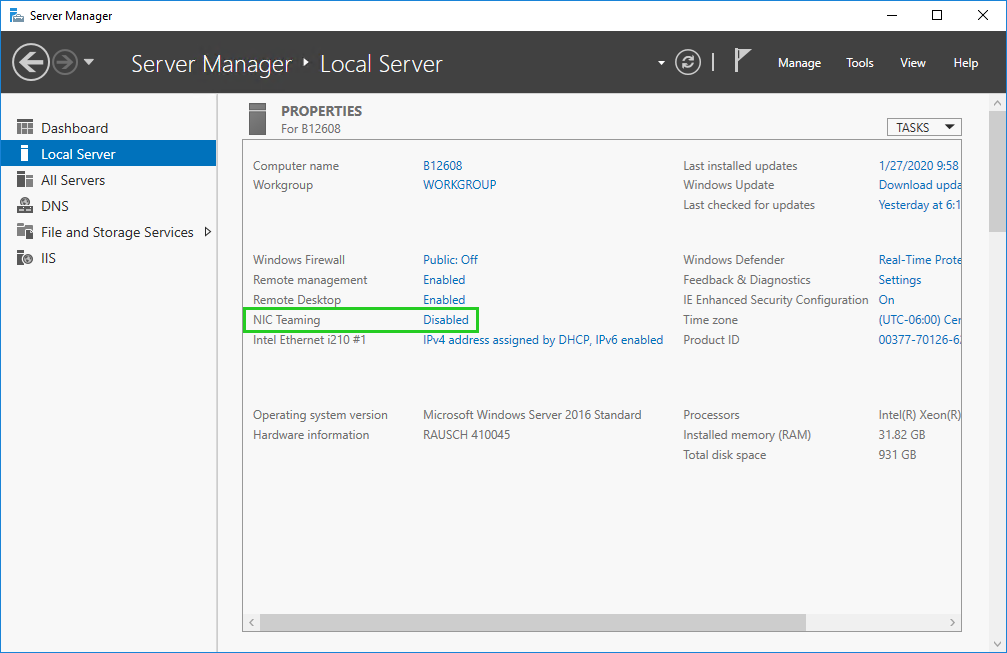
Open the Server Manager.
Click Local Server in the navigation bar on the left.
In the Properties pane, select NIC Teaming. The NIC Teaming window opens.
Click under TEAMS on TASKS > New Team.
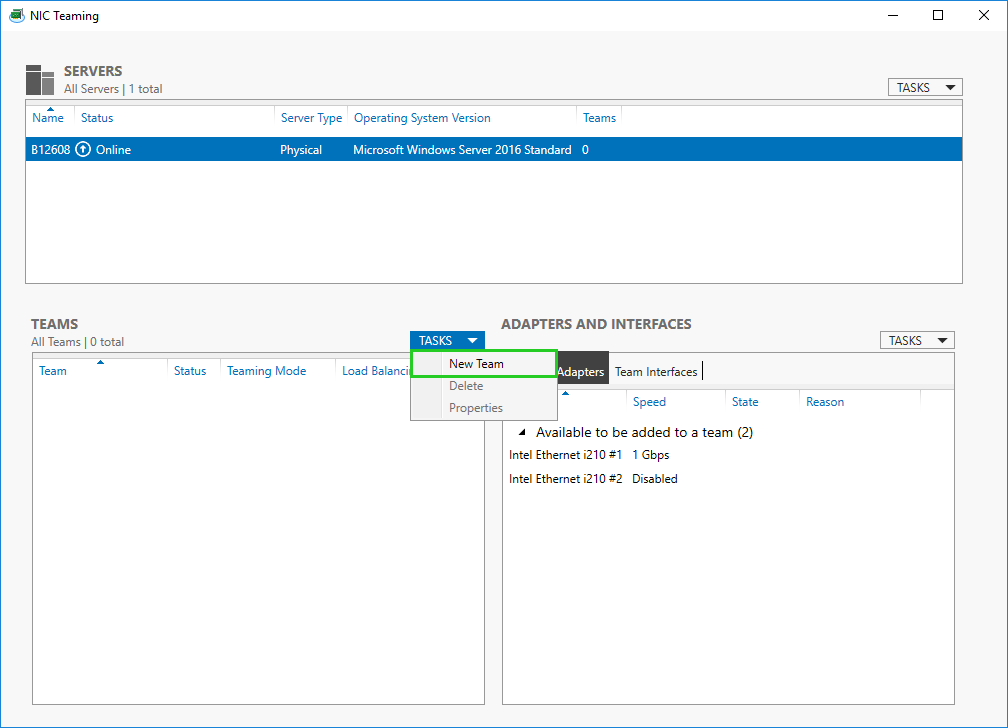
In the Team Name field, enter a name for the new team.
Select the network card for which you want to configure multiple VLANs. Example: Ethernet i210#1
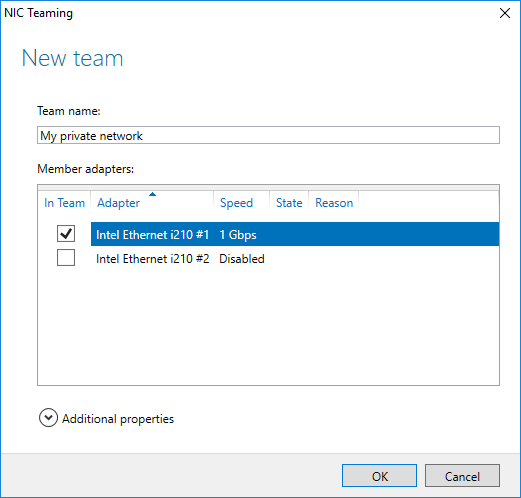
Click OK.
Another additional network interface is added.In the Teams section, click the team created, which is marked in blue.
In the ADAPTERS AND INTERFACES section, click Team Interfaces.
Click Tasks > Add Interface.

Enter a name for the new team interface. Example VLAN 3509
Under VLAN Membership, select the Specific VLAN: option and enter the determined VLAN ID.
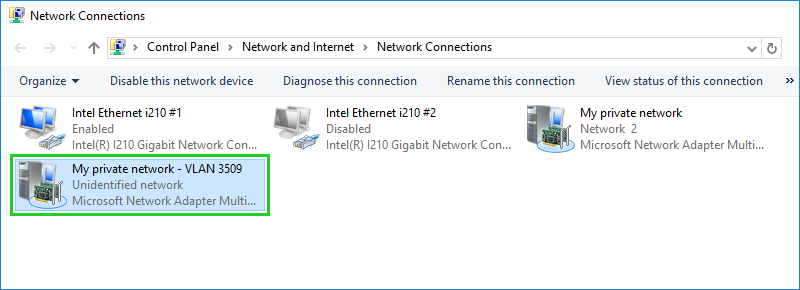
Click OK. The network adapter is created. A second network adapter is then displayed under Control Panel > Network and Internet > Network and Sharing Center > Change Adapter Settings.
Click Control Panel > Network and Internet > Network and Sharing Center > Change Adapter Settings.
Right-click the newly created second network adapter.
Click Properties.
Double-click Internet Protocol Version 4 (TCP / IPv4).
Select the Use the following IP address option: .
In the IP Address: field, enter the IP address that you want the server to have in the private network. Example: 192.168.2.2
In the Subnet Mask: field, enter the subnet mask of the private network. This is 255.255.255.0.
Confirm the remaining open dialogs with OK.
Please Note
The physical network card can no longer be used. This is now connected to the Microsoft multiplexor protocol for network cards.