Manually set up an email account in classic Outlook for Windows (Microsoft 365)
Valid for Mail Basic and Mail Business.
This article explains how to manually set up an IONOS email account in classic Outlook for Windows, which is offered as part of Microsoft 365.
If you are using classic Outlook for Windows for the first time and want to configure an email account, follow the instructions listed in the First-Time Email Account Setup section.
To set up an additional email account in classic Outlook for Windows, follow the instructions listed in the Setting Up Another Email Account section.
If you are using the new Outlook for Windows, see the following article for instructions on setting up an email account:
Manually set up an email account in the new Outlook for Windows (Microsoft 365)
If you're not sure whether you have classic Outlook or new Outlook for Windows installed on your computer, you can use the following article to find out which version of Outlook you're using:
Requirements
You have already set up the email address.
You know the login details (email address and password) for the email account.
You already downloaded Outlook for Microsoft 365 and installed it on your computer.
First-Time Setup of an Email Account
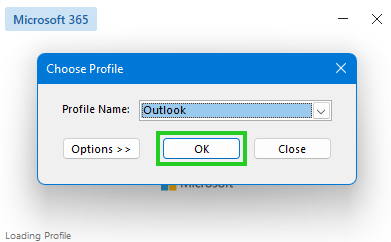
When you open Outlook for Microsoft 365 for the first time after successful installation, the Select Profile window appears. Confirm the automatically set up profile by clicking OK.
If no profile is displayed in the Profile Name field, enter the desired profile name and click OK.
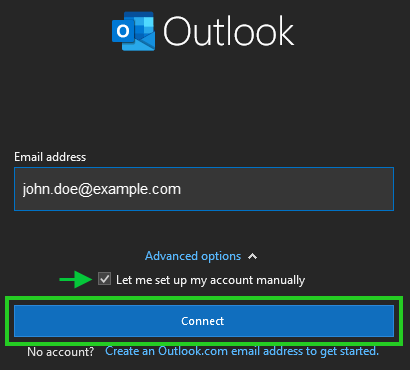
Enter the email address.
Click Advanced options.
Check the Let me set up my account manually option.
Click Connect.
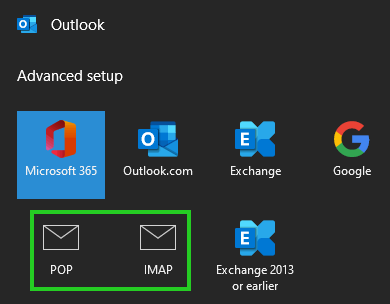
If you want to retrieve your emails using IMAP (Recommended), select the IMAP account type. If you want to retrieve your emails using POP3, select the POP account type.
If you are setting up an IMAP account, enter the incoming mail server imap.ionos.com. Enter port 993 in the Port field and select SSL/TLS in the Encryption method list.
If you are setting up a POP3 account, enter the incoming mail server pop.ionos.com. Enter port 995 in the Port field and enable the Server requires an encrypted connection (SSL/TLS) option.
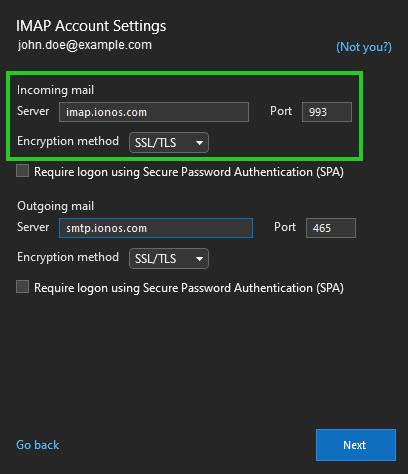
In the Outgoing mail section, enter the outgoing mail server smtp.ionos.com. Then, enter port 465 in the Port field and select SSL/TLS in the Encryption method list.
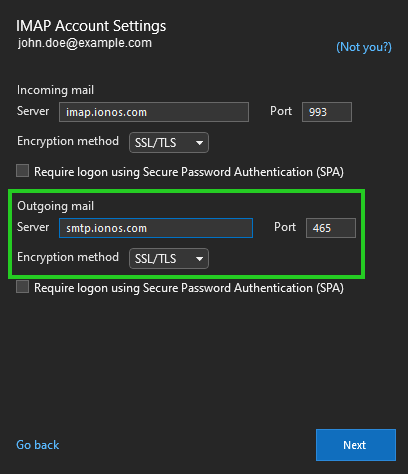
Click Next.
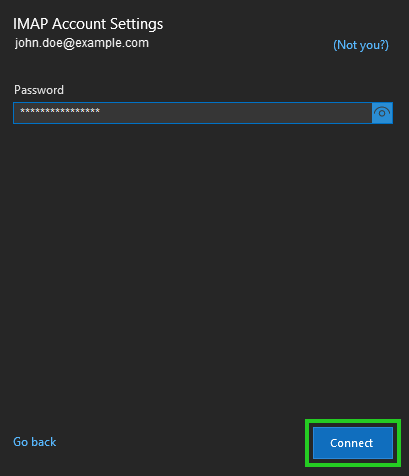
Enter the password you assigned when you set up this email address.
Please Note
If the password is not accepted, assign a new password for your email address. For more information, please see the article Changing Your Email Password.
Click Connect.
The Account successfully added window is displayed.
Click Done.
You can now use Outlook to check and manage your email.
Notes
If no messages are able to be sent or received, check the account settings.
Check the firewall you are using to make sure that the required ports are enabled.
Check the settings of the antivirus program you are using.
Setting Up Another Email Account
Open Microsoft Outlook.
Click File > Info > + Add account.
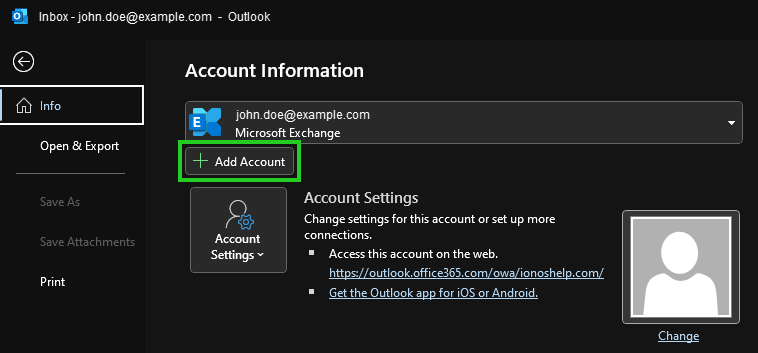
Enter the email address.
Click Advanced options.
Check the Let me set up my account manually option.
Click Connect.
If you want to retrieve your emails using IMAP, select the IMAP account type. If you want to retrieve your emails using POP3, select the POP account type.
If you are setting up an IMAP account, enter the incoming mail server imap.ionos.com. Enter port 993 in the Port field and select SSL/TLS in the Encryption method list.
If you are setting up a POP3 account, enter the incoming mail server pop.ionos.com. Enter port 995 in the Port field and enable the Server requires an encrypted connection (SSL/TLS) option.
In the Outgoing mail section, enter the outgoing mail server smtp.ionos.com. Then, enter port 465 in the Port field and select SSL/TLS in the Encryption method list.
Click Next.
Enter the password you assigned when you set up the email address.
Please Note
If the password is not accepted, assign a new password for your email address. For more information, please see the article Changing Your Email Password.
Click Connect.
The Account successfully added window is displayed.
Click Done.
You can now use Outlook to check and manage your email.
Notes
If no messages are able to be sent or received, check the account settings.
Check the firewall you are using to make sure that the required ports are enabled.
Check the settings of the antivirus program you are using.
Additional information
The following Microsoft article explains how to run the new Outlook and classic Outlook side by side:
Run new Outlook and classic Outlook side-by-side
Further information can be found here: