Setting up protected directories in webspace
Valid for Web Hosting.
You can secure website content with directory protection: Password protection for your directories prevents unauthorized access and protects sensitive data on your webspace. Below we show you how protected directories work, and how to set them up.
How directory protection works
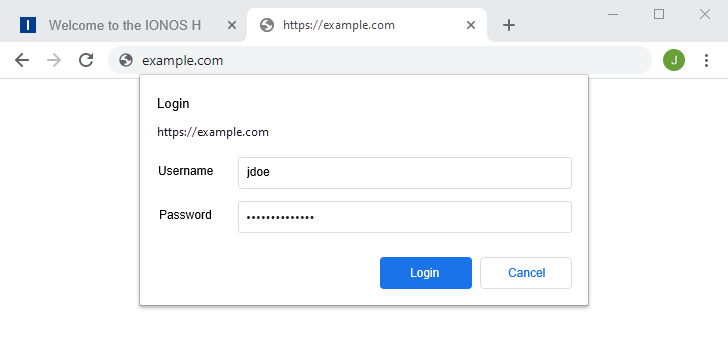
If directory protection is active, a login window appears when accessing the protected directory in the browser, which requires authentication with a username and password. The content, e.g. the start page of a website, is only loaded after successful authentication.
Set up directory protection
To set up directory protection, define a combination of username and password for the directory to be protected.
If you want to set up separate users for other people to access the same directory, create a separate user for each additional person. You can create as many users as you like.
Please Note
When setting up directory protection, an .htaccess file is created in the corresponding directory. Please note that any existing .htaccess files will be overwritten. Overwriting an existing .htaccess file may impair the functionality of your website. We therefore recommend that you only use this function if the directory to be protected does not yet contain an .htaccess file.
- Log in to your IONOS account.
- Click on Menu in the navigation bar, and then on Hosting. If you have several contracts, then select the desired contract.
The Hosting overview page is displayed. - Click on the ellipsis icon (three vertical dots) in the Webspace tile and then select the Protected directories option.

- On the next page, click on New user.
- Enter a username, a password,and optionally a description . These are your future login details as soon as directory protection is active.
| Settings | |
|---|---|
| Username | freely selectable |
| Password | freely selectable |
| Repeat password | repeat selected password |
| Description | freely selectable |
Note
For Windows web hosting plans (ASP.NET hosting), the username is automatically generated by the system and cannot be changed.
Select the directories you want to protect.
Please Note
Directory protection automatically applies to all subfolders of the selected directories. If you select the main directory (/) of your web space, your entire web space is protected. All websites on your webspace are then password-protected.
- Click on Save.
Directory protection is now set up and is active within a few minutes.