Connecting to HiDrive using WebDAV (Windows 10/11)
Valid for HiDrive.
The WebDAV protocol allows you to set up a network drive on Windows 10 or 11 to access HiDrive. This article explains how to set it up and describes typical use cases.
Activating WebDAV in HiDrive
If WebDAV is not already enabled for your HiDrive account, follow the steps below:
- Open the HiDrive web app in your browser.
- Select Settings > Access rights and protocols in the menu bar.
- Click on the pencil icon.
- Activate WebDAV.
- Complete your entries with Save.
Windows 10 setup
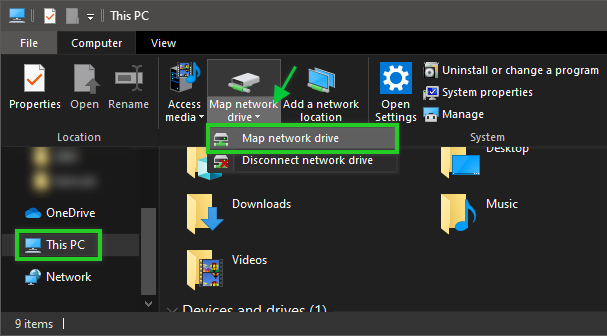
- Open the Windows Explorer.
- Click on This PC and go to the Computer tab.
- Select Map network drive under the Map network drive drop-down menu. A new window opens.
- In the Drive field, select the drive letter under which you want to mount your HiDrive.
- Enter the address https://webdav.hidrive.ionos.com/ in the Folder field.
- Make sure the Reconnect on sign-in box is enabled.
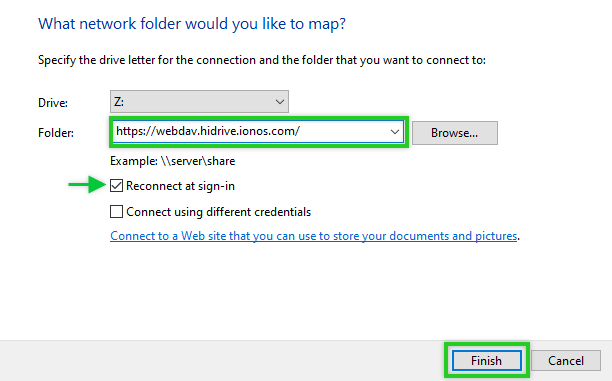
- Confirm your entries with Finish.
- Enter your HiDrive user name and your HiDrive password.
- Complete your entries with OK. Windows Explorer opens with the newly created network drive.
Windows 11 setup
- Open Windows Explorer.
- Right-click on This PC in the Explorer navigation bar.
- Click on Show more options > Map network drive. A new window is opening up.
- Select the drive letter under which your HiDrive is to be integrated in the Drive field.
- In the Folder field, enter the following address: https://user.webdav.hidrive.ionos.com/
The "user" part of the address can be any character string separated from the rest by a period. - Make sure the Reconnect at sign-in option is enabled.
- Confirm your entries by clicking Finish. A new window opens in which your HiDrive user data is requested.
- Enter your HiDrive login details and click OK. Optionally, you can enable the Remember my credentials option.
Using the "net use" command for the WebDAV connection
You can use the net use command to create a WebDAV connection from the Windows command prompt. The following instructions are for Windows 10.
- Click the magnifying glass icon in the menu bar at the bottom of the Windows screen.
- Type cmd in the input box and press Enter to launch the Windows Command Prompt.
Enter the following command in the Windows command prompt:
net use %driveletter%: https://webdav.hidrive.ionos.com user:%username% %password% /persistent:yes
Replace %driveletter%, %username% and %password% with your own details.
- Confirm your entries by pressing the Enter key.
With /persistent:yes you ensure that the connection will be restored when the computer is rebooted. If you do not want a new connection, use /persistent:no instead. In this case, the connection will end as soon as you shut down the computer.
Fixing a slow connection
Certain Windows network settings can cause delays in accessing mounted HiDrive drives. The following instructions apply to Windows 10.
- Click the magnifying glass (search) icon in the menu bar at the bottom of the Windows screen.
- Type Internet Options and select the corresponding entry. A new window will open.
- Select Tab: Connections > LAN Settings.
- Uncheck Automatically detect settings.
- Click OK.
Increasing the maximum file size for downloads
The WebDAV protocol limits file sizes for uploading and downloading individual files. Under Windows, a maximum of 47 MB individual files can be downloaded via WebDAV by default. For larger files, you will receive an error message (Error 0x800700DF). This limit can be raised to 4 GB in the Windows Registry:
- Click the magnifying glass (search) icon in the menu bar at the bottom of the Windows screen.
- Type regedit.
Navigate to the following entry in the registry:
HKEY_LOCAL_MACHINE/SYSTEM/CurrentControlSet/services/WebClient/Parameters
Right-click FileSizeLimitInBytes.
Choose Modify.
Change the base to decimal and enter 4294967295 as the value. This corresponds to the protocol-dependent maximum size of 4 GB.
Click OK.

0-byte files
Files larger than 4 GB cannot be transferred via WebDAV. However, the file size check takes place only after the transfer process has started. If a file exceeds the size limit, the upload is aborted and only a 0 byte file is stored in HiDrive. Make sure to delete these files through the HiDrive web app.
Establishing multiple WebDAV connections
Windows can only authenticate one user per server using WebDAV. You can use other WebDAV connections in parallel by assigning them to different HiDrive users. To do this, add the respective user name in front of the path name, such as https:\\username.webdav.hidrive.ionos.com. Take note that the user name in the example, "username", must be separated from the rest of the address with a period.
You can find out how to create new users in HiDrive in the article Managing HiDrive Users. Additionally, you can view existing users in the HiDrive web app:
Finding Your HiDrive User Name
- On the left side of the HiDrive menu, click Administration > Users. The Team HiDrive Overview page will be displayed.
- Click on the Gear icon in the row with the desired user.
- You can find the user name in the data group User data.